
A wood hood can do something stainless and glass never quite pull off: it can make your kitchen feel designed, not just “installed.” But here’s the truth most buying guides skip—your hood is not décor first. It’s a ventilation system living in the messiest, hottest, greasiest air in the entire house. If you choose purely with your eyes, you’ll end up with a gorgeous centerpiece that’s annoying to clean, loud at the wrong times, and frustrating when you’re searing steaks or frying anything more ambitious than an egg.
If you’re shopping for wood kitchen hoods, you’re probably in one of two moments: either (1) you’re remodeling and want a statement piece that reads custom, or (2) you’re replacing a hood you never loved—one that worked “fine,” but didn’t match the personality of your cabinets, backsplash, and lighting.
This guide is built for the real decision you’re actually making: Do you want an all-in-one hood that arrives ready to vent, or a wood hood cover that looks like a designer custom build but requires the right liner + insert behind the scenes? Those are completely different purchases, and the best choice depends on how you cook, how your ductwork is routed, and how “hands-on” you want to be with finishing, maintenance, and installation.
I’m going to help you decide with the same filter I use when I’m advising people mid-remodel: not just “features,” but friction points that show up in real kitchens—shipping damage checks, how quickly grease films the lower trim, what happens when the hood is heavier than expected, how to avoid a hood that looks bulky in a smaller room, and why a beautiful unfinished cover can still disappoint if you pair it with the wrong insert.
Below you’ll find 10 standout options: three ZLINE wooden wall-mount hoods (complete units with a blower), five Riley & Higgs handcrafted hood covers (designer-level shells that need an insert), plus two Castlewood picks that are pure “cabinetmaker hack” value—perfect if you want the built-in look without paying for a full custom shop build.
In this article
How to Choose the Right Wood Kitchen Hoods
A hood should do two jobs at once: (1) pull heat, grease, and cooking byproducts out of your breathing zone, and (2) make the space feel cohesive— like your cabinets, counters, and lighting were designed as one story. The “best” hood isn’t the one with the most bullet points. It’s the one that matches your venting constraints, your cooktop output, and your maintenance personality.
1. First, decide: all-in-one hood or wood hood cover?
This is the fork in the road that decides everything else.
- All-in-one wood hood (blower included): This is the simplest path. You get a finished wood exterior, a metal insert section, filters, lights, controls, and a built-in blower. You install it, duct it, and cook. The ZLINE models in this guide fit this category.
- Wood hood cover (insert/liner not included): This is the “designer custom” route. You’re buying the architectural shell—the shape, molding, and presence. Inside that shell you install a liner + insert (fan + filters + lights). Riley & Higgs covers fit this category, and many Castlewood pieces are meant to work this way too.
2. Understand the three hidden parts that make or break a wood hood
Most regret with wood hoods comes from not planning these three pieces together:
- The liner (the protective metal pan inside the wood): It keeps the inside easier to clean and protects the wood from heat and grease. Even when a fan assembly claims “no liner required,” many builders prefer a liner because it creates a cleanable, non-combustible surface where grease actually collects.
- The insert (the ventilation “engine”): This is the motor + filters + lights + controls. This is the part that actually moves air, and it’s where performance lives.
- The duct run (the performance multiplier): A great insert can feel weak if the duct run is long, undersized, or full of sharp turns. A “just okay” insert can feel surprisingly strong with short, smooth ducting.
Think of the cover as the face, and the insert/ducting as the lungs. Don’t choose the face first and hope the lungs fit later.
3. Size for capture, not just width
A hood that’s the same width as your range can still perform poorly if it doesn’t capture the plume of heat and smoke. Capture depends on width, depth, and mounting height.
- Width: A safe baseline is “at least as wide as the cooktop.” Many designers prefer slightly wider for better capture and more visual presence—especially over high-output gas burners.
- Depth: Deeper hoods capture better because they cover more of the front burners (where most searing happens). A shallow hood can look sleek but let steam roll out into the room.
- Height above the cooktop: Mount too high and you lose capture. Mount too low and it becomes a head-bump hazard (and can feel visually heavy).
This is where wood hoods shine: because they’re built like architectural pieces, many of them are naturally deeper and more “canopy-like,” which improves capture when paired with proper ducting.
4. Choose airflow like a grown-up: match it to your cooking, not your ego
More airflow isn’t always “better.” What you want is the right power for how you actually cook, with the ability to run quiet most of the time.
- Light cooking households: Simmering, reheating, occasional sautéing. You’ll value lower-noise performance and easy cleaning more than max airflow.
- Everyday cooks: Frequent sautéing, pan-frying, occasional high-heat sear. You want a hood that feels calm on lower speeds but has a “get it out now” speed when something gets smoky.
- High-heat cooks: Wok cooking, frequent searing, grill pans, spicy aromatics. You’ll benefit from stronger airflow, but only if your ducting supports it.
Also: strong hoods can trigger “house pressure” issues in tight homes. The moment you go into very high airflow territory, make-up air becomes part of the conversation so you don’t create backdrafting or door-suction weirdness. The good news is: many homeowners never need to go extreme—smart capture + smart ducting often beats brute force.
5. Ducting is your secret weapon
If you want a hood to “feel powerful” without sounding like a leaf blower, invest your planning energy here:
- Go as straight as possible: Every sharp turn adds resistance and steals airflow.
- Use rigid ducting: Smooth-walled metal ducts move air better than corrugated flex.
- Match duct size to the hood: Undersizing your duct is like breathing through a straw.
- Seal leaks like you mean it: Leaky ducting turns your hood into a greasy attic fan.
6. Noise: why “quiet” is a strategy, not a spec
Most people buy a hood for the one dramatic moment—smoke, sear, bacon. But you live with it on the other 99% of days. A hood that’s only tolerable on max speed will get used less. A hood that’s pleasant on low/medium becomes part of your everyday routine, which keeps grease from building up in your kitchen in the first place.
The ideal setup is multi-speed control where the first speed is genuinely gentle and the top speed is there when needed. ZLINE’s 4-speed approach is a good example of this “quiet most of the time, power when it counts” idea.
7. Wood finish: the part you’ll either love forever or resent weekly
Wood in a kitchen is a joy—until you realize how fast airborne grease clings to edges, trim, and textured grain. Your finish choice determines whether cleaning is a quick wipe or an annoying scrub.
- Prefinished wood (stained or painted): Less work upfront. The key is using gentle, finish-safe cleaners and keeping moisture under control.
- Unfinished wood covers: Highest customization. You can stain to match beams, paint to match cabinetry, or do a two-tone moment. But your finishing schedule matters: the underside, lower trim, and seams need a durable, kitchen-grade finish—not a “pretty furniture” finish.
If you’re doing an unfinished cover, plan your finish like a cabinetmaker: solid primer where needed, cabinet-grade paint or stain system, and a topcoat that can handle wipe-downs without getting tacky or dull.
8. Installation reality: weight, access, and “future you” maintenance
A wood hood can be heavier than it looks—especially all-in-one units with internal framing, baffles, and a motor. Even covers can be substantial because they’re built like furniture.
- Plan support: Hit studs, add blocking if needed, and treat it like hanging a heavy cabinet, not like mounting a picture frame.
- Plan access: Can you remove filters easily? Can you access the insert for service? Two-piece designs (like several Riley & Higgs covers) are popular because they’re maintenance-friendly.
- Plan your ceiling story: Chimney height, crown alignment, and trim transitions matter visually. Many chimney sections are trimmable—great feature, but measure twice so you don’t cut yourself into a corner.
When you choose with these realities in mind, you don’t just end up with a pretty hood—you end up with a hood you actually love using.
Quick Comparison: 10 Wood Kitchen Hoods That Make a Kitchen Look Custom
Use this table to quickly match the right hood to your project type, then jump into the full reviews for the real-life details— like finishing strategy, insert planning, and what to expect on install day.
On smaller screens, swipe or scroll sideways to see the full table.
| Model | Type | Design strength | Best match | Amazon |
|---|---|---|---|---|
| ZLINE KPDD-30 Rustic Dark (Motor Included) | All-in-one hood | Statement wood look + “ready to vent” simplicity with baffles & lights | Most remodelers who want a finished wood hood without the insert puzzle | Amazon |
| ZLINE KPLL-30 Rustic Light (Motor Included) | All-in-one hood | Same performance, lighter finish that plays well with airy cabinetry | Farmhouse/organic kitchens that need warmth without going “dark and heavy” | Amazon |
| ZLINE KBTT-30 Cottage White (Motor Included) | All-in-one hood | Painted look with classic molding vibe + easy “bright kitchen” styling | White/cream kitchens and homeowners who may want to custom paint-match | Amazon |
| Castlewood Rustic Shiplap Chimney Hood (Brown) | Hood cover shell | Rustic shiplap look with trimmable chimney for “built-in” vibes | DIY/contractor remodels that want the look now and will choose an insert separately | Amazon |
| Castlewood Shaker Hood Front (Maple, 24" H) | Cabinet-style front | Budget-friendly “custom cabinet hood” illusion when used with liner/insert | Cabinet layouts where you want the hood to disappear into the uppers | Amazon |
| Riley & Higgs Sloped Front Cover (31.5" W x 36" H) | Premium cover | Clean slope + decorative molding for a crisp, designer wall moment | People who want the custom look and plan to pick their insert intentionally | Amazon |
| Riley & Higgs Curved Front Cover (31.5" W x 36" H) – Option A | Premium cover | Soft curve that reads high-end and forgiving in smaller kitchens | Standard ceiling kitchens that want warmth and craftsmanship without extra height | Amazon |
| Riley & Higgs Curved Front Cover (31.5" W x 36" H) – Option B | Premium cover | Same silhouette category with a slightly different build/listing variant | Buyers who want the curved look but prefer this specific listing/config option | Amazon |
| Riley & Higgs Curved Front Cover (31.5" W x 48" H) | Luxury cover | Tall, dramatic “architectural” presence for high ceilings and big walls | Homes with taller ceilings or crown details that need a longer hood story | Amazon |
| Riley & Higgs Curved Front Cover (37.5" W x 48" H) | Luxury cover | Wider + taller = true centerpiece scale (especially for 36" ranges) | Large kitchens, larger ranges, and anyone who wants “wow” from across the house | Amazon |
In‑Depth Reviews: 10 Wood Hoods That People Actually Love Living With
Now we’ll go model by model. I’m going to talk like someone who’s seen kitchens after the “Pinterest phase”— when the hood has been used for months, when grease has had time to show up, when the fan has been run at every speed, and when homeowners can tell you what they’d do differently if they could rewind the purchase.
1. ZLINE KPDD-30 Rustic Dark – The “Ready-to-Vent” Statement Hood That Doesn’t Feel Overcomplicated
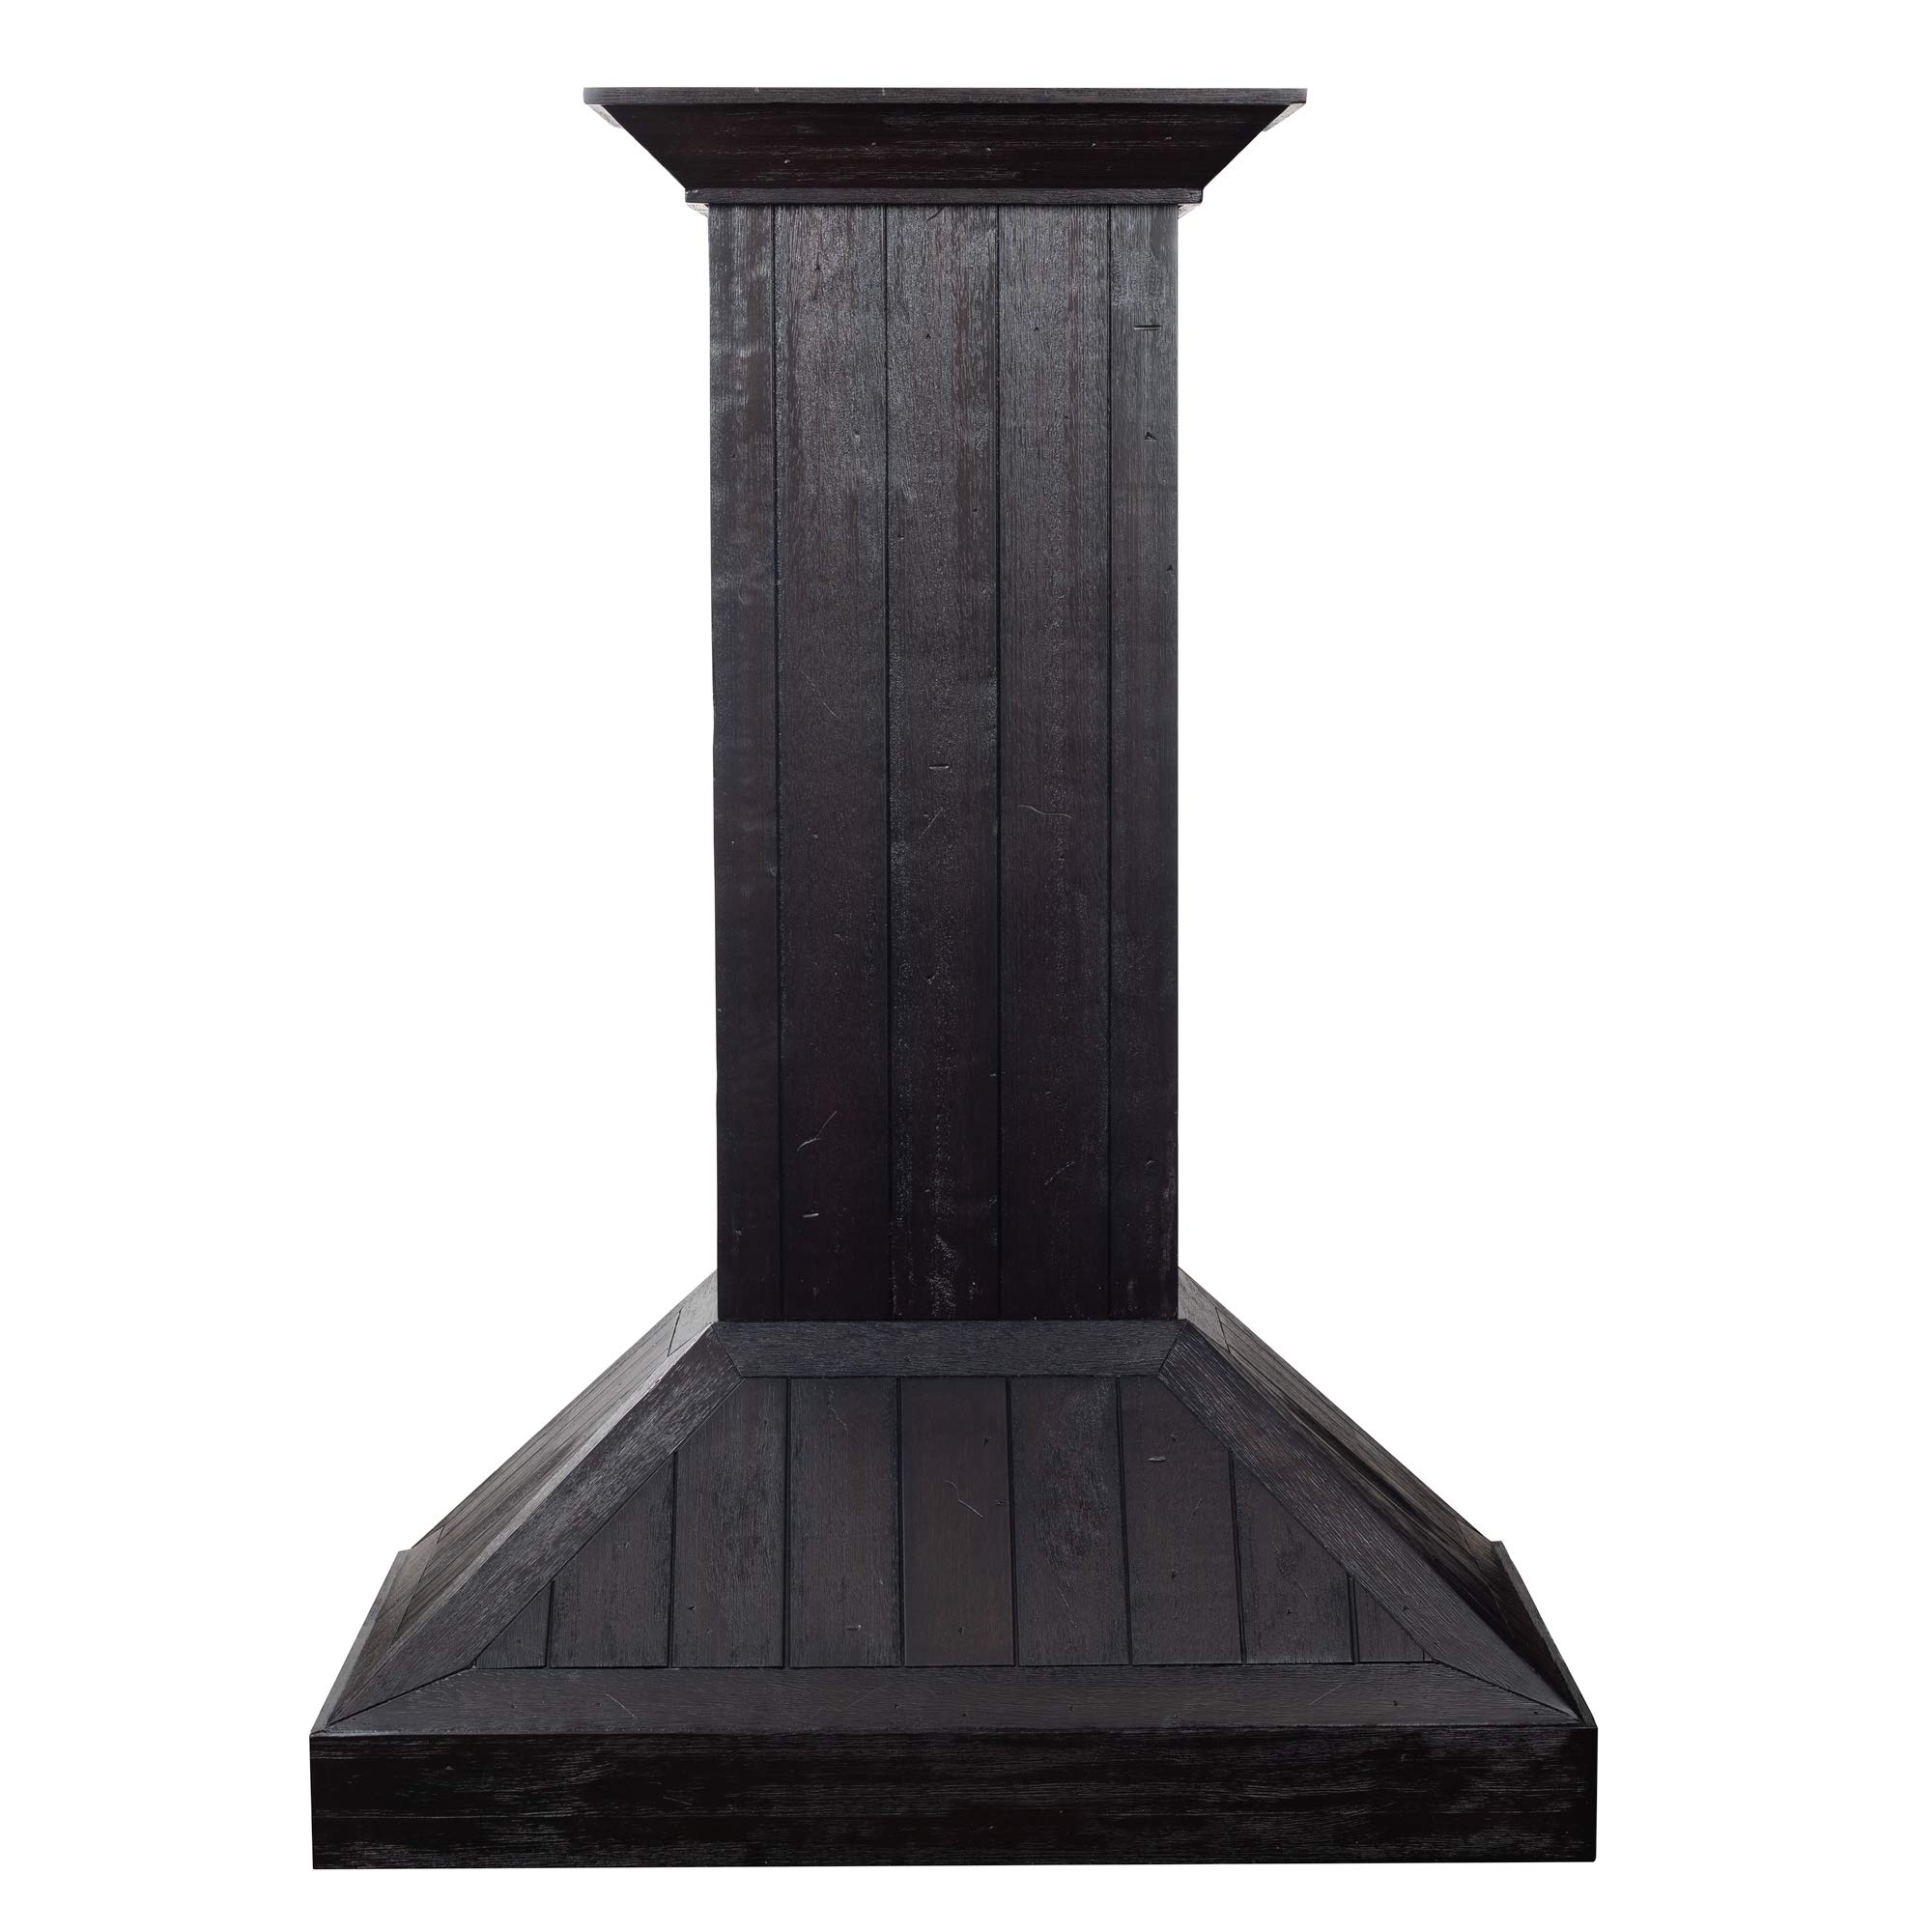
If you want the “custom wood hood look” without signing yourself up for the insert/liner decision tree, the KPDD-30 is a strong anchor. It’s one of those rare products that hits a sweet spot: it looks like a designer piece, but it behaves like an appliance—filters, lights, controls, and a built-in blower arrive as one cohesive unit.
The rustic dark finish is the reason it works in so many kitchens. Dark wood instantly creates contrast, which makes your hood read intentional even before the backsplash is finished. In farmhouse kitchens it feels obvious; in transitional kitchens it feels like a “furniture” element; and in modern kitchens it can become the one warm texture that keeps the room from feeling sterile.
Where this model earns its “best overall” status is not a flashy feature. It’s the way it removes risk. Homeowners consistently love the look, and practical feedback often lands on the same themes: it moves smoke effectively at higher speeds, it’s sturdy, and it can be trimmed to fit the ceiling story (which matters because almost no ceiling is perfectly predictable once cabinets and crown go in).
Now, the honest “real install” part: wood hoods can be heavier than they look, and this one is not a featherweight. If your installer is quoting labor that feels surprising, it’s often because mounting a heavy hood correctly means hitting framing, confirming electrical placement, and taking the time to set it level so the chimney lines look straight against the cabinets.
From an expert lens, here’s why this hood is a strong daily driver: it gives you a practical airflow ceiling for most households (strong enough for searing and frying) while still having multiple lower speeds that make it usable for everyday simmering. That matters because a hood you can tolerate on low speed is a hood you’ll actually run— and the easiest kitchen to clean is the kitchen where grease never had a chance to settle.
Maintenance tip that keeps this hood looking premium: treat the wood like cabinetry, not like a cutting board. Use gentle cleaning routines and keep moisture and steam moving away from the finish. The stainless baffle filters are the “dirty work” part—clean those consistently and the wood stays dramatically cleaner.
Why you’ll like it
- Designer look, appliance simplicity – You don’t have to guess which insert fits or build a liner plan from scratch.
- Rustic dark finish hides real-life mess – Minor scuffs, smudges, and day-to-day dust show less than on bright paint.
- Solid “daily use” airflow strategy – Multiple speeds means you can run it quietly often and crank it only when needed.
- Statement piece energy – It instantly elevates builder-basic kitchens and makes remodels look intentional.
Good to know
- It’s heavy enough that install planning matters—support and leveling are not optional if you want it to look “custom.”
- Like most hoods, higher speeds will sound louder; the win is having usable lower speeds so you don’t live on “max.”
- Wood texture and trim can catch grease if you never run the hood—use it consistently and clean filters on schedule.
Ideal for: remodelers who want a finished, ready-to-vent wood hood that looks custom but doesn’t require custom-engineering the inside.
2. ZLINE KPLL-30 Rustic Light – The Same “Appliance-Easy” Setup in a Softer, Brighter Wood Tone

The KPLL-30 is the KPDD’s brighter sibling: same general “arrives ready” concept, but in a rustic light finish that blends into warm whites, cream cabinetry, light oak floors, or the popular “soft neutral” palette that’s everywhere right now.
If your kitchen has a lot of natural light, a dark hood can sometimes feel like a visual weight hanging in the middle of the wall. Rustic light solves that. It still reads like wood (and still adds warmth), but it doesn’t yank the eye as aggressively. In design terms, it’s a “bridge finish”—it can connect warm cabinets to cooler stone, or tie a white kitchen to wood shelving without turning the hood into a dramatic contrast block.
Where real homeowners tend to split is not on function—it’s on scale. A wood hood is supposed to feel substantial. But in smaller kitchens, that substance can tip into “bulky” if your uppers are shallow, your ceiling is low, or your range wall is narrow. One of the most useful bits of owner feedback around this finish is exactly that: some people absolutely love the statement; others realize the volume is more than they wanted once it’s on the wall.
Here’s how I help people predict that before buying: don’t just measure width. Measure depth and compare it to your cabinet depth. If the hood projects far past your uppers, it will feel more “furniture-like.” That can be stunning—but you have to want that look. If you want a hood that visually tucks into the cabinet line, you might prefer a more cabinet-integrated cover style (like Castlewood or a Riley & Higgs cover built to align with crown).
Performance-wise, this hood is a good fit for everyday cooking households. The smart way to use it is to make the lower speeds your default habit and reserve high speed for the moments when you’re actually creating a smoke plume. That’s how you keep the kitchen from smelling like last night’s meal and keep the wood from collecting that invisible “grease film” that shows up over time.
A practical advantage of lighter finishes: dust shows more, but grease shows less than on glossy white paint. So if you keep a consistent wipe routine, rustic light can stay looking “new” for a long time.
Why you’ll like it
- Brightens the range wall – Gives you the wood warmth without the dark contrast block effect.
- Same “no insert guessing” simplicity – A single purchase that’s ready to vent and live with.
- Works across styles – Farmhouse, transitional, organic modern—this finish is a chameleon.
- Feels premium when paired correctly – Looks especially high-end with textured stone or handmade tile.
Good to know
- In smaller kitchens, the hood’s depth can read bulky—measure depth and sightlines before committing.
- Lighter finishes can show dust faster; plan a quick weekly wipe habit.
- Wood grain + trim means you’ll still want to run the hood consistently so grease doesn’t settle on details.
Ideal for: bright kitchens that want a wood statement without the strong contrast of a dark hood, and homeowners who value an all-in-one setup.
3. ZLINE KBTT-30 Cottage White – The “Molded, Built-In” Look (Plus a Huge Paint-Match Advantage)

If your kitchen is heading toward “classic” rather than “rustic,” the cottage white finish is the ZLINE option that usually lands best. It has that familiar, built-in profile that pairs beautifully with shaker cabinets, crown molding, and traditional hardware. Instead of looking like a separate appliance, it reads like a crafted piece of the kitchen’s architecture.
But the most underrated reason to buy this finish is not how it looks out of the box—it’s how it behaves if your kitchen is picky about white. Homeowner feedback around this model often points out a nuance: the finish can lean more cream than stark bright white in certain lighting. Here’s the twist: in a painted kitchen, that can be a gift. A paintable or repaint-friendly hood can be custom-matched to your cabinetry, which is the difference between “pretty close” and “it looks like it was built with the cabinets.”
If you’re the type who notices undertones (and if you’re reading wood hood guides this closely, you probably are), treat this hood like a cabinet component. If it matches, celebrate. If it doesn’t, you can paint it to match your cabinet formula, especially if your cabinets are a known paint system. That flexibility is rare in the hood world, where many finishes are fixed and you’re forced to “live with it.”
Now the practical side: painted finishes can show shipping scuffs more than stained wood. The best strategy is to inspect on arrival like you would a large appliance: check edges, corners, and the most exposed faces before installation day. A small touch-up is easy; ignoring damage until it’s mounted is how small issues become big frustration.
Performance-wise, this hood follows the same philosophy as its rustic siblings: you get a usable daily airflow range, lights that actually illuminate the cooktop, and filters that are meant to be cleaned rather than replaced constantly. The lifestyle advantage is not “maximum power.” It’s predictable everyday usability with a design that suits traditional kitchens.
My favorite design pairing here: cottage white hood + warm brass hardware + slightly imperfect handmade tile. It looks expensive because it looks intentional—like a kitchen with layers, not just catalog parts.
Why it works
- Classic built-in look – Pairs naturally with crown, shaker cabinets, and traditional kitchens.
- Paint-match potential – If your whites are specific, the ability to repaint is a massive advantage.
- All-in-one simplicity – No insert/liner shopping required.
- Great visual “calm” – Doesn’t dominate the wall; it harmonizes with cabinetry.
Good to know
- White finishes can show shipping marks—inspect early so you’re not discovering issues after install.
- If you want a bold contrast moment, the rustic finishes will feel more dramatic.
- Like any wood hood, it stays cleaner when you run it consistently (especially during high steam cooking).
Ideal for: classic kitchens, painted cabinetry projects, and homeowners who want a hood that can be made to match—not just “close enough.”
4. Castlewood Rustic Shiplap Chimney Hood – The “Instant Farmhouse” Look (If You Plan the Insert Smart)

This Castlewood shiplap hood is the kind of product people find when they want the “HGTV farmhouse reveal” without commissioning a custom shop. The shiplap face gives texture immediately, and texture is what makes a kitchen feel warm and lived-in—in the best way.
The most important expert point: treat this as a shell decision, not a “ventilation decision.” The shell gives you the look. Your liner/insert choice gives you the performance. That means you should start this purchase by asking one practical question: What insert am I using, and how will I access it for cleaning and service?
Here’s why that matters. Shiplap texture is gorgeous, but it also creates edges where airborne grease can settle over time—especially around the bottom trim line where the plume hits. If your insert has great filtration and you run it consistently, this stays clean. If your insert is weak or you only run it when things get smoky, you’ll get that slow grease haze that makes rustic wood look dingy instead of charming.
Real homeowner feedback around this type of hood tends to cluster in a few areas:
- People love the look. It’s often described as “favorite part of the kitchen” because it changes the entire range wall immediately.
- Install instructions can be light. This is common with “finish carpentry meets appliance” products. Many owners rely on a handyman/installer rather than treating it like an IKEA build.
- Trim flexibility is a major win. Trimmable chimney sections are what save you when ceilings aren’t level or crown molding changes the math.
My pro move with this hood: plan your insert so your filters are easy to remove and your lights are serviceable without unmounting the shell. A hood cover should be a “once installed, forget it” piece. The insert should be the serviceable component.
Design tip that keeps the shiplap from feeling theme-y: pair it with one modern element (sleek hardware, simple pendant lights, or a cleaner backsplash pattern). That contrast keeps the hood reading like intentional architecture instead of a décor trend.
Why it’s a smart buy
- Big style impact fast – Shiplap texture makes the kitchen feel custom without custom-shop pricing.
- Chimney can be trimmed – Helpful when ceilings aren’t level or crown molding changes your final height.
- Works with many insert strategies – You can choose the ventilation “engine” based on how you cook.
- Rustic finish hides small dings – Great for real households where perfection isn’t the goal.
Good to know
- This category lives or dies by insert choice—don’t buy the shell without a ventilation plan.
- Texture can catch grease if you rarely use the hood; consistent use keeps it looking great.
- Instruction quality may feel less “consumer appliance” and more “carpentry project,” so plan your installation accordingly.
Ideal for: farmhouse and rustic kitchens that want maximum visual payoff, and homeowners who are comfortable pairing a hood cover with the right insert/liner setup.
5. Castlewood Shaker Style Hood Front – The Budget-Friendly Way to Get a Built-In Cabinet Hood Look

This is not a “hood” in the appliance sense—and that’s exactly why it can be such a power move. A shaker hood front is a cabinet-building component: it’s designed to mount between two wall cabinets so your range wall reads like one continuous, built-in cabinet composition. In the right kitchen, this looks more expensive than many full hoods because it feels like custom millwork.
Here’s when it’s the perfect choice: you want the hood to visually disappear into cabinetry. Instead of a big canopy shape, you get a clean “box” look that matches your uppers. That style works especially well in smaller kitchens where a deep canopy hood might feel too dominant, or in modern-traditional kitchens where you want calm, simple lines.
What you’re really buying here is freedom:
- Freedom to choose your insert. Pick the performance level you need without paying for a hood exterior you don’t want.
- Freedom to match finish. Paint it to match cabinets, stain to match shelves, or do a two-tone contrast if you want the hood area to be a subtle feature.
- Freedom to control proportions. With the right side panels and trim, you can make the hood look tall and architectural, or short and minimal.
Real owner feedback tends to be simple: it arrives well packaged, the quality feels good, and people are excited to paint/stain it and finally get that built-in look. That’s exactly what you want from a component piece. You don’t need a “wow” review—what you need is predictability so your cabinetmaker or handyman can integrate it.
Expert tip: before you paint, decide what kind of kitchen life you live. If you cook a lot, consider a finish system that’s meant for cabinets (durable and wipeable). The hood zone is a high-touch, high-vapor area. A soft, delicate paint finish will look gorgeous on day one and tired by month six.
Also: because this is meant to mount between cabinets, your layout matters. If your range wall has open shelves or no adjacent uppers, this style might not be the best fit. This piece shines when it can “puzzle” into a cabinet run like it was always meant to be there.
Why it’s a hidden gem
- Looks like custom cabinetry – When built out properly, it reads like millwork, not an appliance.
- Finish-match control – Paint or stain to match your cabinets instead of hoping an appliance finish “fits.”
- Insert freedom – You control ventilation performance based on how you cook.
- Perfect for smaller kitchens – A cabinet-style hood can feel visually lighter than a big canopy.
Good to know
- This is a component, not a complete hood—you still need an insert/liner plan.
- It’s designed to be mounted between wall cabinets, so layout matters.
- The final look depends on your build-out (side panels, bottom, trim, and how cleanly everything is finished).
Ideal for: homeowners who want the most “built-in cabinet” look possible, especially in kitchens with wall cabinets flanking the range.
6. Riley & Higgs Sloped Front (31.5" W x 36" H) – A Custom-Cabinet Look With Clean Lines and Serious Craftsmanship
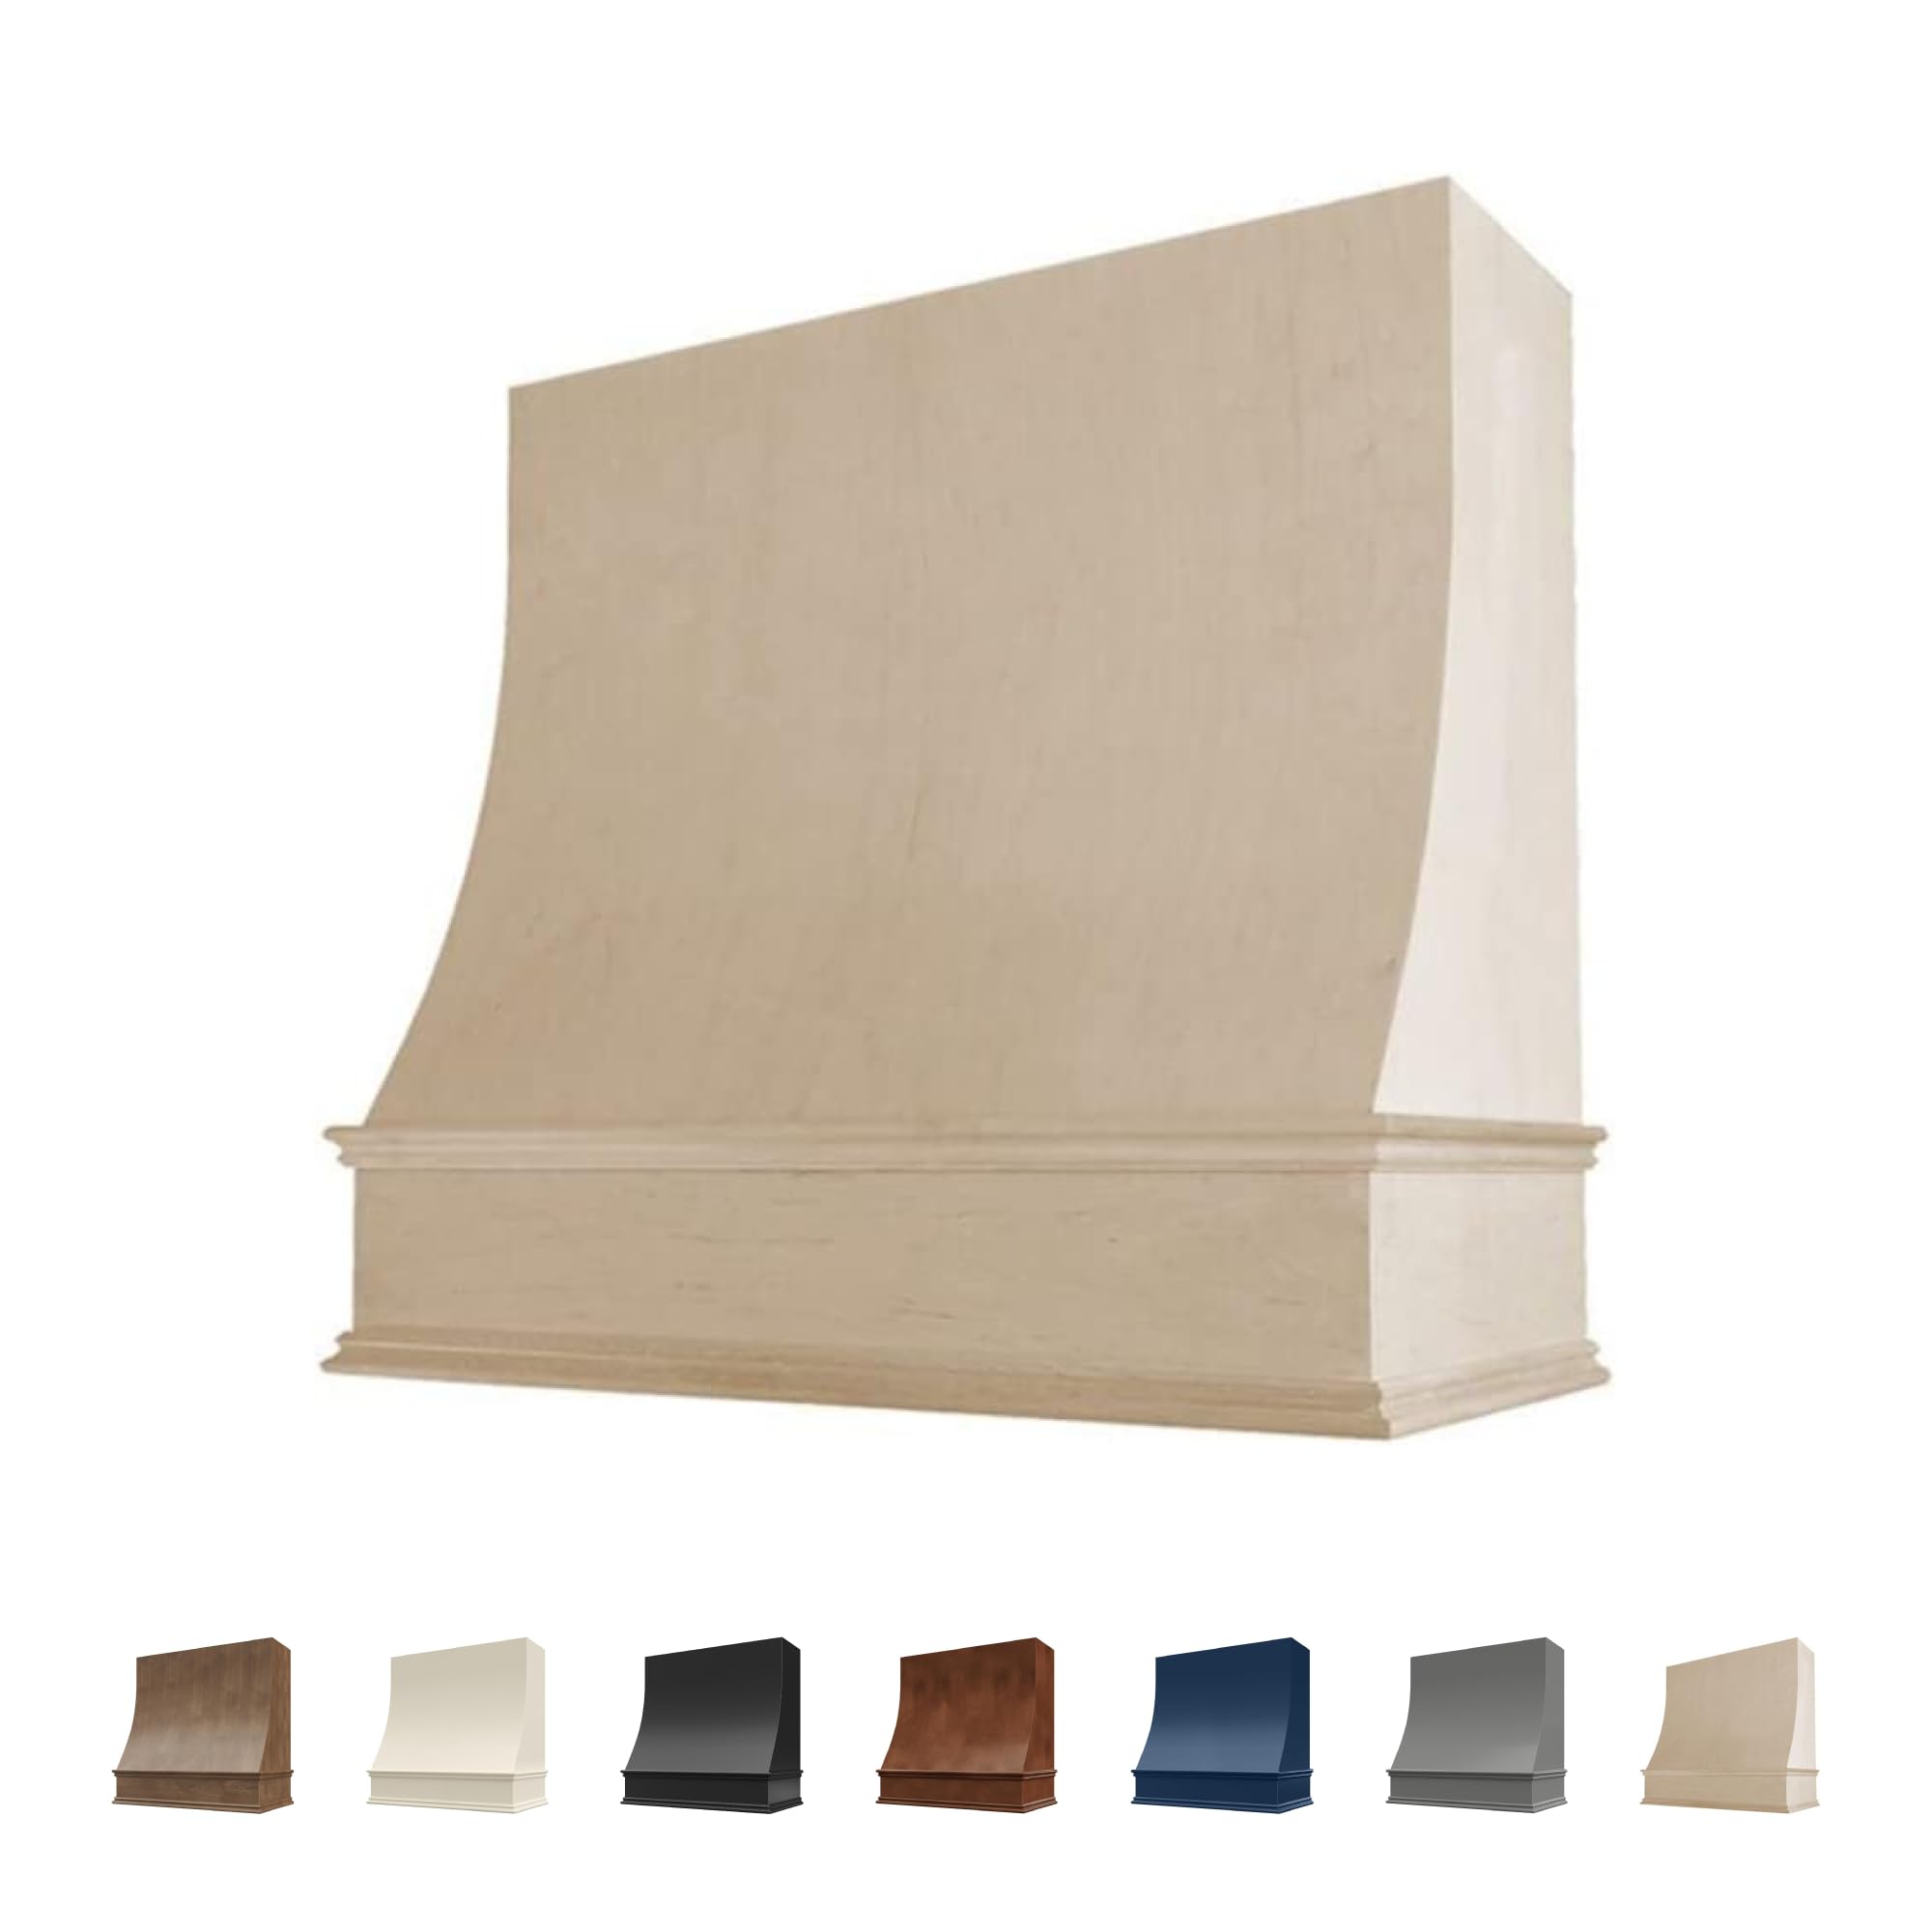
Riley & Higgs sits in a different lane than “standard appliance hoods.” This is the lane of handcrafted millwork—where the hood is part of the room’s architecture, and where the question isn’t “does it vent?” (that’s the insert’s job), but “does it look like it belongs in a designer kitchen?”
The sloped front is powerful because it’s visually disciplined. Curves can feel romantic; slopes feel crisp and intentional. If your kitchen leans modern farmhouse, transitional, or “clean classic,” this shape plays beautifully with shaker cabinetry, simple crown, and warm metals. It’s the kind of hood that makes the entire wall look planned.
Now the part that separates experienced remodelers from first-timers: when you buy a cover, you must plan your insert at the same time. Real buyer feedback on this hood highlights a common reality: the cover can be beautiful and well-made, but you still need the right motor/insert solution to complete the system. That’s not a flaw—it’s simply the nature of custom-style covers. The cover is the furniture. The insert is the appliance.
What I love from a usability standpoint is the two-piece design concept: you can get access to the fan and ducting without turning maintenance into a demolition project. That’s how custom millwork should be built—serviceable, not precious.
Finishing advice that keeps this hood looking “luxury” long term:
- Finish every exposed edge—especially the underside and the lower trim where grease wants to settle.
- Use a durable cabinet-grade system rather than a soft decorative paint.
- Plan for seams—on an unfinished hood, your painter/cabinet finisher can make seams disappear with the right prep and caulking strategy.
Installation reality: because this is a substantial piece, it behaves more like hanging a heavy cabinet. Owners often describe it as easy to hang, which is a great sign—it suggests the build is square, the mounting makes sense, and it’s not a fight. But it’s still a “two-person lift” type of object in most kitchens.
If you want a hood that looks like it cost a lot more than it did after it’s finished, this is exactly the kind of shell that delivers—provided you pair it with an insert that matches how you cook.
Why it’s premium
- Architectural slope – Clean lines that read designer and pair well with modern-traditional kitchens.
- Unfinished customization – Match cabinets precisely (paint or stain) for a true built-in look.
- Service-friendly design – Two-piece access makes long-term maintenance far less annoying.
- Statement without “theme” – Looks elevated without feeling like a décor trend.
Good to know
- You must plan an insert/liner solution—this is a cover, not a complete vent hood.
- Finishing quality matters as much as the hood itself; budget time for proper prep and topcoat.
- Curbside delivery style means you’ll want a plan to move it into the home before install day.
Ideal for: homeowners who want a true custom-cabinet hood look and are ready to choose an insert intentionally instead of buying an all-in-one unit.
7. Riley & Higgs Curved Front (31.5" W x 36" H) – Option A: The Soft-Curve Hood That Makes a Kitchen Feel Expensive
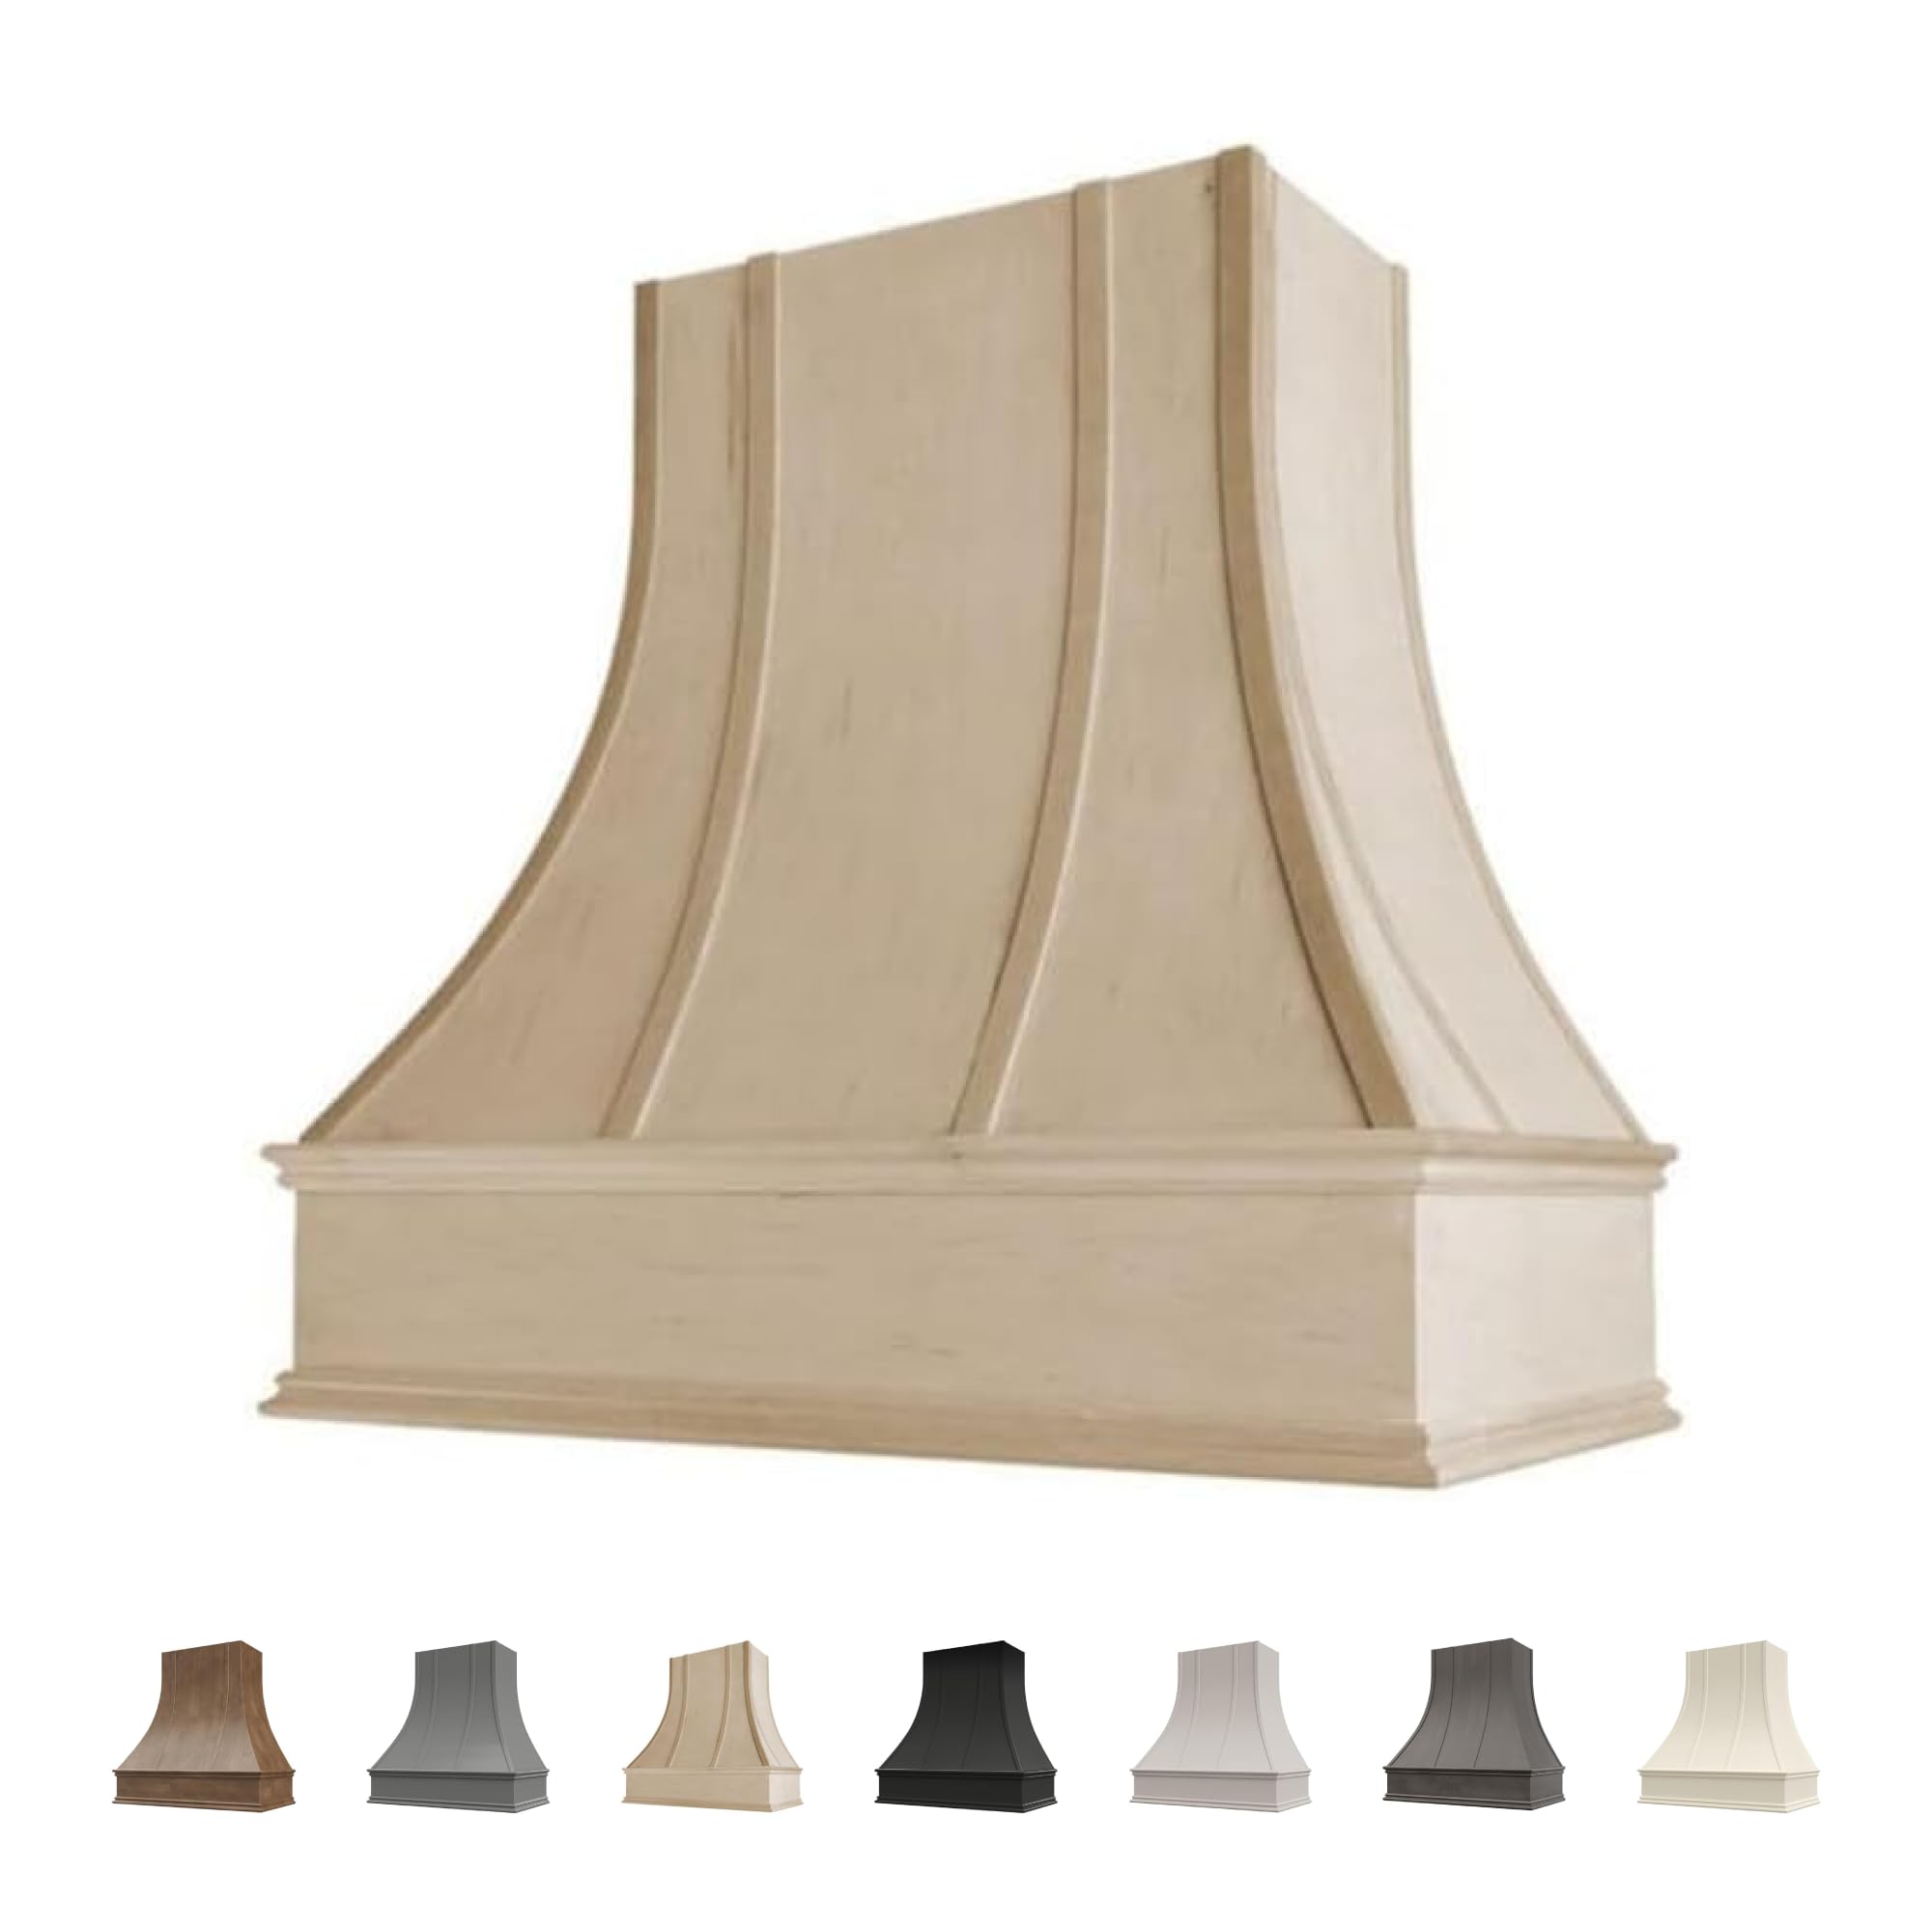
If you want the “custom hood” look but you don’t want the hood to feel sharp or boxy, a curved front is the move. Curves are forgiving. They soften the range wall, they play beautifully with natural materials, and they make the hood feel like a crafted object instead of an appliance cover.
The 31.5" width / 36" height format is a particularly practical size for standard kitchens because it creates presence without requiring a tall ceiling story. In an 8–9 foot ceiling kitchen, an overly tall hood can feel like it’s trying too hard. A 36" height hood can feel intentional and proportional—especially when you’re pairing it with crown molding or upper cabinets.
Homeowner reviews of Riley & Higgs covers tend to repeat the same emotional language: “show stopper,” “statement piece,” “beautiful workmanship.” That’s the reputation you want in a cover. Nobody buys a handcrafted hood cover hoping it’s “fine.” They buy it because they want the wall to feel special.
But the most useful insight from real buyers is practical, not emotional: the cover is only half the system. One of the most common “surprises” is insert selection. So here’s the expert way to approach it:
- Choose your insert size first (most people in this width category choose a 30" insert).
- Choose your liner so the inside is cleanable and protective.
- Choose your blower strength based on how you cook and how your ducting is routed.
Now let’s talk finishing—because finishing is where you either get a jaw-dropping custom look or an “almost” look. A curved hood makes finish even more visible because light rolls across the curve. That means prep matters: fill, sand, prime (if painting), and use a cabinet-grade paint system so the finish stays hard and wipeable.
This is also a hood style that rewards restraint. If you stain it, keep the stain tone aligned with either floors or shelving—not both unless you want a very wood-heavy room. If you paint it, match cabinetry or go one tone deeper for a subtle contrast. The curve already provides visual interest; you don’t need to force drama.
Why it shines
- Curved silhouette feels designer – Curves instantly read high-end and soften the entire range wall.
- Great proportions for standard ceilings – Enough presence without needing a tall 48" hood story.
- Unfinished = true match potential – Perfect if you want it to look like it was built with your cabinets.
- Service access mindset – Cover-style hoods can be built to remain maintenance-friendly.
Good to know
- You need an insert/liner plan to complete the system—budget time for that decision.
- Finish quality matters more on curved surfaces; prep and topcoat are non-negotiable.
- Because it’s a statement piece, it will look best when the range wall (tile, pot filler, lighting) is planned as a whole.
Ideal for: homeowners who want a soft, high-end custom look on a standard ceiling wall and are ready to choose a proper insert behind the scenes.
8. Riley & Higgs Curved Front (31.5" W x 36" H) – Option B: Same Category, Different Listing Variant for the Curved-Look Buyer

Let’s be honest: sometimes you don’t want to overthink it. You want the curved look, you want the craftsmanship, and you want a hood cover that your cabinet finisher can make look like it was always part of the plan. This listing sits in that exact lane—a curved, unfinished hood cover with decorative molding that’s built to be finished to your kitchen’s story.
So why include an “Option B” at the same general size? Because in the real world, buyers often choose based on availability, shipping timing, or the exact listing configuration that matches their project schedule. When you’re in the middle of a remodel, “will it arrive when my contractor is ready?” can matter as much as “is it beautiful?”
What matters most—regardless of which 31.5" x 36" curved listing you choose—is that you approach it like a system:
- The cover sets the aesthetic. It’s your crown molding moment on the range wall.
- The liner makes cleaning sane. It’s where the grease goes, and it’s what you’ll wipe down.
- The insert determines your daily experience. Noise, light quality, filter removal, airflow feel—this is the “live with it” part.
If your kitchen is open concept and your hood is visible from the living space, curved covers are especially smart because they look “furniture-like” from side angles. Boxy covers can look harsh when you see them from a distance; curves stay graceful.
Finish strategy here is the same as any premium unfinished hood: use a kitchen-appropriate system. If you’re painting, go cabinet-grade and let it cure fully before heavy cooking. If you’re staining, seal it properly so wipe-downs don’t leave shiny “polish spots.” And whatever you do, finish the underside like it’s a countertop—because it will be exposed to heat, steam, and grease.
One more expert note: if you want your hood to look truly custom, align its crown detail with your cabinet crown detail. When the crown lines match, the hood looks built-in. When they clash, the hood looks like an add-on. That one choice can change the entire perception of quality.
Why it earns a spot
- Curved front reads premium – A soft silhouette that looks intentional in both farmhouse and transitional kitchens.
- Unfinished flexibility – Lets you match cabinets precisely instead of guessing undertones.
- Great for open concept sightlines – Curves stay elegant from angles and across the room.
- Project-timing friendly – A practical “Option B” for buyers choosing based on listing availability/config.
Good to know
- Insert/liner selection is still required—don’t buy the cover without planning the engine.
- Curved surfaces highlight finish flaws; prep work matters if you want a luxury look.
- This piece wants good lighting and a well-planned backsplash to look its best.
Ideal for: curved-hood lovers who want a premium cover in this size category and prefer this specific listing’s configuration for their remodel timeline.
9. Riley & Higgs Curved Front (31.5" W x 48" H) – The High-Ceiling “Architectural Column” Hood Cover
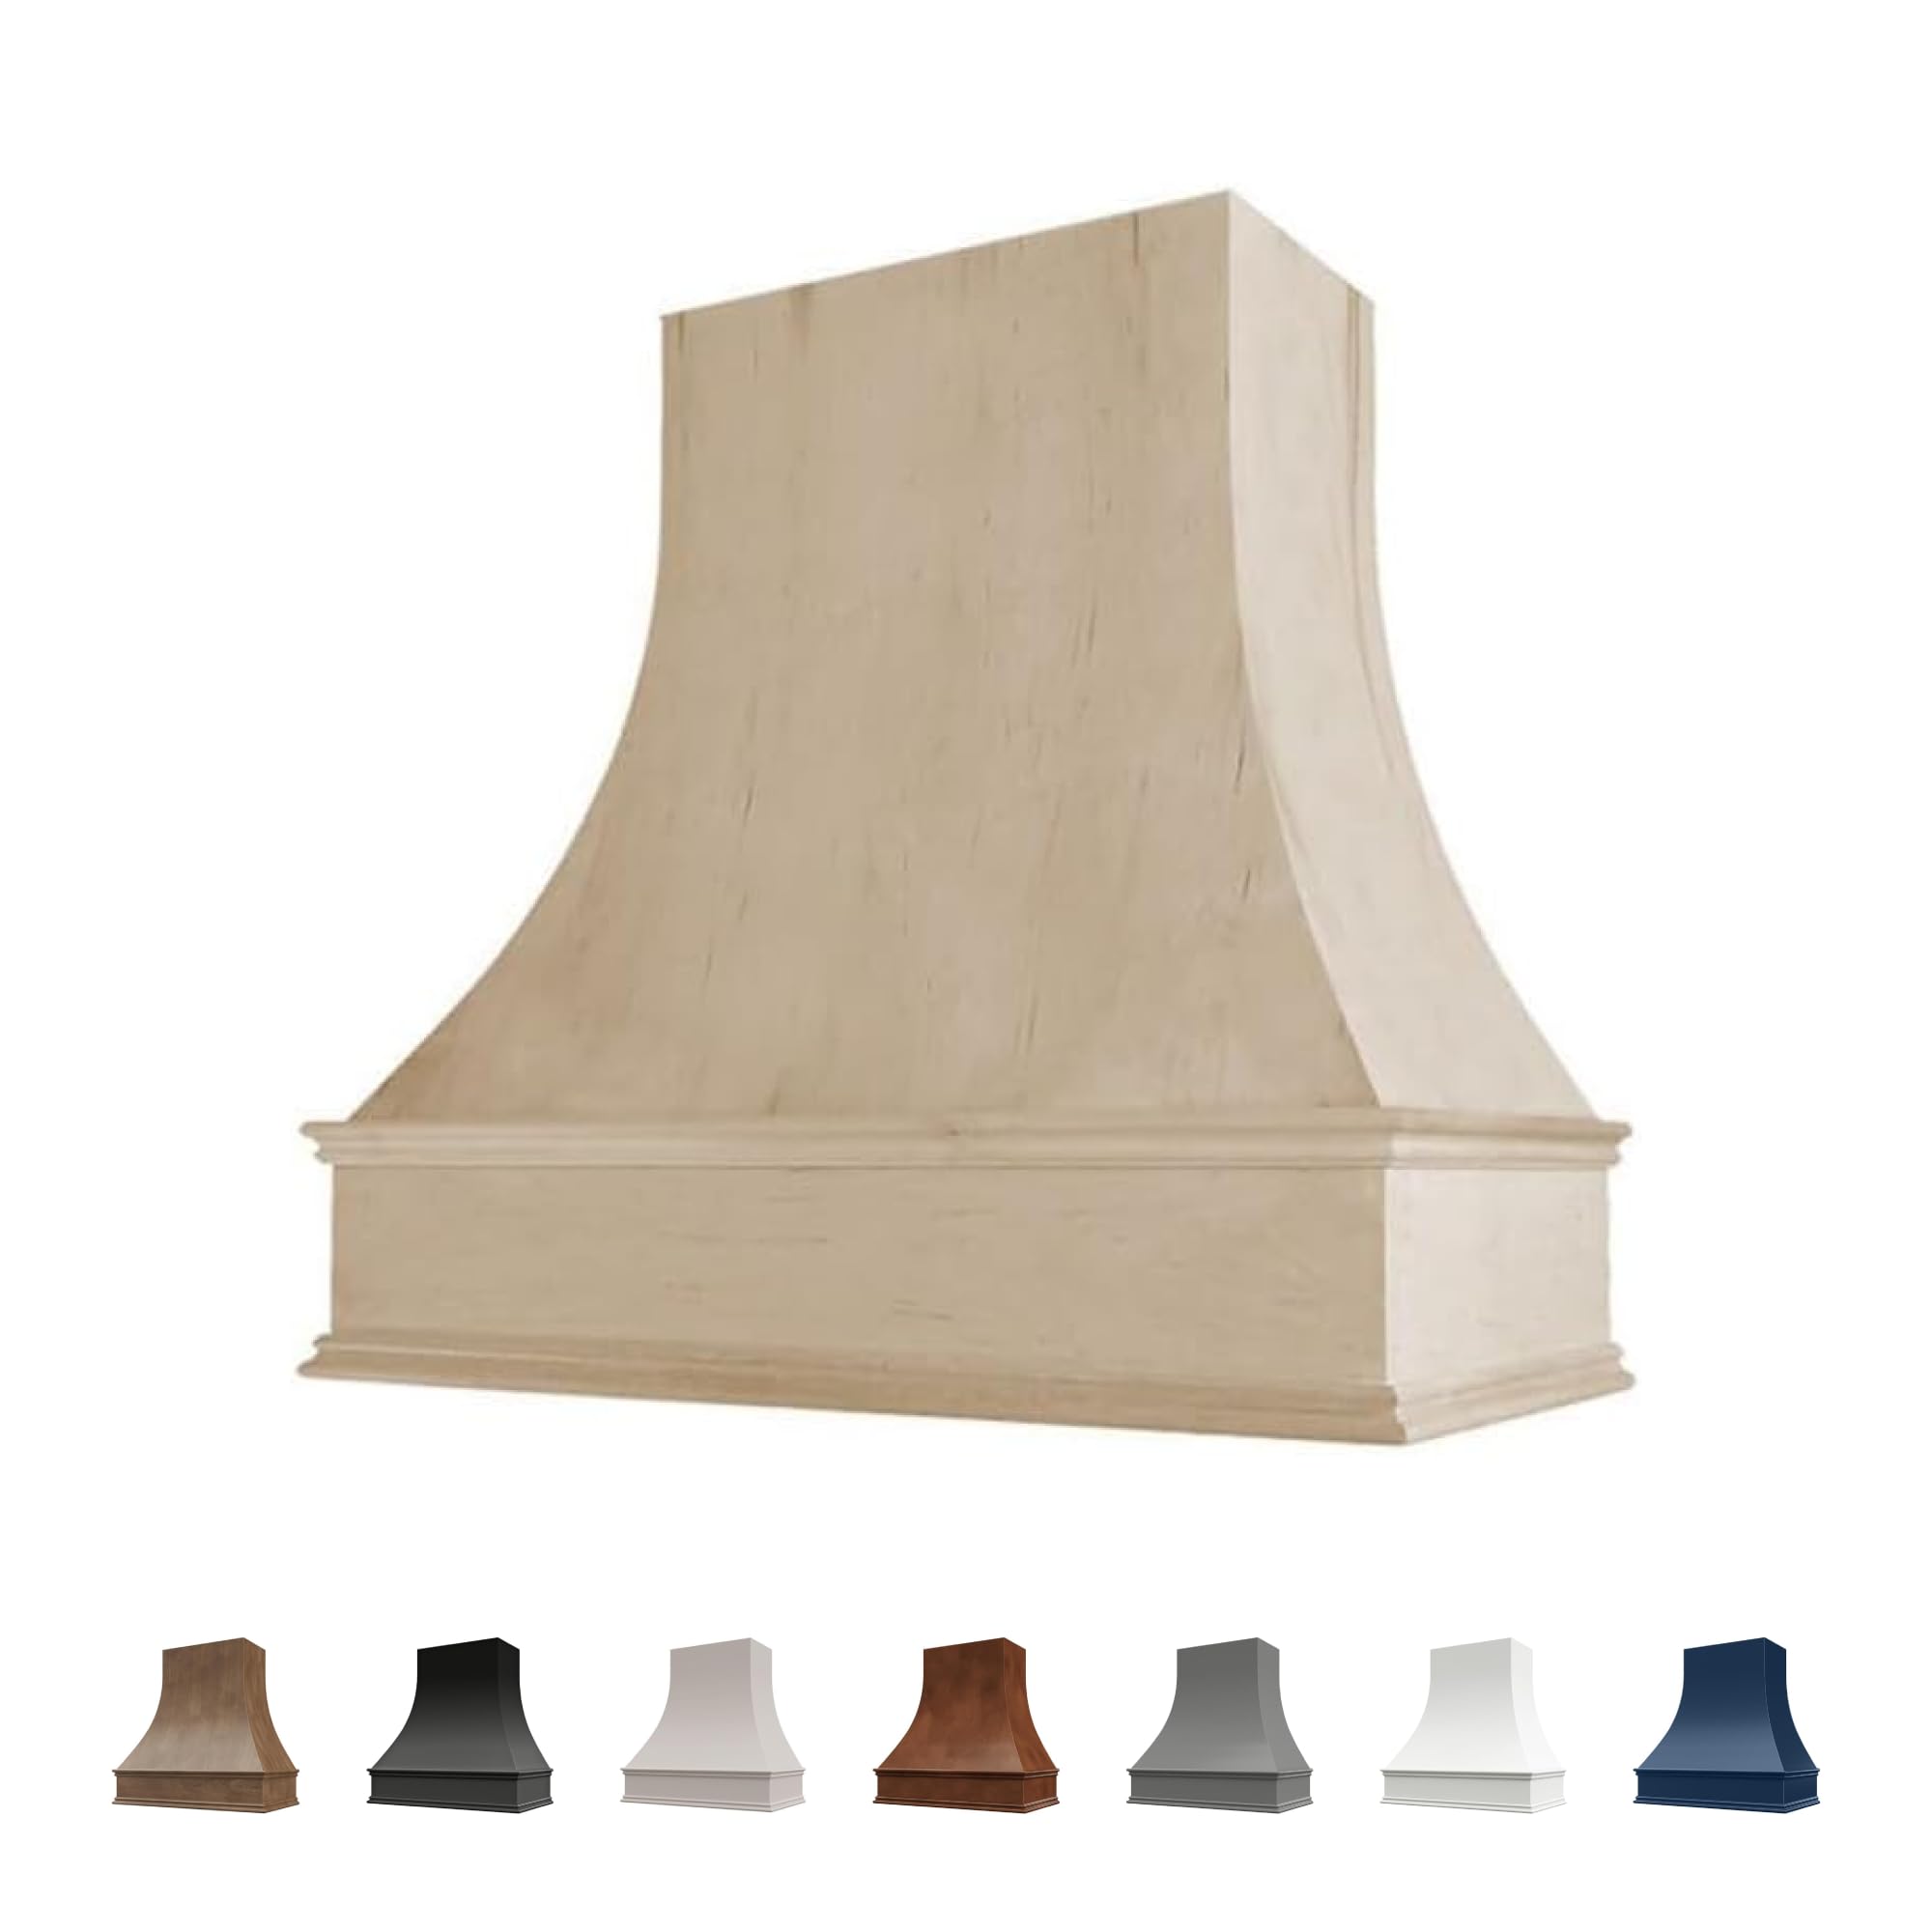
This is the hood cover you choose when a standard-height hood looks “short” on your wall. In taller kitchens—especially those with higher ceilings, big crown molding, or a large uninterrupted backsplash area—a 36" hood can feel like it stops too early. A 48" cover creates a full vertical story. It looks like architecture, not an appliance.
Homeowner feedback about Riley & Higgs taller covers often includes a detail that matters a lot in remodel life: trim flexibility. Several buyers mention being able to trim height (within limits) to make it work with their ceiling situation. That’s exactly what you want in a tall cover: the ability to tailor the final proportions so it aligns with cabinetry and crown lines instead of fighting them.
This cover also solves a design problem many people don’t anticipate: visual balance. If you have a 36" range in a big kitchen, you need something above it that has equal “weight.” A tall cover provides that weight without relying on busy tile patterns or oversized accessories to fill space. It becomes the focal point, and everything else can calm down.
But here’s the expert caution: taller covers make your insert planning even more important. Why? Because the insert will sit inside this larger shell, and you need it to feel centered and purposeful. A small insert floating inside a tall cover can look awkward if the proportions aren’t planned. Most homeowners in this width category still choose a 30" insert, but the finishing trim and liner selection are what make it feel integrated.
Finishing strategy on tall covers is where you can create truly stunning results:
- Match cabinetry exactly for the “built with the cabinets” effect.
- Go one tone deeper than cabinetry for a subtle, high-end contrast that doesn’t scream.
- Stain to match beams or shelving if you have another wood element that needs a partner.
And from a maintenance standpoint, the win of a tall cover is that it can visually hide more of the insert/ducting zone, keeping your range wall looking clean and intentional. Just make sure the bottom edge is finished like a working surface: that’s the line that sees the most grease, steam, and wipe-down action.
Why it’s worth it
- Perfect for tall walls – Creates a full architectural story where standard hoods look too short.
- Luxury “custom build” presence – The kind of hood scale you see in high-end remodels.
- Unfinished finishing freedom – Match cabinets, stain to coordinate wood elements, or create subtle contrast.
- Proportion control – Tall covers help balance big kitchens and larger ranges.
Good to know
- You still need an insert/liner plan—this is the shell, not the ventilation engine.
- Proportions matter: plan how the insert sits visually within the taller cover.
- Finish prep is essential; tall surfaces show light and shadow, so flaws can stand out if rushed.
Ideal for: higher ceilings, large range walls, and homeowners who want the hood to be a true architectural centerpiece.
10. Riley & Higgs Curved Front (37.5" W x 48" H) – The Big-Kitchen, Big-Range Statement Cover
If you’ve got a larger range, a larger wall, or an open-concept kitchen where the range area is visible from everywhere, this is the cover that looks “right.” There’s a moment in big kitchens where standard-size elements start to look underscaled—like you bought a nice product, but you didn’t buy it for the room you actually have. This wider + taller format solves that instantly.
The curved front keeps the scale from feeling aggressive. A big box hood can look imposing. A big curved hood looks intentional, elegant, and high-end— more like a piece of furniture built into the wall.
From an expert planning standpoint, this cover is ideal for 36" range setups because the wider cover gives you room to create better visual balance. Even if your insert is sized appropriately, the outer cover can make the wall feel grounded and “designed.” It’s the same reason large fireplaces look better with larger mantels: scale signals quality.
Now, the deeper planning point: when you go larger on the cover, you must plan your liner and insert so the system feels coherent. Most homeowners will use an insert sized for their cooktop (often 36" in this category, depending on the exact build), and the liner keeps the interior clean and safe. The goal is to make the underside look intentional—like a professional kitchen component, not an afterthought.
Finishing on a large cover is where you can create an absolutely unforgettable kitchen:
- Painted to match cabinetry: This makes the hood feel like a built-in architectural feature.
- Two-tone strategy: Hood one shade deeper than cabinets for a subtle, designer-level contrast.
- Stained wood moment: Pair with beams, floating shelves, or a wood island to make the room feel layered.
Maintenance reality: bigger covers can actually be easier to live with visually because they hide more of the functional “hood stuff.” But the bottom edge still needs regular attention. The kitchen stays looking premium when the lower trim is clean—because that’s where your eye lands when you’re cooking.
This is the kind of cover you buy once and build the whole wall around. If you want your kitchen to feel like a magazine spread and a real cooking space, this is the luxury scale that delivers—when paired with the right insert and ducting.
Why it’s a powerhouse look
- True centerpiece scale – Looks correct over larger ranges and in open-concept kitchens.
- Curved front keeps it elegant – Big, but not boxy or harsh.
- Custom finish potential – Match cabinets, create contrast, or coordinate wood elements for a high-end result.
- Architectural balance – Helps the entire wall feel designed, not pieced together.
Good to know
- This is a cover—insert/liner selection is required for function and long-term cleanability.
- Because it’s large, delivery/handling planning matters (moving it into the home, staging, install day).
- The best results come when you plan the entire range wall (tile height, pot filler placement, lighting) around it.
Ideal for: large kitchens, 36" range setups, and homeowners who want the hood to be a defining architectural feature—not just a vent.
How Wood Hood Performance Actually Works (Capture, Ducting & Why “Bigger Fan” Isn’t the Whole Story)
Most frustration with a hood comes from expecting airflow alone to solve everything. Real performance is a three-part equation: capture + airflow + ducting. When those align, your kitchen stays fresh and your hood feels effortless. When they don’t, even an expensive hood can feel weak, loud, or weirdly ineffective.
Capture: the quiet secret that separates “works fine” from “works great”
- Depth matters – If the hood doesn’t cover the front burners well, steam and smoke can roll forward into the room.
- Mounting height matters – Too high and the plume spreads before the hood can grab it.
- Canopy shape matters – Hoods that feel like a true canopy often capture better than flat, shallow designs.
This is where wood hoods and wood covers can be surprisingly effective. Many are deeper and more “furniture-canopy” shaped than slim metal hoods, which helps keep the plume contained—especially when you’re cooking at the front of the cooktop.
If you’re choosing between a complete ZLINE hood and a cover + insert system, here’s the mental model: ZLINE gives you a known, integrated capture + airflow design. A cover + insert system gives you higher customization, but capture depends on how you size and place the insert inside the shell.
Airflow: choose a daily-use range, not a “one-time emergency” number
- Use low/medium most days – The best hood is the one you actually run.
- Reserve high for smoke events – Searing, frying, heavy aromatics.
- Balance power with comfort – A hood that’s unbearable to listen to becomes kitchen décor, not ventilation.
A practical note for planning: if you go into very high airflow territory, many building code conversations introduce make-up air requirements to avoid depressurizing the home. You don’t need to panic about that—just plan intelligently so your hood is powerful enough for your cooking without creating a “tight house pressure” problem.
Ducting: how to make the same hood feel stronger (and quieter)
- Short, straight duct runs win – The closer the hood is to the exterior termination, the better it feels.
- Fewer elbows = more real airflow – Every sharp turn adds resistance and noise.
- Rigid metal ducts beat flex – Smooth walls move air and reduce turbulence.
- Correct sizing matters – Don’t choke a hood with undersized ducting and then blame the hood.
This is also why “insert selection” matters so much on cover-style hoods. You can buy a beautiful cover, but if you pair it with a weak insert and poor ducting, the kitchen will still smell like last night’s stir-fry. Conversely, a well-chosen insert with smart ducting can make a mid-budget cover perform like a premium setup.
Cleaning strategy: treat the insert like the engine, the wood like cabinetry
- Clean filters consistently – Baffle filters are built to be cleaned; mesh filters can clog faster depending on design.
- Wipe the bottom edge routinely – That’s where grease wants to settle.
- Keep moisture under control – Steam is rough on wood finishes over time if it isn’t vented away.
The goal is simple: keep grease where it belongs—on the filters and liner—so your wood stays beautiful with minimal effort. That’s the difference between a hood that stays a showpiece and a hood that slowly becomes a project.
FAQ: Wood Hoods, Inserts, Finishes, and What People Wish They Knew Earlier
Do wood hood covers really need a metal liner?
All-in-one hood vs. cover + insert: which is “better”?
How do I choose insert size for a hood cover?
What finish holds up best on an unfinished wood hood cover?
Why do some people say their hood is “bulky” after install?
How do I keep a wood hood from getting greasy or yellow over time?
Final Thoughts: Pick the Hood That Matches How You Cook (and How You Want Your Kitchen to Feel)
Here’s the truth: the best hood isn’t the one with the most hype. It’s the one that fits your kitchen and your habits— so you actually use it, keep it clean, and feel proud every time you walk into the room.
If you want a simple, high-confidence path, choose a complete hood. If you want the most custom look possible, choose a cover and plan the insert like a system. Either way, the goal is the same: a range wall that feels intentional and a kitchen that doesn’t hold onto yesterday’s smells.
- Want the “best overall” blend of style + simplicity? Start with the ZLINE KPDD-30 Rustic Dark. It’s a finished, ready-to-vent statement hood that looks custom without requiring you to engineer the inside.
- Love the ZLINE approach but want a softer wood tone? Choose the ZLINE KPLL-30 Rustic Light for airy kitchens that want warmth without heavy contrast.
- Building a classic white kitchen and want a built-in vibe? The ZLINE KBTT-30 Cottage White is the move—especially if paint-match flexibility matters to you.
- Want a rustic “custom” look on a value-driven remodel? Consider the Castlewood Rustic Shiplap Hood and pair it with an insert you choose intentionally.
- Want the cabinet-built hood look without paying for a full custom shop? The Castlewood Shaker Hood Front is the “smart builder” move when you have adjacent uppers and want the hood to blend into cabinetry.
- Want a premium, handcrafted hood cover that looks like designer millwork? Go Riley & Higgs: Sloped 31.5" x 36" for crisp lines, or Curved 31.5" x 36" (Option A) for a softer, high-end silhouette.
- Want a taller luxury statement for big walls and higher ceilings? Choose the Curved 31.5" x 48" or go full “wow” with the Curved 37.5" x 48" for large kitchens and larger ranges.
One final nudge: pick the option that makes you feel calm. Calm choices lead to better installs, better daily use, and a cleaner kitchen. And when you’re investing in woodwork and ventilation, calm is exactly what you want—because the right wood kitchen hoods choice should feel like a permanent upgrade, not a weekly project.
