
A kitchen hood is one of those “quiet heroes” you only notice when it’s missing. When it’s working well, your home smells cleaner, your cabinets stay less sticky, and you don’t have that lingering haze after searing, frying, or boiling pasta for a crowd. When it’s working poorly, everything around your cooktop becomes a slow-moving grease magnet… and the air feels heavy even if the kitchen looks spotless.
If you’re shopping for a range hood cover, you’re probably trying to solve two problems at the same time: you want better ventilation and you want your kitchen to look finished—like it was designed that way from day one. That’s the mindset of a smart buyer, because the best-looking kitchens aren’t always the ones with the fanciest countertops. They’re the ones where the “functional stuff” (ducts, liners, filters, lighting, seams) disappears into a clean, intentional focal point.
Here’s what most buying guides get wrong: they treat hoods like a checklist. CFM? Check. Lights? Check. Stainless steel? Check. But real kitchens don’t work like a spec sheet. Real kitchens have elbows in the duct run, uneven ceilings, short cabinets, microwaves that used to live there, and a cooking style that swings between “toast and tea” and “full-on stir-fry smoke show.” The best choice is the one that performs in your layout—and stays easy to live with after the honeymoon.
This guide is built around the stuff that actually changes your experience: capture area (the invisible “umbrella” over your burners), how the controls feel when your hands are wet, how quickly filters gunk up in a frying-heavy home, how painted finishes behave after months of wipe-downs, and the hidden reason some hoods feel loud even when the numbers look fine. I’m also pulling from real-life user feedback patterns: what people love after install, what annoys them later, and what they wish they knew before the box showed up.
Below, you’ll find 10 standout picks—from budget-friendly, all-in-one wall hoods to premium wood shells that turn an insert into a true architectural centerpiece. If you want one guide that takes you from “confused and overwhelmed” to “I know exactly what to buy,” you’re in the right place.
In this article
- How to choose the right hood setup for your kitchen and cooking style.
- Quick comparison table of 10 standout options.
- In-depth reviews of each model, with real-life pros and cons.
- How ventilation performance actually works (capture, ducting, and noise).
- FAQ and final buying tips so you can choose once—confidently.
How to Choose the Right Range Hood Cover for Your Kitchen
A hood choice is rarely just a “product” decision. It’s a layout decision, a maintenance decision, and a style decision rolled into one. The best picks are the ones that match how you actually cook, how your ducting is built, and how much hands-on cleaning you’re willing to do. Here’s the framework I use to make this feel simple and crystal-clear.
1. Start with the single most important decision: shell-only or all-in-one?
Before you compare brands, decide what category you’re buying:
- All-in-one wall hood: This includes the blower, filters, lighting, and the finished exterior you see. You install it, connect ducting (or set up ductless), and you’re done. These are excellent when you want a straightforward upgrade and you don’t want to hunt for a separate insert.
- Decorative wood shell (insert/liner required): This is the “architectural” route. The wood piece is the visible façade, but the real ventilation work is done by an insert/liner and blower you install inside. This path is unbeatable for built-in, custom kitchens—especially when you want the hood to match cabinetry or become a focal point.
The practical difference: all-in-one hoods are easier to buy and install. Decorative shells look more custom and can be easier to service later (because you can access the insert), but they require planning: insert sizing, ducting alignment, and a finishing strategy (paint, stain, sealing).
2. Measure like you’re paying an installer (even if you’re DIY)
Most installation stress comes from missing one simple measurement. Grab a tape measure and write these down:
- Cooktop width: 30 inches and 36 inches are the big ones. Match the hood to the cooktop width at a minimum, and consider going wider if you do lots of high-heat cooking.
- Cooktop depth: Deep front burners and griddles change everything. If your hood is too shallow, the plume can escape out the front—even with strong airflow.
- Distance to ceiling: This determines whether you need an extension, a taller chimney section, or a taller shell.
- Cabinet height and crown molding: These affect where the hood visually “lands.” A hood can be powerful but look awkward if it ends at a weird height.
- Duct location: Centered ducts are easiest. Off-center ducts are still workable, but you want a hood that gives you enough internal space to transition cleanly.
A pro tip that saves headaches: if your ceiling isn’t perfectly level (many aren’t), favor hoods and shells that are trimmable or forgiving at the top seam. That single detail can keep your install from looking “almost right.”
3. Ducted vs ductless: know what problem you’re trying to solve
This isn’t a moral debate. It’s a “what’s possible in my house?” decision.
- Ducted (vented outside): Best for real smoke, grease, and strong odors. It removes air from your home and sends it outside. If you cook with high heat, sear often, or do aromatic foods regularly, ducted is the gold standard.
- Ductless (recirculating with carbon filters): Works when you can’t vent outside. It pulls air through grease filters and carbon filters, then returns it to the room. It can reduce odor, but it won’t remove humidity the same way and it’s only as good as your filter maintenance.
The real-world takeaway: ductless setups can make a kitchen feel noticeably better for light-to-medium cooking, but ducted setups are the move when you want your kitchen air to reset quickly after a heavy meal.
4. Airflow is important… but “capture” is the hidden power multiplier
You can buy a strong blower and still get disappointing results if the hood doesn’t catch the cooking plume. That’s capture. Think of the hood as an umbrella. A stronger fan helps, but the umbrella still has to be positioned correctly and wide enough to catch what’s rising.
- Width helps because it gives the plume less chance to escape out the sides.
- Depth helps because front burners are where most “it still smells” complaints come from.
- Mounting height matters because too high can reduce capture, and too low can feel cramped (and can be unsafe for tall pots).
If you want a hood you’ll actually use daily, prioritize models that feel effective on low and medium speeds. The “quiet power” is the power you’ll run most often.
5. Noise is rarely “the fan.” It’s usually the system
When a hood feels loud, the instinct is to blame the motor. But in real kitchens, noise often comes from:
- Restrictive ducting (too many elbows, long runs, sharp transitions).
- Vibration points (loose mounting, thin wall backing, or metal parts touching).
- Air turbulence caused by undersized ducts or cramped internal transitions.
That’s why two people can buy the same hood and have totally different experiences. If your duct run is complex, choose a hood with multiple speeds and a reputation for good performance without forcing “max speed or nothing.”
6. Filters and cleaning: choose your “maintenance personality”
This part is unglamorous, but it’s where satisfaction is won.
- Baffle filters: Durable, sturdy, and typically dishwasher friendly. They’re common in more premium builds and handle grease well when cleaned regularly.
- Mesh filters: Often found in budget units. They can work fine, but they may require more frequent cleaning and can feel less “forever” than baffles.
- Painted finishes: Look amazing, but cleaning technique matters. Harsh abrasives and aggressive scrubbing can dull, mark, or peel paint over time.
- Unfinished wood shells: Give you ultimate color control, but they need a proper finishing plan to resist grease and humidity long-term.
If you want the hood to keep looking expensive, make sure your future self has an easy filter routine and a finish you won’t be afraid to wipe down.
7. Controls and lighting are “daily touch points”—don’t ignore them
You’ll interact with controls and lighting far more than you think. This is where a hood can feel premium or annoyingly cheap.
- Push buttons: Reliable and easy. Not always the sleekest, but they’re simple and predictable.
- Touch panels: Modern look, but can be finicky if the touch area is small or you’re trying to tap quickly mid-cooking.
- Gesture controls: Brilliant when tuned well, frustrating when overly sensitive or not sensitive enough. If you love it, you’ll feel like you live in the future. If you hate it, you’ll disable it and use the normal buttons anyway.
- Lighting placement: A light can be “bright” but still useless if it’s placed too far back and creates a weird shadow on the front burners.
8. Installation reality check: weight, support, and “test before final”
Wall hoods and wood shells can be heavy. Plan like a pro:
- Find solid backing (studs or a proper support board) before you lift anything.
- Test electrical + fan function before the final mount. It’s much easier to swap a panel or light before it’s on the wall.
- Protect finishes during install (especially painted black and hand-finished wood). Small scratches happen most during positioning.
- Have a plan for the chimney seam if your ceiling is uneven. Trimmable designs reduce “why does that gap exist?” stress.
9. Style is not “extra”—it’s part of why you’ll love your kitchen
The hood is often the visual anchor of your cooking wall. Decide what mood you want:
- Cottage / painted wood for a soft, built-in look that can match cabinets.
- Rustic dark wood for farmhouse warmth and contrast against light countertops.
- Hand-hammered metal for a designer statement that reads upscale instantly.
- Shiplap chimney for texture and a “made for this house” feel.
- Matte black steel for modern kitchens that want clean lines without fuss.
10. A “future-proof” hood plan saves money and headaches
Your best long-term setup is the one you can maintain easily:
- Choose filter types you’re willing to clean on schedule.
- Make sure replacement parts (filters, lights, carbon kits) are easy to find for your model.
- If you’re going shell-only, choose an insert size you can upgrade later without rebuilding the entire wood façade.
- Prioritize low-to-mid speed usability, because that’s where your hood will live most days.
Quick Comparison: 10 Range Hood Cover Picks That Look Custom
Use this table to spot the models that match your kitchen goals, then jump into the reviews for the real-world details—like cleaning effort, control quirks, and which options feel genuinely “built-in” once the remodel dust settles.
On smaller screens, swipe or scroll sideways to see the full table.
| Model | Category | Signature advantage | Best match | Amazon |
|---|---|---|---|---|
| ZLINE Wooden Wall Mount (Cottage White) | Wood + motor | Cabinet-like built-in look with a complete ventilation system inside | Most kitchens wanting “custom without custom complexity” | Amazon |
| IKTCH 36" Black Wall Mount (900 CFM) | All-in-one | High airflow with modern controls and dishwasher-safe baffle filters | Heavy cooking homes that want real clearing power | Amazon |
| ZLINE Wooden Wall Mount (Rustic Dark) | Wood + motor | Farmhouse warmth with a durable inner steel frame and baffle filtration | Rustic kitchens that want a statement without metal shine | Amazon |
| ZLINE Hand-Hammered Copper (Designer Series) | Statement metal | Texture-rich finish that looks designer while staying practical to use | Style-first remodels that still want solid everyday venting | Amazon |
| Castlewood Rustic Shiplap Chimney | Wood + liner | Shiplap texture + included ventilator/liner for a high-end rustic focal point | Farmhouse remodels that want a bold “built for this house” look | Amazon |
| Riley & Higgs Curved Front (White, Molding) | Shell only | Luxury wood façade, two-piece design for easier install and service access | Custom kitchens using a separate insert/liner | Amazon |
| Riley & Higgs Sloped Front (Unfinished) | Shell only | Paint/stain-ready wood shell with a “true custom” finishing advantage | DIY finish lovers who want perfect cabinet color matching | Amazon |
| Riley & Higgs Curved Front Tall (Unfinished) | Shell only | Taller profile for ceilings and crown lines, plus trim-friendly flexibility | Kitchens that need a bigger vertical presence above the range | Amazon |
| SNDOAS Matte Black Wall Hood (GD1775BPA) | Budget hood | Modern black look with simple 3-speed controls and easy maintenance | Style upgrades on a tight budget (ducted or ductless-ready) | Amazon |
| SNDOAS Matte Black Wall Hood (Button Control) | Budget hood | Simple install, decent airflow for everyday cooking, clean pyramidal profile | First-time hood buyers who want a quick, affordable improvement | Amazon |
In‑Depth Reviews: 10 Hood Picks That Look Better and Work Smarter
Now we’ll go model by model. I’m not going to talk like a catalog. I’m going to talk like someone who’s installed, cleaned, lived with, and listened to the real-world complaints people share after the first month—when the hood stops being “new” and starts being part of daily life.
1. ZLINE Wooden Wall Mount (Cottage White) – The “Custom Kitchen” Shortcut That Still Vents Like a Real Hood

This ZLINE is the pick I recommend when someone says, “I want my hood to look like cabinetry, not an appliance.” It has that built-in, architectural presence—clean lines, crown molding detail, and a painted wood exterior—without forcing you into a fully custom carpenter build. And unlike a shell-only hood, it arrives as a complete ventilation system with lighting, filters, and a multi-speed blower setup ready to work.
The real win here is balance. The design reads high-end from across the room, but it doesn’t punish you during day-to-day use. The push-button controls are simple (which, honestly, ages better than fussy touch panels), and stainless baffle filtration is the kind of “grown-up” choice that tends to stay easy over time—especially if you actually wash them on a schedule instead of waiting for the “why is everything sticky?” moment.
Where buyers are happiest is the finished look once it’s on the wall. This hood instantly makes the range area feel intentional. It’s also a strong choice if you’re trying to soften a kitchen that feels too stainless-steel-heavy. Painted wood brings warmth. That said, a very common real-life note is color expectation: “white” can read more like a cottage cream in some lighting. The smart move is to treat the factory finish as a starting point, not a perfect match promise. Many homeowners paint it to match cabinets, and the shape takes paint well when prepped correctly.
Installation-wise, treat it like furniture, not like a light fixture. It’s substantial. You want solid support, careful leveling, and patience. If your ceiling isn’t perfectly level, the chimney/crown line becomes where your eyes go—so the ability to trim or adjust is a practical design feature, not a minor detail. When installed thoughtfully, this is the hood that makes guests say, “Wait… was that always there?” That’s the highest compliment a kitchen upgrade can get.
Why you’ll like it
- Looks built-in – Cabinet-like presence with crown detail makes the cooking wall feel designed.
- Simple controls that age well – Push buttons are easy to use and easy to teach to anyone in the home.
- Practical filtration – Baffle filters are sturdy and maintenance-friendly when cleaned regularly.
- Paintable “match the room” potential – Great if your cabinet white is warm, cool, or custom tinted.
- Strong choice for remodel flow – Lets you get the custom vibe without building from scratch.
Good to know
- Expect it to be heavier than it looks; plan support and a careful install approach.
- “White” may read cream in some kitchens; paint matching is common for perfectionists.
- If your duct position is off-center, plan your transition inside the hood early so it stays clean and quiet.
- Like any wood-exterior hood, you’ll want a gentle cleaning routine to preserve the finish.
Ideal for: homeowners who want a custom-looking kitchen focal point without having to design a full carpenter-built hood from scratch.
2. IKTCH 36" Black Wall Mount (900 CFM) – The High-Airflow Upgrade That Feels Like a Serious Vent System

If your cooking produces real smoke—searing, wok cooking, high-heat grilling indoors, or lots of spice-forward meals—this is the type of hood that changes your kitchen from “smells like last night” to “air clears fast.” The headline feature is airflow, but the bigger story is confidence: people buy powerful hoods because they want the sense that the system can keep up, even on the messy days.
The IKTCH tends to win points in three places that matter in real life: it looks modern and substantial, it moves a lot of air without feeling like a jet engine on low and mid speeds, and it’s built around grease management you can actually maintain. The stainless baffle filters are removable, designed to be cleaned easily, and the hood includes details like an oil collector that quietly reduces the “why is this dripping?” drama cheaper units can develop if you let grease build up.
Now for the honest part that makes or breaks satisfaction: control experience. Gesture sensing sounds amazing (and can be), but real owners often report a learning curve. Some say it’s finicky at first, others say it stops responding, and the consistent bright spot is that customer support frequently sends replacement parts or panels when a control component misbehaves. That pattern matters. When you buy a hood with modern electronics, what you’re really buying is the combination of hardware and how the brand responds when something small goes wrong. A responsive support team can turn a “this is annoying” moment into “I’d buy from them again.”
Another real-life note: lighting. People like bright cooktop lighting, but some units can develop a hum when lights are on. In the real world, that’s not a “spec” issue—it’s a comfort issue, because a high-pitched noise becomes irritating after a week. The best approach is exactly what experienced buyers do: test the hood fully (fan + lights + controls) before the final install. That tiny step saves hours later.
If you want a modern black hood that feels like a real ventilation upgrade (not just a decorative piece), this is one of the strongest options in this lineup. It’s especially good when your goal is performance-first, with style as a close second.
Why it stands out
- High airflow capability – Built for kitchens where smoke and odor control actually matters.
- Multiple control methods – Touch panel, gesture option, and remote give you flexibility.
- Strong grease management – Baffle filtration + oil collection details help long-term cleanliness.
- Lighting that’s genuinely useful – Adjustable brightness makes cooking feel easier at night.
- Customer support pattern – Many owners report quick replacement parts when controls act up.
Good to know
- Gesture controls can be love-or-hate; practice and testing matter.
- Some users report light hum issues; test fully before final mounting.
- The interface flow can feel “linear” (cycling speeds) rather than instantly jumping to a desired setting.
- As with any strong hood, ducting quality affects both performance and perceived noise.
Ideal for: heavy cooking households who want a noticeable jump in smoke clearing power and a modern black look that feels premium on the wall.
3. ZLINE Wooden Wall Mount (Rustic Dark) – Farmhouse Warmth With a “Real Hood” Interior
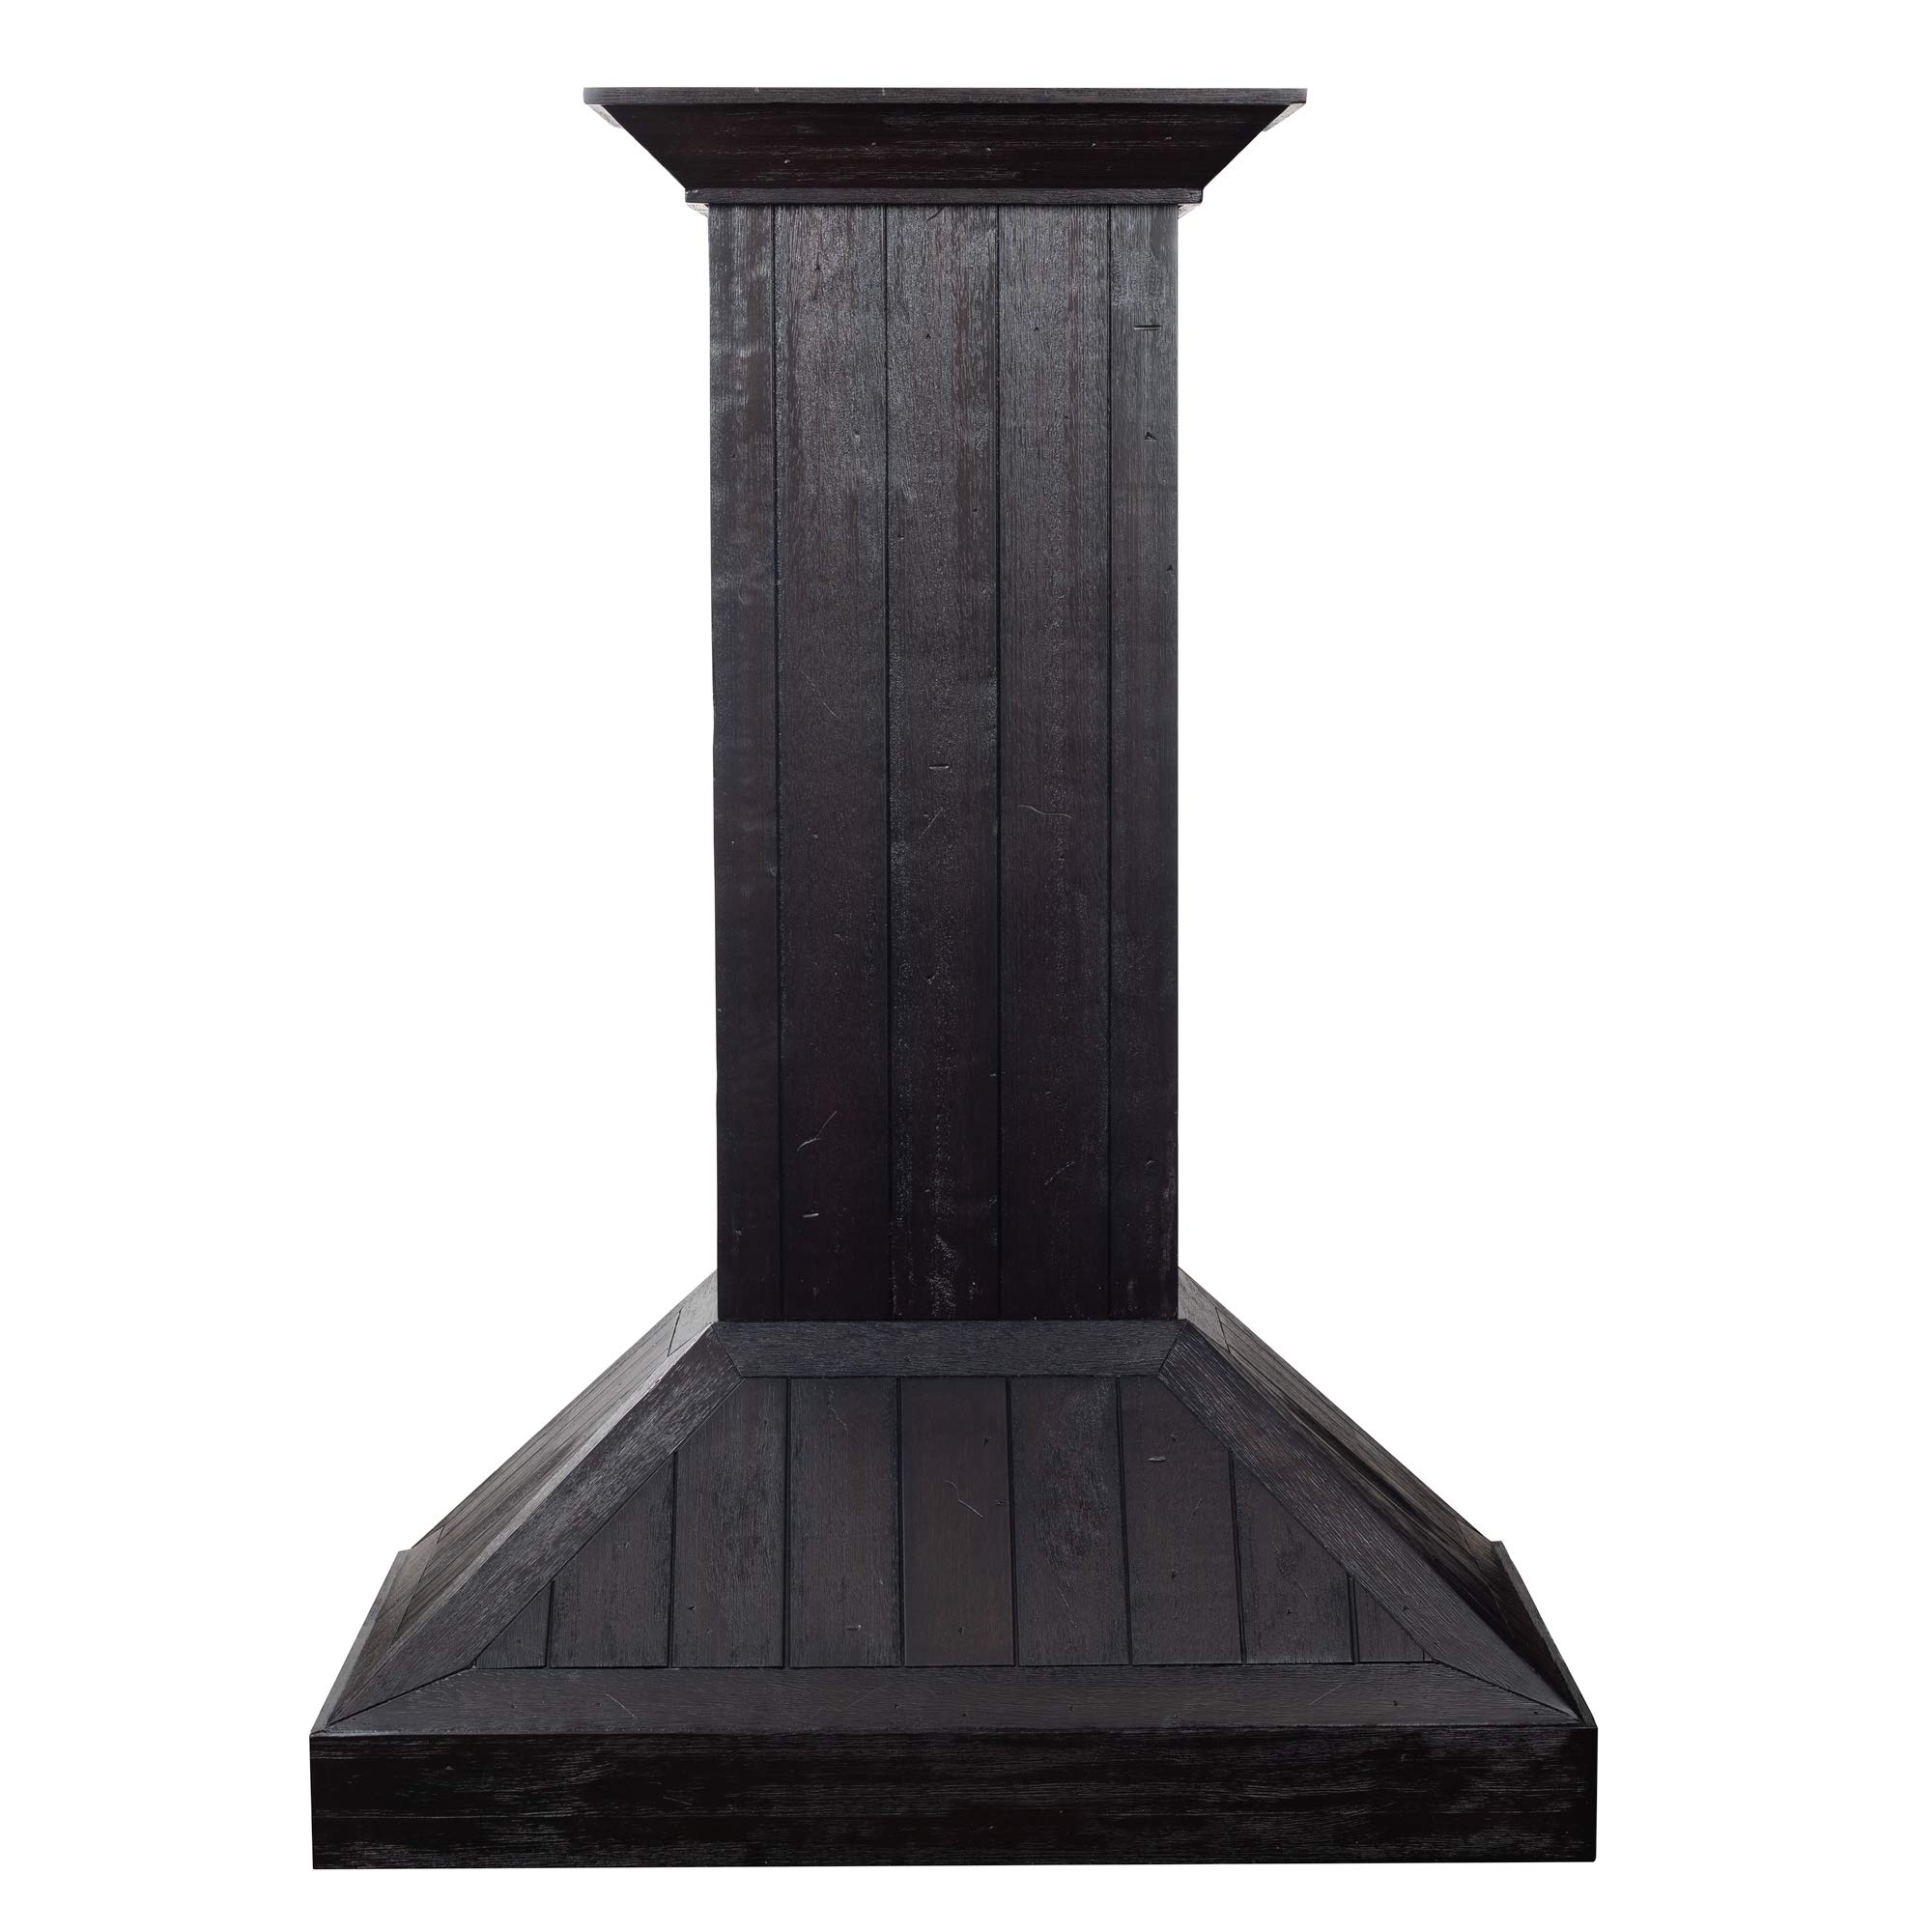
This is the choice for people who want warmth and texture without turning their kitchen into a theme. A rustic dark wood hood can anchor a space—especially if you’re pairing it with light cabinets, white tile, or stone countertops. The ZLINE here hits that “farmhouse but polished” sweet spot: it’s wood on the outside, but still built as a complete wall-mount hood system with lighting and baffle filtration inside.
The big reason this works in the real world is psychological: rustic finishes are forgiving. Stainless shows fingerprints and smudges instantly. Dark, textured wood hides daily life better—especially if your kitchen is busy. That doesn’t mean you ignore maintenance, but it does mean you don’t feel like you’re constantly wiping it just to keep it looking presentable. This is a subtle but huge quality-of-life advantage.
Owner feedback patterns on ZLINE wooden hoods often point to the same two themes: the look is even better than expected once installed, and the install feels “heavier than expected.” That’s not a warning—just a planning note. This isn’t a flimsy decorative piece. It has structure. That’s also why it tends to feel solid over years of use. If you want a hood that feels like it belongs in a remodel, not like something you’ll replace after one season, that build quality matters.
A practical tip: rustic dark finishes can vary slightly from photos depending on lighting and grain. That’s normal for hand-finished or distressed-style wood. If you’re matching a specific stain or cabinet tone perfectly, you either want to see sample photos in real kitchens or choose an unfinished option you can stain yourself. If you’re okay with a “coordinated, not identical” match, the rustic dark route is a great way to add character without adding chaos.
Why it’s a great rustic pick
- Strong farmhouse presence – Adds warmth and texture that makes the cooking wall feel designed.
- Complete hood system – You get lighting, filtration, and multi-speed control in one package.
- Forgiving daily look – Dark wood hides life better than shiny steel in busy homes.
- Solid feel – Owners often describe it as sturdy and long-lasting once mounted.
- Easy-to-understand controls – Simple buttons keep day-to-day operation low-friction.
Good to know
- It’s heavy; plan support, leveling, and help during install.
- Rustic finishes can vary; treat photos as direction, not a perfect color guarantee.
- If your duct run is complicated, plan the internal transition so it stays quiet and efficient.
Ideal for: farmhouse and rustic kitchens that want a warm, textured focal point with the simplicity of a complete hood system inside.
4. ZLINE Hand-Hammered Copper (Designer Series) – The Hood That Makes the Whole Kitchen Feel Upgraded
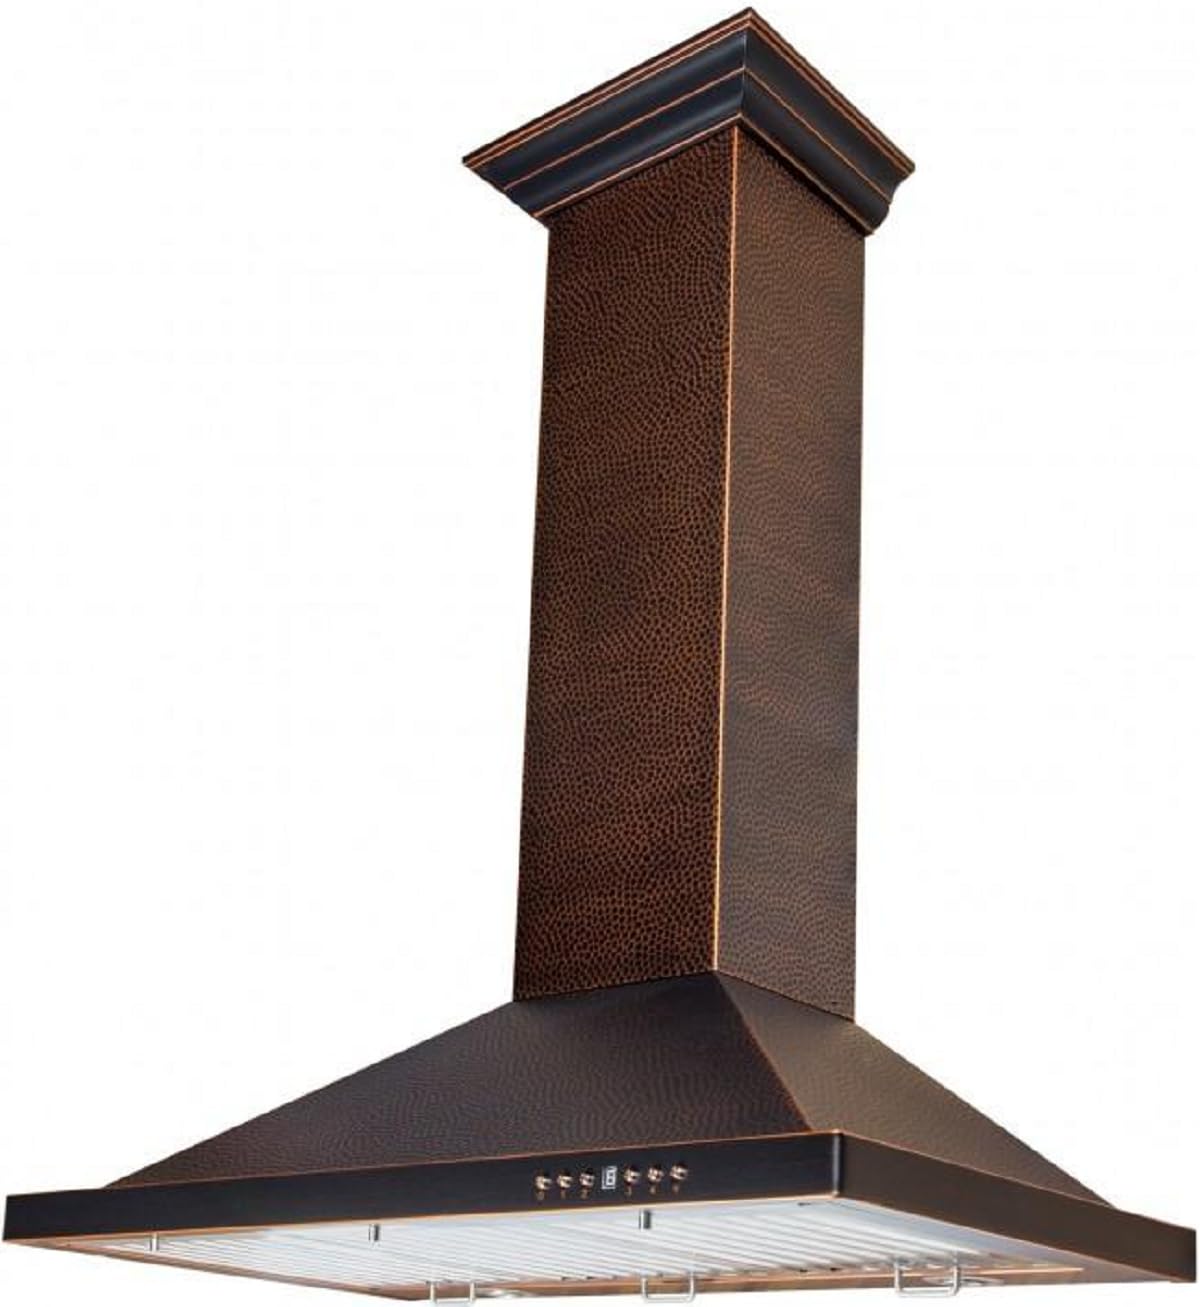
Some hoods disappear. This one is meant to be seen. A hand-hammered metal finish adds depth that flat stainless can’t touch, and it can make even a “simple” kitchen look like it was styled by a designer. If you want a focal point without building a full custom wood enclosure, this is one of the most dramatic transformations you can make on the cooking wall.
The best part of a statement hood is that it does double duty: it becomes décor, and it still has to work as ventilation. This ZLINE keeps the everyday experience straightforward: push-button controls, multiple fan speeds, and baffle filtration that doesn’t feel disposable. It’s also convertible for homes that need ductless flexibility, which is a practical advantage for condos or kitchens where exterior venting is complicated.
Now let’s talk about “expectation management,” because it’s the difference between delighted and disappointed. Hammered copper finishes can look different in person than in staged photos. Some owners describe the finish as more dramatic and darker, with more variation than expected. That can be a positive if you want character, but if you were hoping for a bright copper shine, you should expect a deeper, moodier tone. The texture is the point—it catches light differently throughout the day, which makes it feel alive rather than flat.
Lighting is another detail where taste matters. Some people love the illumination; others don’t love the look of the light quality or how it reads against the metal. Here’s the smart way to think about it: if your kitchen already has great ambient lighting, hood lights are task lights. You want them to be clear and functional, not necessarily “warm and pretty.” If you want a specific mood, you can always build that with under-cabinet lighting elsewhere.
This is the hood for someone who wants a “wow” moment without sacrificing basic usability. If you like the idea of a bold finish and you’re okay with natural variation, it’s a standout.
Why it’s worth considering
- Instant visual upgrade – The hammered texture adds depth and designer presence.
- Simple controls – Push buttons keep operation reliable and easy.
- Convertible setup – Useful if you need ductless flexibility with charcoal filtering.
- Practical filtration – Baffle filters are a strong long-term maintenance choice.
- Feels “custom” without carpentry – Big impact without building a wood enclosure.
Good to know
- Finish can look darker/more varied than photos; expect character, not uniformity.
- Lighting preference is personal; treat hood lights as task lighting first.
- Metal finishes look best with gentle cleaning—avoid abrasive pads that flatten texture over time.
Ideal for: remodelers who want a statement focal point and a hood that still feels simple to use every day.
5. Castlewood Rustic Shiplap Chimney – The Texture-First Farmhouse Hood That Looks Truly Built-In

This Castlewood style is for the homeowner who wants the hood to feel like architecture—like it was framed into the house, not hung on the wall later. Shiplap does something special visually: it adds texture without making the kitchen feel busy. That’s why it looks so “finished” in farmhouse and transitional homes, especially when paired with brick, stone, or simple subway tile.
What makes this more than a pretty box is that it includes a ventilator/liner setup rather than forcing you to build everything from scratch. That matters because many decorative wood hoods look incredible, but the insert selection becomes a second project. Here, the idea is more packaged: you get the shell and a working ventilation solution designed to live inside. It’s a helpful bridge between “all-in-one metal hood” and “fully custom shell-only build.”
Real-life buyer notes tend to cluster around three themes:
- It looks high-end once installed—often becoming the favorite part of the kitchen.
- Installation can be confusing for DIYers if instructions are sparse or you haven’t installed a hood before.
- It’s the kind of product you should test early—because if a fan component is faulty, you want to know before it’s mounted and trimmed.
One of the most practical advantages of a shiplap chimney hood is trim flexibility. If your ceiling isn’t perfectly level, a capable installer can adjust the chimney section so the top line looks intentional. That’s the difference between “new hood” and “built-in focal point.” A handyman or contractor can also solve the electrical and mounting pieces quickly, which is why many buyers who love this hood choose professional installation even if they DIY other parts of the remodel.
Bottom line: if you want rustic texture and a big design payoff, this is a strong candidate. Just approach it like a serious install with real planning—not a quick swap.
Why people love it
- True farmhouse focal point – Shiplap texture reads custom and architectural.
- High-end look without building from scratch – Shell + working ventilation concept simplifies the “custom hood” route.
- Trim-friendly chimney – Helpful if ceilings are imperfect or you need slight adjustments.
- Warm, rustic finish – Pairs beautifully with natural materials and classic kitchen palettes.
- Big visual return – The hood becomes a centerpiece, not an afterthought.
Good to know
- Instructions may not feel “DIY friendly”; some buyers prefer a handyman install.
- Test fan/controls early so you catch any issues before final mounting.
- Wood texture and stain can vary slightly; that’s part of rustic character.
Ideal for: farmhouse remodels that want a shiplap centerpiece and prefer a more packaged approach than sourcing a separate insert from scratch.
6. Riley & Higgs Curved Front (White, Decorative Molding) – Luxury Cabinet-Style Presence With Service-Friendly Design
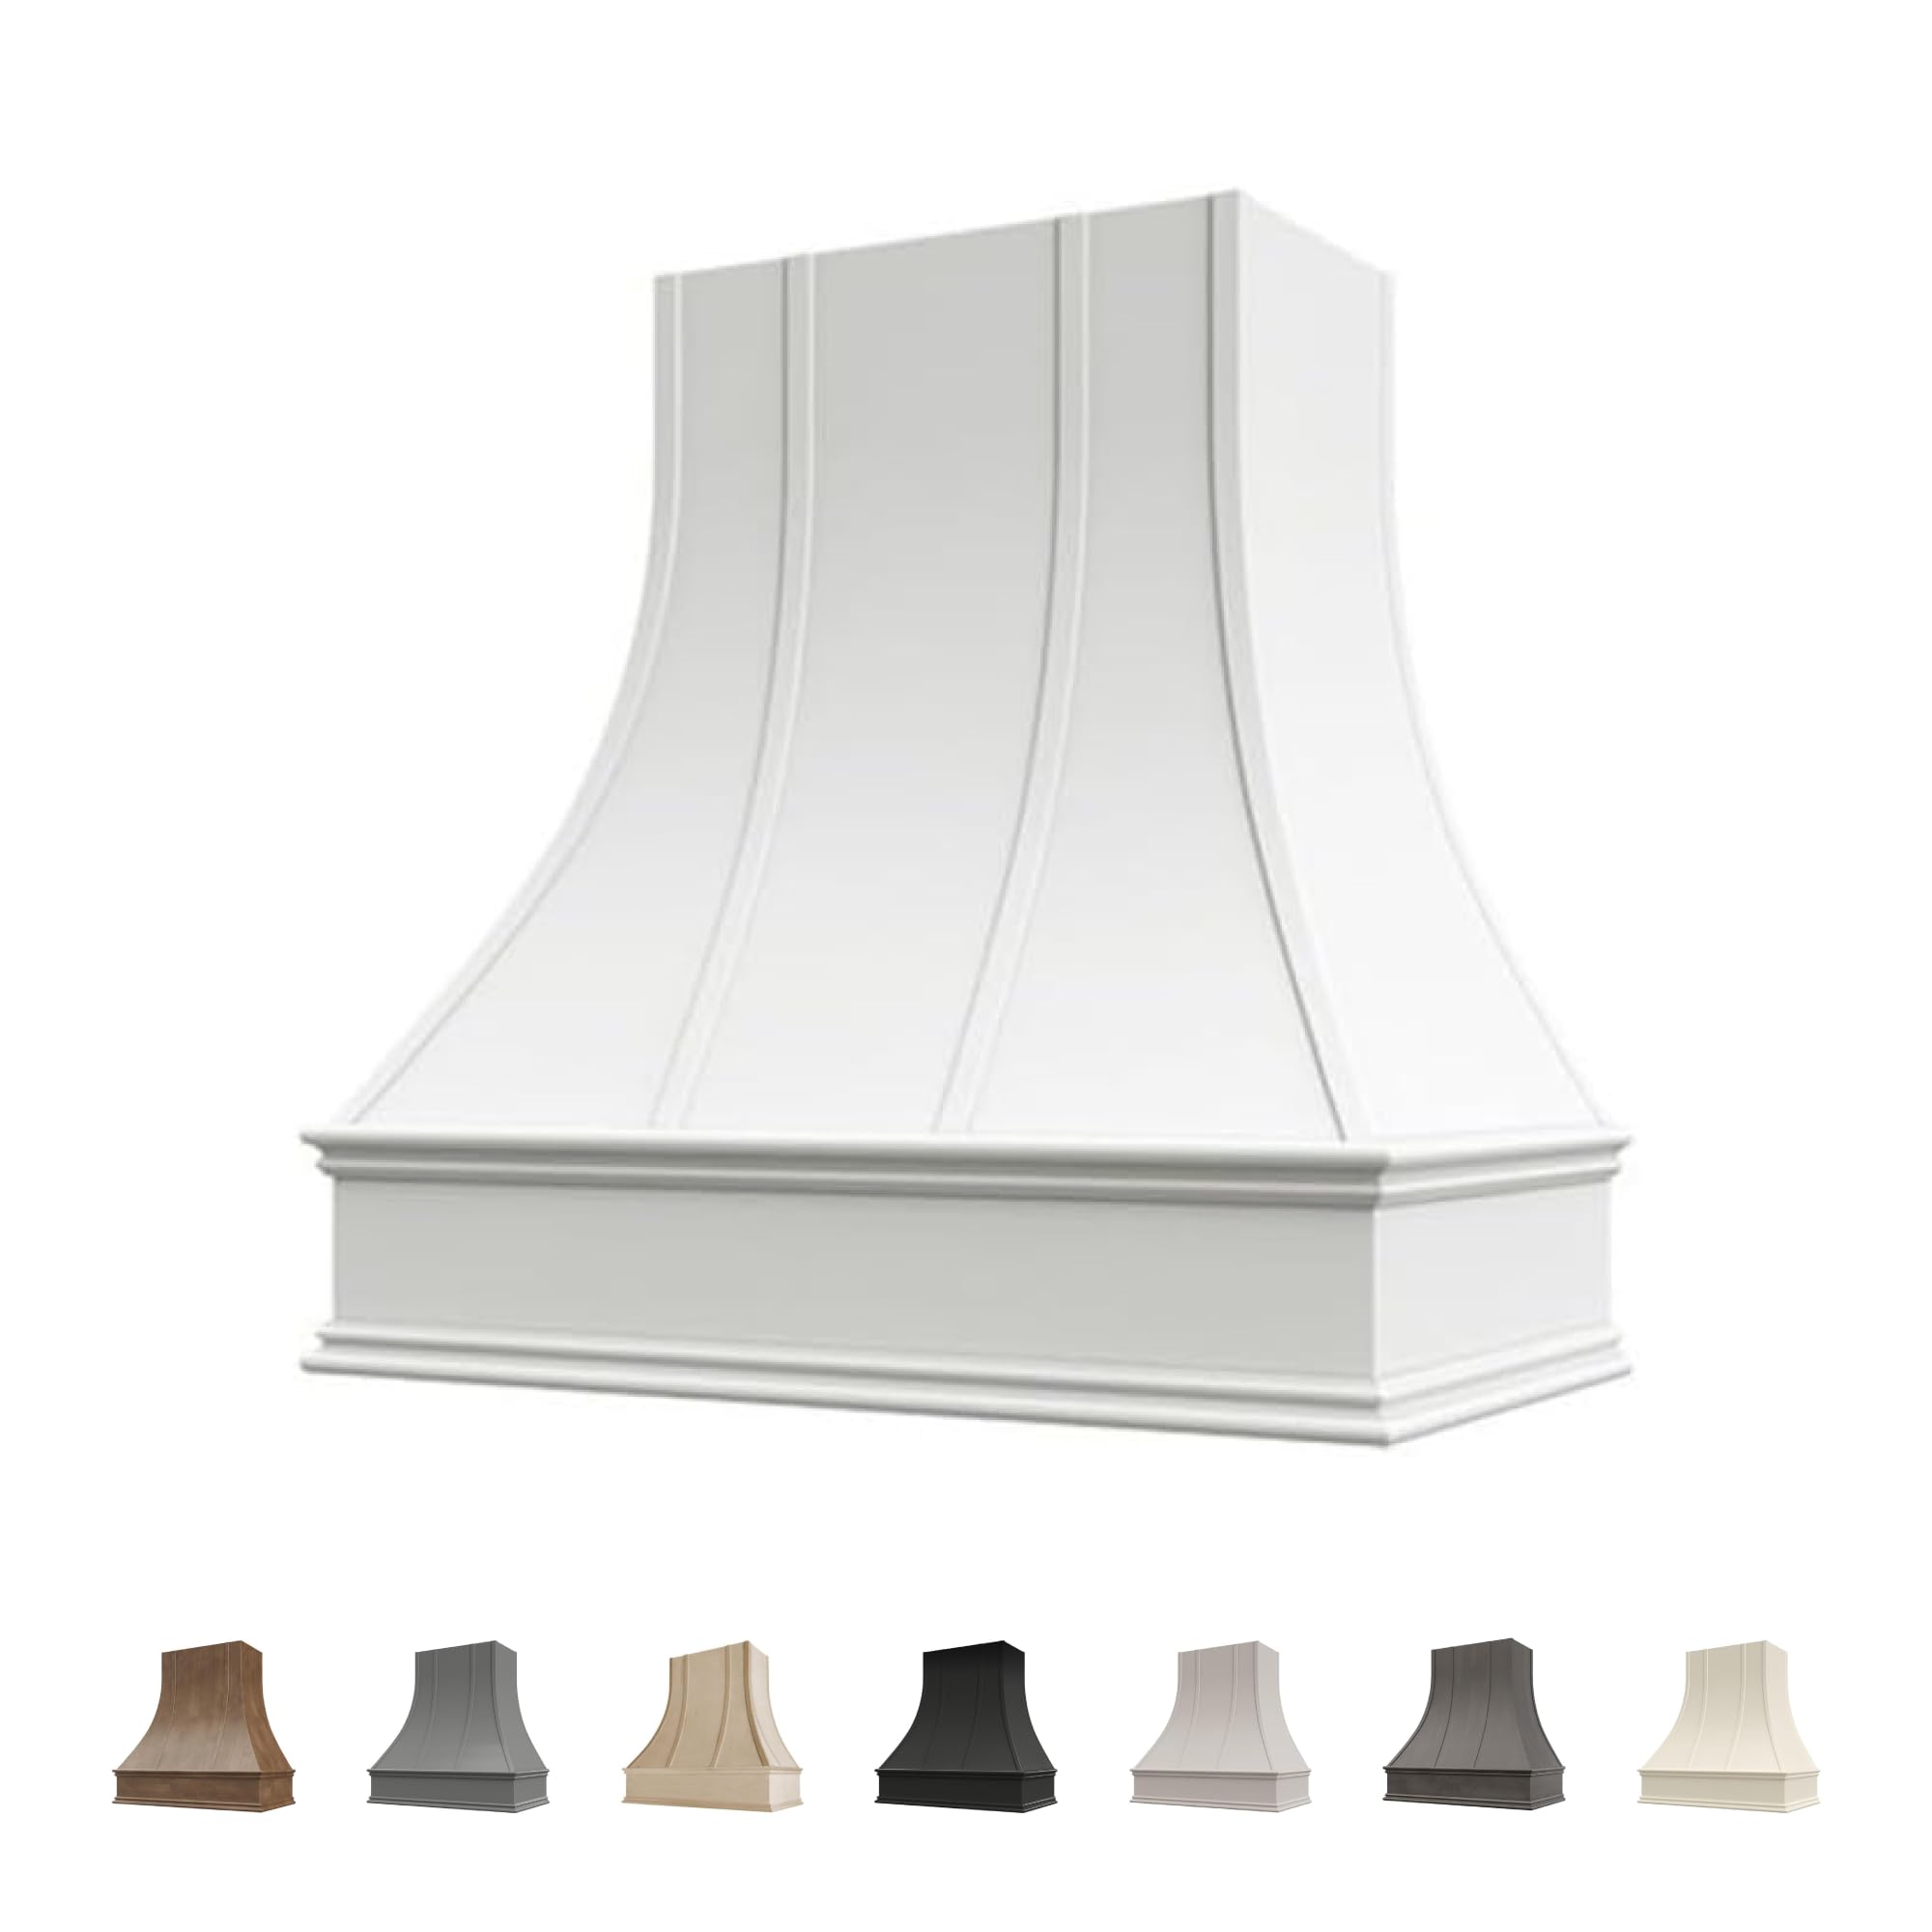
This is the “I want it to look like a custom cabinetmaker built it” option. Riley & Higgs pieces are meant to be decorative façades—wood shells that turn your hood area into a finished architectural feature. If you’re building a kitchen where the hood is the centerpiece (not something you try to hide), this category is the real deal.
Here’s the expert way to think about shell-only hoods: you are buying aesthetics, proportion, and access. You’re not buying airflow directly. Airflow comes from the insert/liner and blower you select and install inside the shell. That’s actually a power move when you do it intentionally, because you can choose an insert that matches your cooking intensity and your duct setup, then wrap it in a façade that matches your design vision.
One standout detail here is the two-piece construction. In the real world, that makes installation easier (you mount the base, install ventilation components, then attach the upper piece), and it makes future service less painful. If you ever need to access wiring, ducting, or the insert itself, this design is more forgiving than a one-piece “giant box” that traps everything behind trim and caulk.
Shipping and handling are part of the ownership experience with premium wood shells. These pieces are typically delivered curbside and require you to move them into the home. That’s not a negative—it’s just part of buying a large, crafted wood component. Plan help, plan space, and plan your sequence: mounting, ventilation, final alignment, then finishing touches.
For buyers who want white cabinetry cohesion, the key is finish harmony. A factory-white shell can look stunning in a white kitchen, but “white” is never just one white. Lighting, undertones, cabinet paint, and wall color all matter. If you’re obsessive about perfect matching, you may prefer an unfinished model you can paint with your cabinet paint. If you want “beautiful and close,” a finished white shell can be a gorgeous shortcut.
Why it feels luxury
- Custom cabinetry vibe – Decorative molding and curved front create a designer focal point.
- Two-piece practicality – Easier installation and easier future access to ventilation components.
- Pairs with your ideal insert – Lets you choose ventilation power separately from exterior style.
- Craftsmanship-first feel – This is a “built” piece, not a thin decorative panel.
- Transforms the whole wall – The hood becomes the anchor feature of your kitchen design.
Good to know
- This is a shell; you still need to choose an insert/liner and blower separately.
- Curbside delivery means you’ll need a plan to move it safely into the home.
- Color matching depends on your kitchen palette; perfectionists may prefer unfinished + custom paint.
- Your final performance depends on the insert you choose and how well the ducting is built.
Ideal for: homeowners doing a design-forward remodel who want the hood to look like a cabinetmaker feature and plan to pair it with a separate insert.
7. Riley & Higgs Sloped Front (Unfinished) – The “Finish It Your Way” Showpiece for Remodel Perfectionists
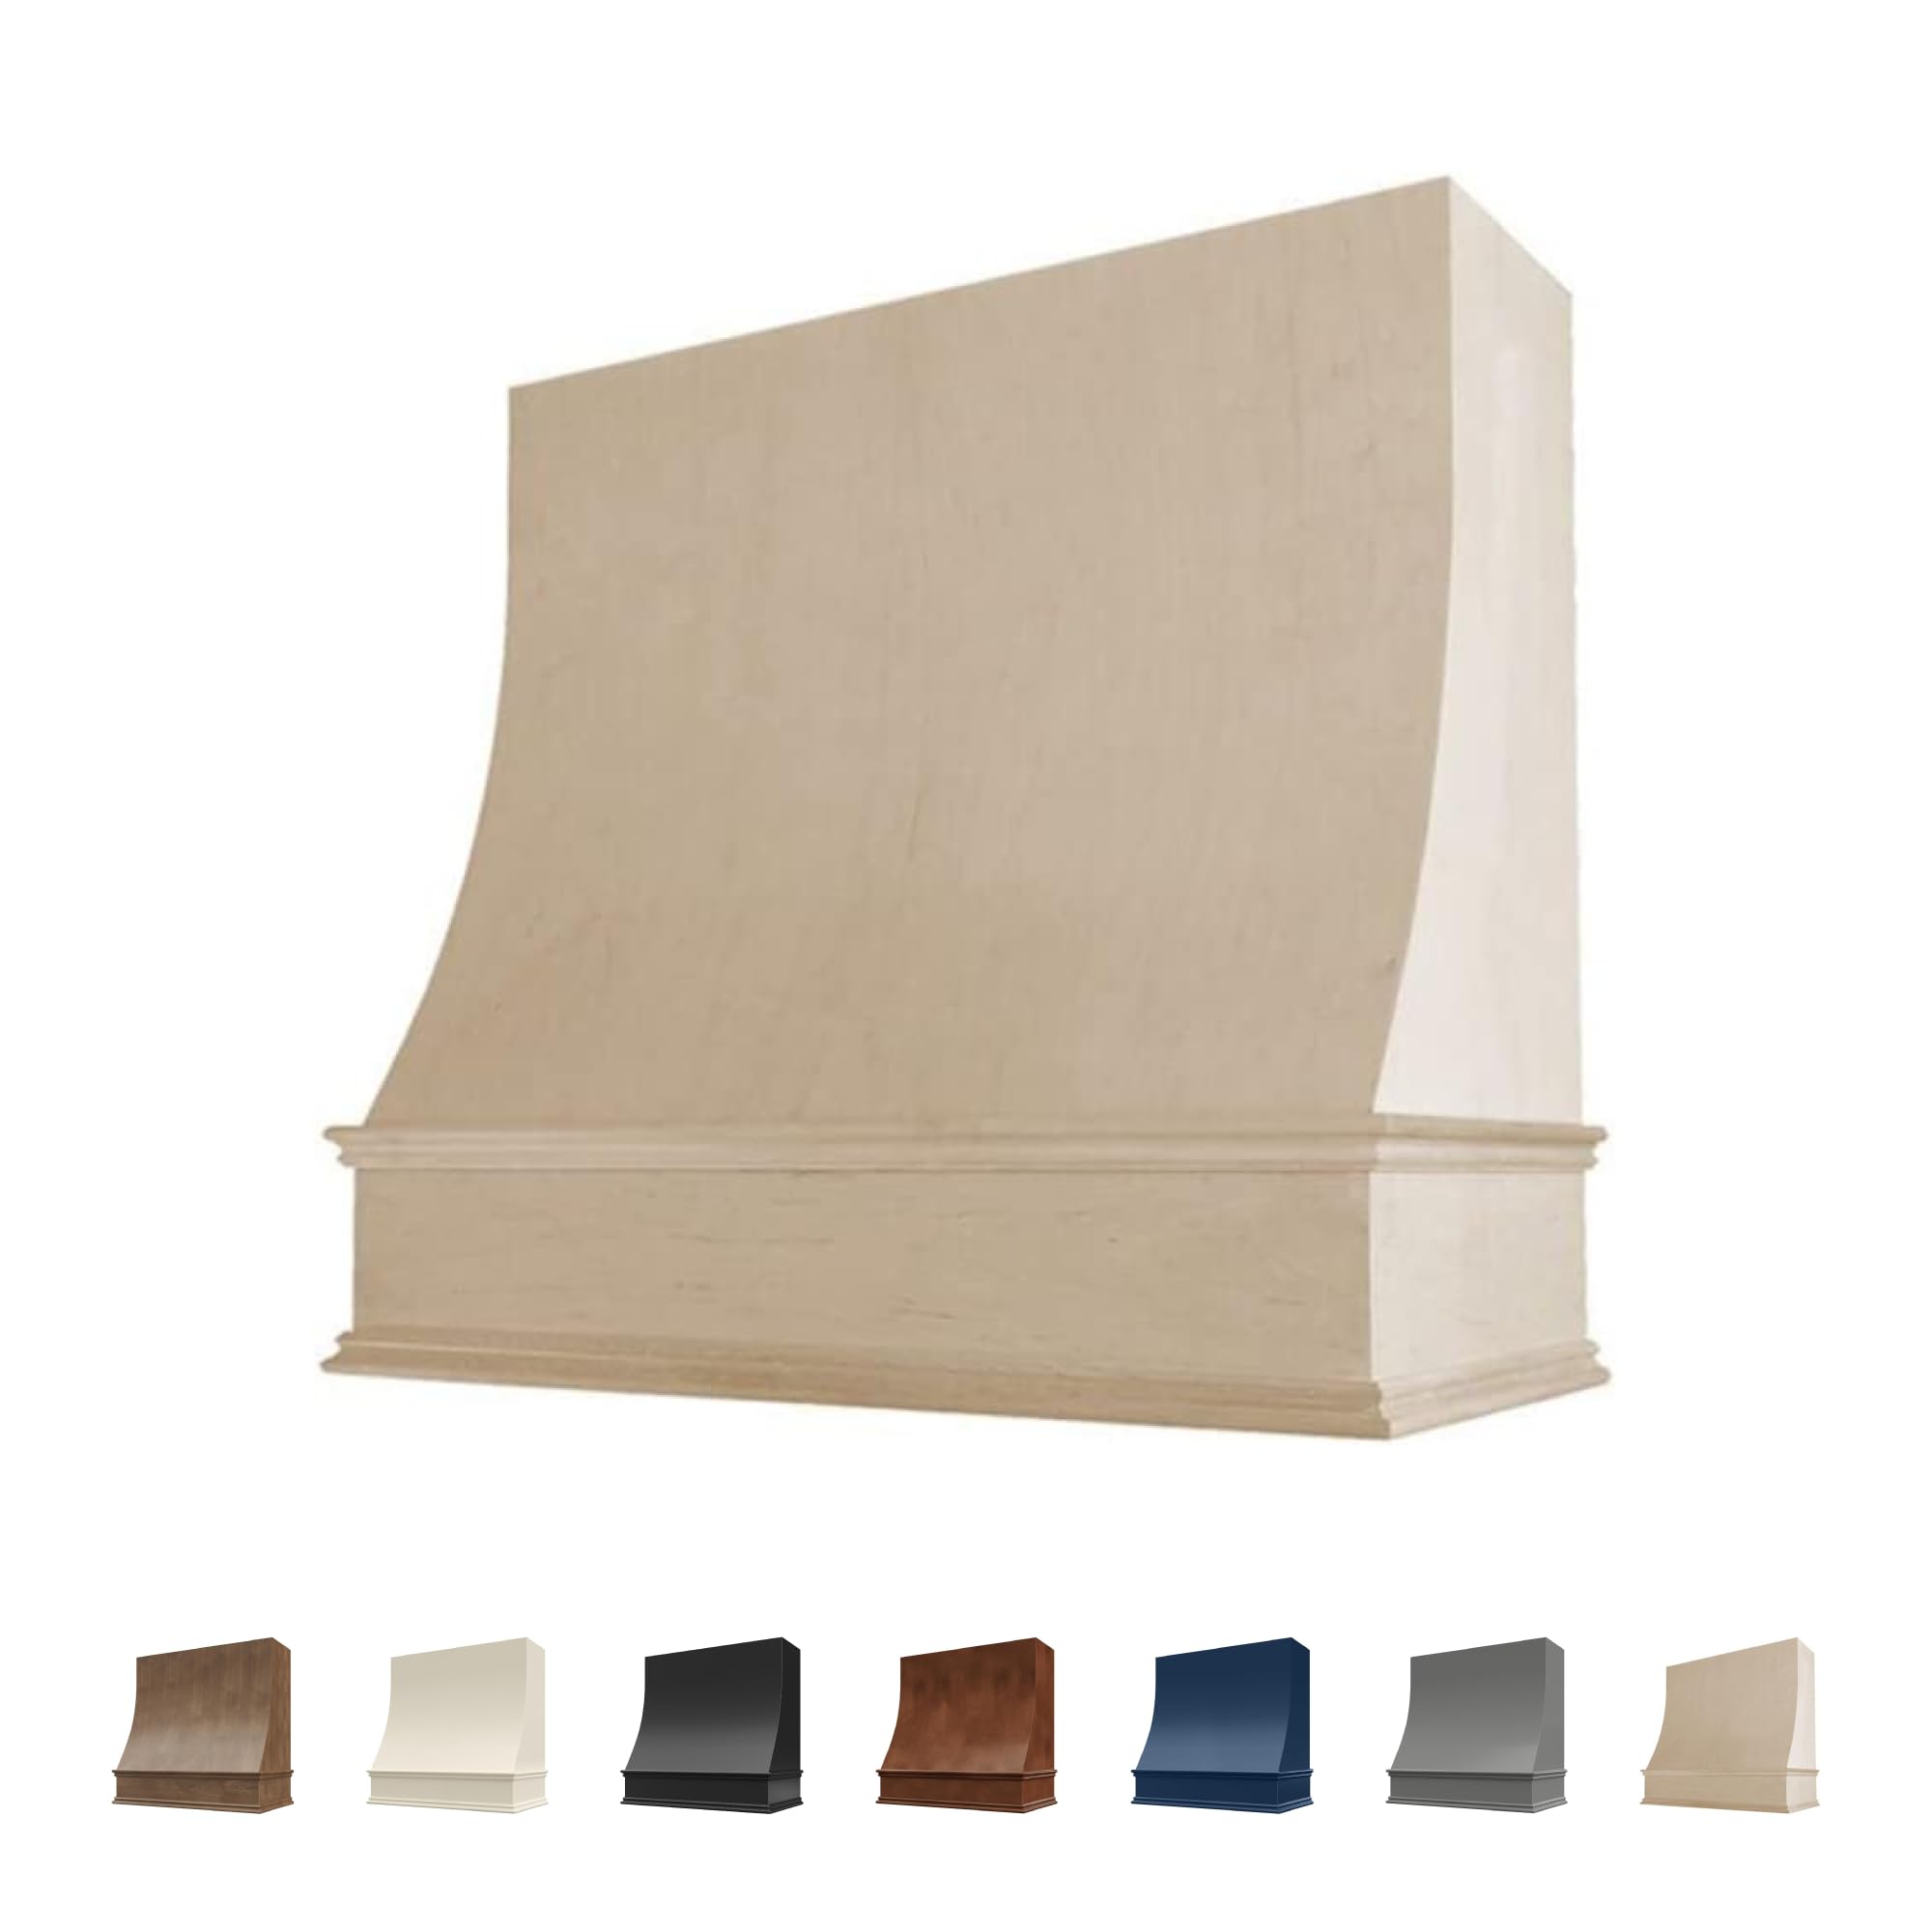
Unfinished wood is the secret weapon of truly cohesive kitchens. If you’ve ever tried to “match white,” you know it’s rarely a match—it’s a negotiation. This sloped-front unfinished shell lets you finish the piece with your exact cabinet paint, stain tone, or specialty finish, so the hood doesn’t look like a separate product. It looks like part of the built-in millwork.
The sloped front shape is also a smart design move. It reads substantial without being boxy, and it can make the hood look taller and more intentional even if your ceiling height is average. That matters in kitchens where you want the hood to feel like a statement but you don’t want it to overpower the room.
Here’s the “expert-level” tip that most people only learn after the fact: choose your insert before you finish your shell. Not because you can’t do it later, but because insert selection affects cutouts, liner alignment, and service access. Many buyers who love shell-only hoods mention the same challenge—finding the right motor/insert to pair with it. That isn’t a flaw in the shell. It’s simply the reality of mixing design components. Solve it early and the whole project becomes smooth.
Finishing strategy matters. Your hood lives above heat, steam, and grease. That’s not scary—just real. If you paint it, use a cabinet-grade paint system and seal edges properly. If you stain it, use a protective topcoat that’s built for wipe-downs. Think of it like cabinetry near a sink: it needs a finish that tolerates life.
When done well, this type of hood is a “showstopper” in the best way. It looks custom because it is custom—custom finished, custom integrated, and visually tied into your kitchen story.
Why it’s a remodel favorite
- Perfect cabinet matching – Unfinished wood lets you use your exact paint or stain.
- Statement shape – Sloped front looks intentional and upscale without feeling bulky.
- Two-piece installation advantage – Easier mounting and easier access to ventilation inside.
- Long-term design flexibility – You can upgrade inserts later without changing the exterior look.
- Feels truly custom – This is how high-end kitchens get their “built, not bought” look.
Good to know
- You must source an insert/liner separately; plan that purchase early.
- Finishing takes time—prime/paint or stain/seal properly for durability.
- Best results come from careful measurement and a thoughtful install sequence.
- Delivery is typically curbside; plan help and space for handling.
Ideal for: homeowners who want a flawless cabinet match and are willing to finish the hood to make it look truly built-in.
8. Riley & Higgs Curved Front Tall (Unfinished) – The Bigger Vertical Presence That Makes a Kitchen Look Finished

This is the hood façade for kitchens that need a stronger vertical anchor. If your ceilings are taller, or your cabinet layout leaves a lot of blank wall above the cooktop, a standard-height hood can look undersized—like it’s floating instead of grounding the space. A taller shell fixes that. It gives the cooking wall “architecture,” and it helps the hood read as an intentional centerpiece.
The curved front profile is especially good at feeling upscale without being harsh. Curves soften a kitchen visually, and they pair beautifully with shaker cabinets, transitional hardware, and warmer stone. And because this one is unfinished, you get the same key advantage: you can finish it to match cabinets exactly, or you can create contrast with a different paint or stain tone.
A practical real-life highlight with taller shells is trim flexibility. Many owners love being able to adjust height during install to accommodate crown molding lines, ceiling quirks, or the exact “landing” point they want. That matters because the most expensive-looking kitchens are the ones where the hood aligns cleanly with cabinetry and trim—not where it’s just “somewhat centered.”
Just like the other shell-only options, your ventilation performance lives inside the insert and ducting. That’s why it’s smart to shop the insert at the same time. Treat the shell as the visual architecture, and treat the insert as the engine. When those two decisions are made together, the result feels pro-level.
If you want the hood to be the star of the room—and you want it to look right at taller heights—this is the type of piece that gets you there.
Why it works in tall spaces
- Taller visual anchor – Helps the cooking wall look finished in higher-ceiling kitchens.
- Unfinished = perfect match – Finish it with your cabinet paint for true integration.
- Curved profile feels premium – Softer, more designer look than a plain rectangle box.
- Two-piece practicality – Easier install and easier future access to the insert.
- Trim-friendly approach – Great when crown molding lines and ceiling levels aren’t perfect.
Good to know
- You still need a separate insert/liner; plan it early so everything aligns cleanly.
- Finishing is part of the project—paint/stain and seal for wipe-down durability.
- Larger pieces require handling planning (delivery, carrying, and mounting support).
Ideal for: kitchens with taller ceilings or large blank wall space where a standard-height hood would look undersized.
9. SNDOAS Matte Black Wall Hood (GD1775BPA) – Clean Modern Lines When You Just Want It Done

This SNDOAS model is a strong pick when you want a clean, modern black hood without turning the decision into a month-long research project. It’s a straightforward wall-mount design with simple controls, basic lighting, and a form factor that looks “right” in many kitchens—especially when replacing an older builder-grade hood or an outdated microwave/hood combo.
The real-life value here is simplicity. Three speeds. Buttons you can understand at a glance. Filters you can remove and clean without tools. If your goal is “make my kitchen feel cleaner and look better,” this kind of unit can do the job—particularly for everyday cooking like simmering, sautéing, and occasional frying.
Where owners tend to land after living with it: they like the look and they like the value, but they learn that painted black surfaces need a gentler cleaning touch. That’s not unique to this model—painted black hoods across brands can show wear if you scrub hard, use aggressive cleaners, or treat the finish like bare stainless. The right approach is mild soap, soft cloth, and patience. It’s the difference between a hood that stays sleek and a hood that starts looking tired.
Lighting is another “real life vs listing” moment. Some buyers find the light useful and bright enough; others think it looks cheaper than expected or positioned in a way that creates a small pool of light rather than a broad wash across the cooktop. Here’s the honest take: if you already have under-cabinet lighting or good ceiling lighting, hood lights become support lighting. If you rely on hood lights as your main task light, choose a hood known for better lighting placement.
As a budget-friendly wall hood, this is best when you want a solid upgrade, simple controls, and a clean aesthetic—without expecting boutique-level detailing.
Why it’s a smart budget choice
- Modern matte black look – Clean pyramidal profile upgrades a cooking wall quickly.
- Simple controls – Buttons are intuitive and reliable for daily use.
- Convertible setup – Can be vented outside or set up for recirculating with optional carbon filters.
- Easy filter maintenance – Removable filters keep upkeep straightforward.
- Good “replace the old hood” path – Especially helpful when swapping an existing vent.
Good to know
- Painted finishes require gentle cleaning; harsh scrubbing can reduce long-term “new” look.
- Lighting quality and placement may feel basic compared to premium models.
- Best performance still depends on ducting quality and installation tightness.
Ideal for: homeowners who want a clean modern hood upgrade with straightforward controls and maintenance—without paying for premium materials or advanced electronics.
10. SNDOAS Matte Black Wall Hood (Button Control) – A Quick Win for First-Time Hood Buyers

If you’re buying your first wall hood—or you’re replacing something old and you just want a noticeable improvement without overthinking it—this is a simple, affordable path. The design is classic: a chimney-style pyramidal hood that fits many kitchen layouts, with basic button controls and a practical filter setup.
Real-life feedback on budget hoods often sounds like this: “It looks great, it was easy to install, and it helps.” That’s the lane this hood lives in. For everyday cooking, having any dedicated hood that pulls steam and odor away is a meaningful upgrade. The three-speed setup gives you a low setting for daily simmering, and higher settings for stronger cooking events. Expect the top speed to be louder—that’s normal in this category—and treat the mid setting as the “most used” day-to-day option.
The biggest mistake buyers make with budget hoods is expecting the same “feel” as premium models. Premium hoods often have heavier steel, smoother switches, better lighting diffusion, and more refined internal airflow design. Budget hoods can still do real work, but they shine most when you treat them as a clean, simple function-first appliance.
A common point of frustration in this category is airflow expectation. Some buyers question whether claimed airflow matches what they feel in the kitchen. The practical fix is system thinking: keep filters clean, minimize duct restrictions if venting outside, and avoid unnecessary duct reducers. If you use it ductless, remember that carbon filters need regular attention, because saturated carbon reduces odor control quickly.
If your goal is a fast, affordable upgrade that looks modern and performs well enough for daily meals, this hood can be a very satisfying choice—especially when installed carefully and maintained consistently.
Why it works for many homes
- Affordable functional upgrade – A simple path to better kitchen air for everyday cooking.
- Classic chimney profile – Fits many kitchens and looks more upscale than basic under-cabinet vents.
- Easy controls – Button layout is simple and practical when cooking quickly.
- Removable filters – Maintenance is straightforward when you keep a schedule.
- Ducted/ductless flexibility – Works for different home constraints with optional carbon setup.
Good to know
- Expect more noise on high speed; most owners live on low-to-mid settings.
- Budget lighting may not feel premium; treat it as basic task support lighting.
- Like many value hoods, perceived performance improves dramatically with good ducting and clean filters.
Ideal for: first-time hood buyers and budget-focused kitchens that want a clean look and practical everyday performance without premium add-ons.
How Ventilation Performance Actually Works (and Why Your Setup Matters)
Here’s the truth: a hood is only as good as the system around it. The hood body, the ducting path, the filter type, and the mounting height all work together. When people say, “This hood is amazing,” what they usually mean is, “My kitchen finally clears fast and doesn’t feel greasy.” That outcome comes from capture + airflow + low resistance.
What makes a hood feel “effective” in real kitchens
- Capture area over the burners – Wider and deeper coverage catches more plume before it spreads.
- Correct mounting height – Too high reduces capture; too low can feel cramped and can interfere with tall cookware.
- Usable mid-speed performance – The best hoods feel effective before you hit max speed.
- Low turbulence design – Smooth internal airflow means less “howling” and better real-world clearing.
- Grease filtration that stays clean – A clogged filter makes a hood feel weak even if the motor is strong.
That’s why some kitchens feel dramatically better after a hood upgrade even when the homeowner didn’t change cooking habits. They simply installed a hood that captures better and is easy to run daily.
Performance upgrades that don’t require buying a new hood
- Clean filters on a schedule – Make it easy: dishwasher routine or soak-and-rinse habit.
- Reduce duct resistance – Fewer sharp elbows, fewer reducers, smoother transitions.
- Seal vibration points – A small vibration can sound like a “loud motor” if the mount isn’t solid.
- Use the hood earlier – Start it before smoke builds; it captures better when it’s already moving air.
- Choose the right speed – Low for daily, mid for most cooking, high for searing/frying or strong odors.
In most homes, the fastest improvement is simple: keep filters clean and avoid ducting bottlenecks. A hood that “should” be powerful can feel weak if the air has nowhere easy to go.
FAQ: Choosing a Hood Setup Without Regret
Should I buy an all-in-one hood or a decorative wood shell?
What’s the smartest way to choose the right size?
Why do some hoods feel loud even when the specs seem normal?
I want ductless. Will it still help with odors?
How do I keep black painted or wood finishes looking good long-term?
What’s the biggest mistake buyers make with shell-only hoods?
Final Thoughts: Pick a Range Hood Cover You’ll Love Every Day
The right hood choice makes your kitchen feel cleaner, calmer, and more “finished.” The wrong choice can look great in photos but feel annoying in daily life—loud, hard to clean, or oddly weak because it wasn’t matched to your ducting and cooking style.
Here’s the simplest way to choose confidently from this list:
- Want the best all-around built-in look with a complete system? Start with the ZLINE Wooden Wall Mount (Cottage White). It’s the “custom kitchen shortcut” that still gives you a practical hood setup.
- Cook hard and want real clearing power? Choose the IKTCH 36" Black Wall Mount. It’s built for smoke-heavy cooking and has the kind of airflow capacity that feels like a true upgrade.
- Want warm farmhouse style without losing everyday usability? The ZLINE Wooden Wall Mount (Rustic Dark) brings texture and mood while still acting like a real hood.
- Want the “designer statement” metal centerpiece? Look at the ZLINE Hand-Hammered Copper. It’s the fastest way to make a kitchen look intentionally styled.
- Love shiplap texture and want a bold farmhouse focal point? Consider the Castlewood Rustic Shiplap Chimney. It’s a centerpiece move—especially in rustic and transitional homes.
- Doing a true custom build with a separate insert? Go with a premium wood façade like the Riley & Higgs Curved Front (White), or choose a finish-your-own option like the Riley & Higgs Sloped Front (Unfinished) or Riley & Higgs Curved Front Tall (Unfinished). These are the “make it look built, not bought” choices.
- Need a budget-friendly modern black hood upgrade? The SNDOAS Matte Black Wall Hood (GD1775BPA) and SNDOAS Button-Control Wall Hood are solid “quick win” upgrades when you want better air and a cleaner look without a premium build.
Choose the range hood cover that matches how you actually cook, how your ducting is built, and how you want your kitchen to feel when you walk in. If you get that match right, you won’t need another guide—you’ll just enjoy a cleaner, calmer kitchen every day.
