A “tough steak problem” is almost never really about the steak. It’s about the moment you realize your weeknight dinner plan is about to turn into a chewing workout. You can marinate longer. You can buy a pricier cut. Or you can do what butchers (and a lot of hunters) have done forever: mechanically break down the fibers so the meat cooks and chews the way you hoped it would.
If you’re shopping for a meat tenderizing machine, you’re not looking for a cute gadget. You’re looking for control: control over texture, control over flavor penetration, control over cook time, and honestly… control over whether your family says “this is AMAZING” or quietly reaches for more sauce.
Here’s the part most buying guides get wrong: they treat every tenderizer like it’s the same tool with a different logo. But in real kitchens, the user experience is everything. The “best” unit isn’t just the one with more blades. It’s the one that doesn’t jam mid-batch, doesn’t slide across your counter, doesn’t make cleaning feel like a punishment, and doesn’t leave you guessing whether you actually improved the meat—or just flattened it.
This guide is built around the friction points that show up in real ownership: how the feed throat behaves with wider steaks, what happens when the meat has a little fat, how easy it is to disassemble without tools, whether the base actually stays put, and what owners say after months of use (not five minutes after unboxing).
Below are 12 standout picks—manual cubers that make butcher-style cube steak at home, 2-in-1 jerky slicer/tenderizers, a true commercial electric option, and a couple of “workflow upgrades” that turn marinating and batch prep into something you can do on a random Tuesday without planning your life around it.
In this article
How to Choose the Right Meat Tenderizing Machine
The right choice isn’t about being “more powerful” on paper. It’s about getting the texture you want—consistently—without turning prep into a chore. I like to think of tenderizing tools as a workflow decision: what problem are you solving, how often do you solve it, and how much cleanup you’ll tolerate to get there.
1. Start with the result you want (not the tool)
“Tender” can mean three different things, and choosing the wrong mechanism is why so many people buy a tenderizer… and then stop using it.
- Butcher‑style cube steak texture: You want a blade/knife cuber that creates a tight grid pattern and breaks up long fibers. This is the “chicken fried steak” effect.
- Fast marinade penetration + softer bite: You want controlled piercing (needle/blade action) without shredding the meat. Great for lean game and weeknight grilling.
- Uniform strips for jerky / cheesesteaks / fajitas: You want a slicer roller or 2‑in‑1 system so every piece cooks and dehydrates evenly.
2. Understand the three big machine styles (and what they do to meat)
This is where we go beyond the spec sheet. Here’s what the tools do in the muscle—the difference you’ll actually taste and feel.
Blade/knife cubers (roller-style)
These are what a lot of people imagine when they picture a “real” tenderizing machine. Two rollers with knife sets rotate and cut into the meat as you crank (manual) or feed (electric). The goal is not to flatten the steak—it’s to sever stubborn connective tissue and shorten the long muscle fibers that make cheap cuts feel chewy.
- Best for: round steak, venison, tougher beef cuts, pork cutlets, cube steak, and batch prep.
- What separates great from frustrating: comb design (prevents wrapping/jams), throat size, and how quickly the unit disassembles for cleaning.
2‑in‑1 slicer/tenderizer systems
These are the workhorses for jerky households. One roller set slices uniform strips. The other roller set tenderizes. The win is consistency: uniform thickness means uniform results—no “half-dry, half-chewy” batches.
- Best for: jerky, cheesesteaks, fajitas, stir-fry strips, and families who process a lot of meat at once.
- What separates great from “ugh”: how easily you can swap rollers and how painful the cleanup is after fat, seasoning, or sticky marinades.
Flavor and workflow accelerators (marinators + add-ons)
Not every “tender” bite comes from cutting fibers. Sometimes the real win is time and flavor distribution: evenly coating meat, driving marinade into tiny gaps, and doing it without leaving raw meat sitting in the fridge forever.
- Best for: meal preppers, busy households, and anyone who wants “marinated taste” fast.
- What separates great from gimmick: airtight sealing, drum rotation, and easy-to-clean design.
3. Manual vs. electric: it’s less about power and more about control
Electric machines shine when you have volume, a tight timeline, or a small business workflow. But manual machines have one underrated superpower: they let you “feel” the meat. That feedback matters because it tells you if the cut is too thick, too cold, too fatty, or too uneven.
- Choose manual if: you want precision, you’re working with varied cuts (especially game), and you don’t mind cranking for a few minutes.
- Choose electric if: you’re doing big batches regularly and you want speed with minimal effort—provided you’re ready to clean and maintain a larger unit.
4. Throat width and thickness limits are not “minor specs”
This is one of the biggest real-life heartbreaks: you buy a machine, then realize your normal steaks don’t comfortably fit the feed throat. A wider throat is not just convenience—it prevents “forced feeding,” bunching, and uneven tenderizing.
- Wide-throat machines are friendlier for big round steaks, broad venison cuts, and batch cubing.
- Narrower machines can be perfect for small kitchens and smaller cuts—but require more trimming and portioning.
5. Counter stability is everything (and it’s usually the deciding factor)
If a tenderizer slides while you crank, two things happen: (1) you hate using it, and (2) you put your fingers in risky positions. Stability comes in three common forms:
- C‑clamps: Most reliable. Great if you don’t mind clamping to a counter or table edge.
- Suction bases: Great on smooth surfaces, frustrating on textured counters. Some units stick like a champ once you learn the “press down then lock” technique.
- Heavy set feet: Better than nothing, but many owners end up adding non-slip pads or rubber feet for confidence.
6. Cleaning is the hidden cost (so plan your cleanup before you buy)
Tenderizers fail in real kitchens for one reason: nobody wants to spend ages cleaning sharp parts. If cleanup is unpleasant, your machine becomes “special occasion only,” and then becomes “why did we buy this?”
- Look for tool-free disassembly: latches or hand screws beat tiny bolts.
- Prioritize open access to rollers: if you can rinse and brush safely, you’ll actually clean it properly.
- Decide your rule: either “wash immediately after use” or “don’t buy a machine that punishes you if you wait.”
Many experienced owners keep a dedicated long-bristle brush just for tenderizer blades. That small habit turns cleanup from stressful to routine.
7. A quick word on safety (because it affects your cooking habits)
Mechanical tenderizing creates tiny channels and cuts. That’s the point. It’s also why smart cooks treat tenderized meat with respect: cook it properly, keep surfaces clean, and don’t let raw juices cross-contaminate.
The good news: once you adopt a clean workflow, these machines are incredibly satisfying. The best ones let you make “butcher-quality results” at home, with cheaper cuts, in less time—and that’s the kind of upgrade that pays you back every week.
Quick Comparison: 12 Meat Tenderizing Machine Picks
Use this table to identify the models that match your reality (home cooking, jerky batches, hunting season prep, or small commercial volume), then jump into the reviews for the details that matter—like jamming behavior, counter stability, and how owners describe cleanup after real use.
On smaller screens, swipe or scroll sideways to see the full table.
| Model | Type | Real-life strength | Best match | Amazon |
|---|---|---|---|---|
| Hakka Commercial Meat Tenderizer (7" / 37‑blade) | Manual cuber | “Butcher-style” results with a wide throat and solid, stainless feel | Most home cooks + hunters who want dependable cube steak results | AmazonCheck Price |
| Weston Manual Meat Cuber/Tenderizer (07‑3101‑W‑A) | Manual cuber | Durability-first design with a long reputation for consistent cubing | People who want a “buy it once, keep it forever” style tool | AmazonCheck Price |
| Valley Sportsman 2‑in‑1 Tenderizer + Jerky Slicer | 2‑in‑1 | One unit for “tenderize” days and “uniform jerky strips” days | Jerky households that also want tender steaks without extra gear | AmazonCheck Price |
| VEVOR Commercial Electric Tenderizer (450W) | Electric | High-throughput tenderizing for big batches with minimal effort | Small commercial kitchens or heavy home batch prep | AmazonCheck Price |
| LEM BigBite Electric 2‑in‑1 Jerky Slicer/Tenderizer (602TJ) | Motorized | Dedicated machine for slicing strips and tenderizing tough cuts fast | Serious jerky makers who want a stand-alone powerhouse | AmazonCheck Price |
| LEM BigBite 2‑in‑1 Attachment (for grinders) | Attachment | Turns your grinder into a slicer/tenderizer station | LEM/BigBite grinder owners who want one modular ecosystem | AmazonCheck Price |
| VEVOR Multi‑functional Processing Motor (CT‑8) | Power add‑on | Upgrades manual batch processing workflows into “push button” mode | Sausage makers / batch prep cooks building an electric workflow | AmazonCheck Price |
| Hakka Meat Tenderizer (5" / 27‑knife) | Compact cuber | Stainless build in a smaller footprint for everyday kitchen use | Smaller kitchens that still want true cubing performance | AmazonCheck Price |
| YBSVO Commercial Manual Cuber (7" feed / 40 blades) | Wide-feed manual | Sharp blades + wide throat for big cuts (with smart technique) | Hunters and bulk cookers who want wide feeding without electric | AmazonCheck Price |
| Paladin Equipment 2‑in‑1 Tenderizer + Jerky Slicer | 2‑in‑1 | Rugged feel with clamps—popular for deer processing and jerky runs | People who want “one machine” for jerky and tenderizing | AmazonCheck Price |
| STX Chef’s Elite Vacuum Marinator & Tumbler | Marinator | Flavor penetration in minutes + rotating mix action for consistency | Meal preppers who want “marinated taste” without waiting overnight | AmazonCheck Price |
| Cofun Manual Meat Tenderizer Tool (stainless gear) | Budget manual | Quick batch tenderizing with suction stability (once you learn it) | First-time buyers who want a simple manual option for home use | AmazonCheck Price |
In‑Depth Reviews: 12 Tenderizing Setups People Actually Keep Using
Now we go model by model. This is where the “real life” stuff shows up: how the machine behaves when the meat is uneven, how owners handle cleaning without losing a fingertip to sharp rollers, and which designs feel calm and controlled versus fiddly and stressful.
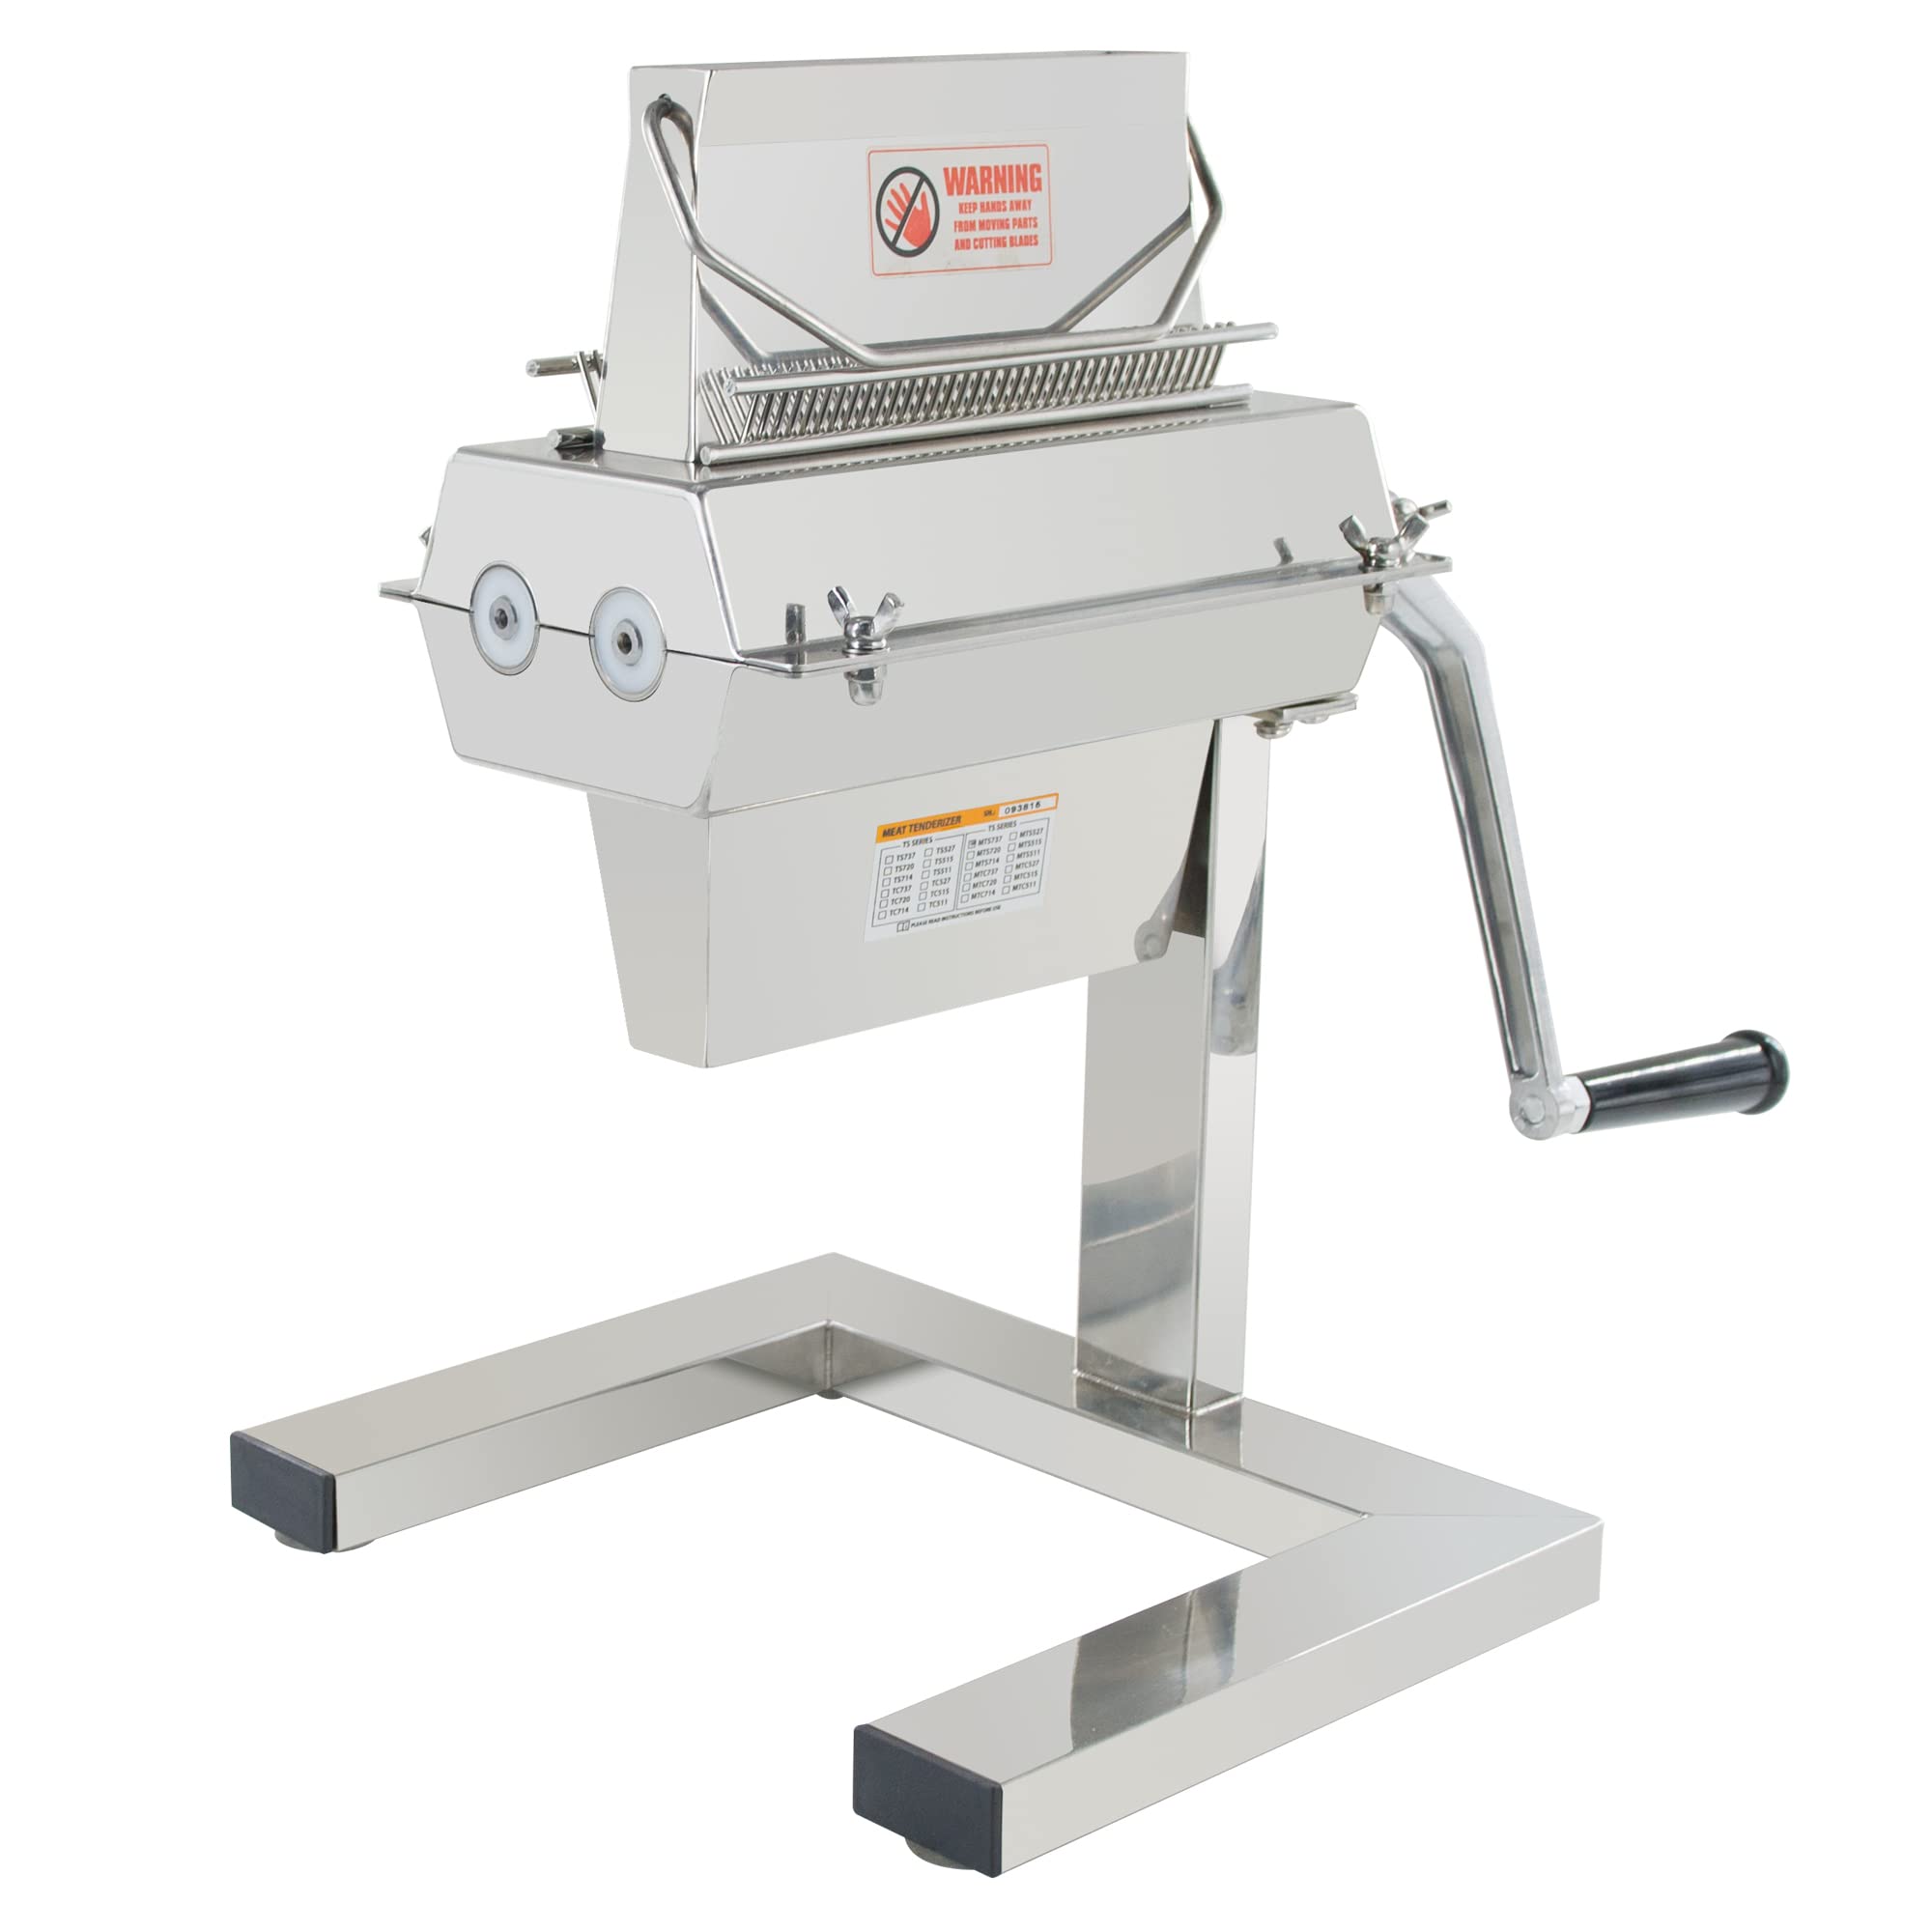
1. Hakka Commercial Meat Tenderizer (7" / 37‑blade) – The “Butcher Counter” Feel at Home
 Check Latest Price
If you’ve ever bought cube steak from a butcher and thought, “How do they get it that consistent?”, this is the style of machine that answers the question. The Hakka 7-inch unit is built around a wide throat and dual blade rollers that cut through connective tissue instead of just squashing the meat. The result is that classic “shorter fibers, easier chew” texture—especially noticeable with round steak, venison, and lean cuts that normally fight back.
What separates the Hakka from many look-alikes is the “use it like a grown-up” feel: it’s hefty, the blade rollers are substantial, and owners routinely describe it as sturdy enough for repeated batches without feeling flimsy. That matters because tenderizing is not a single gentle pass—it’s often a small process: one pass, rotate the meat 90 degrees, second pass, then decide if a third is needed for your preferred “cube steak” level.
In real kitchens, the Hakka shines most when you treat it like a station. Set it up on a stable surface (smooth surfaces help if you rely on suction), lay out your cutlets, and run a batch. That batch approach is exactly why hunters love units like this: you can process steaks and cutlets for the freezer, and suddenly your “tough meat” meals become quick, reliable, and something people actually look forward to.
The honest tradeoff is common to almost every true cuber: the rollers are extremely sharp, and cleaning requires attention. Owners who love this category usually develop the same habit: clean immediately, use a long brush, and handle rollers by the ends rather than gripping near blades. That’s not a “downside” so much as the cost of a machine that actually cuts fibers.
Why it earns “best overall”
- Wide feed makes life easier – Less trimming and folding, more consistent passes.
- True cubing effect – The texture change is obvious on tougher cuts and game meat.
- Sturdy stainless feel – Owners often describe it as “built to last” rather than a disposable gadget.
- Great for batch prep – Perfect if you like processing a lot at once and freezing meal-ready portions.
Good to know
- Like most cubers, it demands a cleaning routine—waiting too long makes cleanup harder and less safe.
- Suction/feet performance depends on your counter surface; textured counters often need a board or mat strategy.
- Expect a brief learning curve on “ideal thickness” so the crank feels smooth instead of strained.
Ideal for: home cooks and hunters who want butcher-style results without buying a huge commercial machine, and who are willing to adopt a simple “clean right away” habit.
2. Weston Manual Meat Cuber/Tenderizer (07‑3101‑W‑A) – Built Like a Tool, Not a Toy
 Check Latest Price
Weston sits in that rare category of “old-school equipment you end up trusting.” People don’t buy this one because it looks fancy. They buy it because they want a unit that feels engineered for years of use—especially if they’re tenderizing tough beef, processing venison, or trying to recreate the cube steak their family grew up eating without pounding meat for ages.
A common theme in real owner feedback is the “workflow joy” of it: clamp it down, turn the handle, and in seconds you get meat that’s visibly altered. What used to be a noisy, tiring mallet session becomes an efficient, repeatable process. That matters more than it sounds—because when the tool is fast, you’re more likely to use it regularly. And regular use is how you stop “buying only expensive cuts” out of fear of toughness.
Here’s the deep detail that separates happy owners from frustrated ones: feeding consistency. Machines like the Weston work best when you prep the meat for the machine—trim hard edges, cut the piece so it sits flat, and avoid overly thick folds that bunch at the throat. Some owners even wish for a dedicated push stick/plunger for perfectly even feeding. The included tongs help, but a true pusher would make the process even smoother, especially for small chunks or stew-meat-style pieces.
On the cleaning side, this is one of the reasons Weston’s reputation stays strong: disassembly is straightforward, and people consistently mention that cleanup is reasonable for a device with sharp rollers—provided you don’t let it sit. A quick hot rinse, a brush pass, and you’re done. Skip that step, and you’ll spend longer and feel less safe doing it.
The best use-case for Weston is the one most “AI guides” ignore: angle and direction control. If you want true cube steak texture, run the meat through once, then rotate 90 degrees and run again. The second pass creates that dense grid that changes chew dramatically. That simple technique is why this tool can make a cheap cut feel like a totally different product.
Why people keep it for years
- Durable construction – Owners consistently describe it as sturdy, well-built, and “not flimsy.”
- Fast cubing results – One or two passes can dramatically change texture and tenderness.
- Clamp stability – When clamped, it’s rock-solid and feels safe to operate.
- Batch processing friendly – Great for prepping multiple meals and freezing portions.
Good to know
- Some users wish it included a true push stick for more even feeding on small pieces.
- Cleaning requires attention to sharp edges—use a brush and handle rollers carefully.
- If you expect “set it and forget it,” this is still a hands-on tool—best used with a simple prep routine.
Ideal for: cooks who want a long-term, no-nonsense cuber for tough cuts, game meat, and classic cube steak—especially if you like tools that feel genuinely durable.
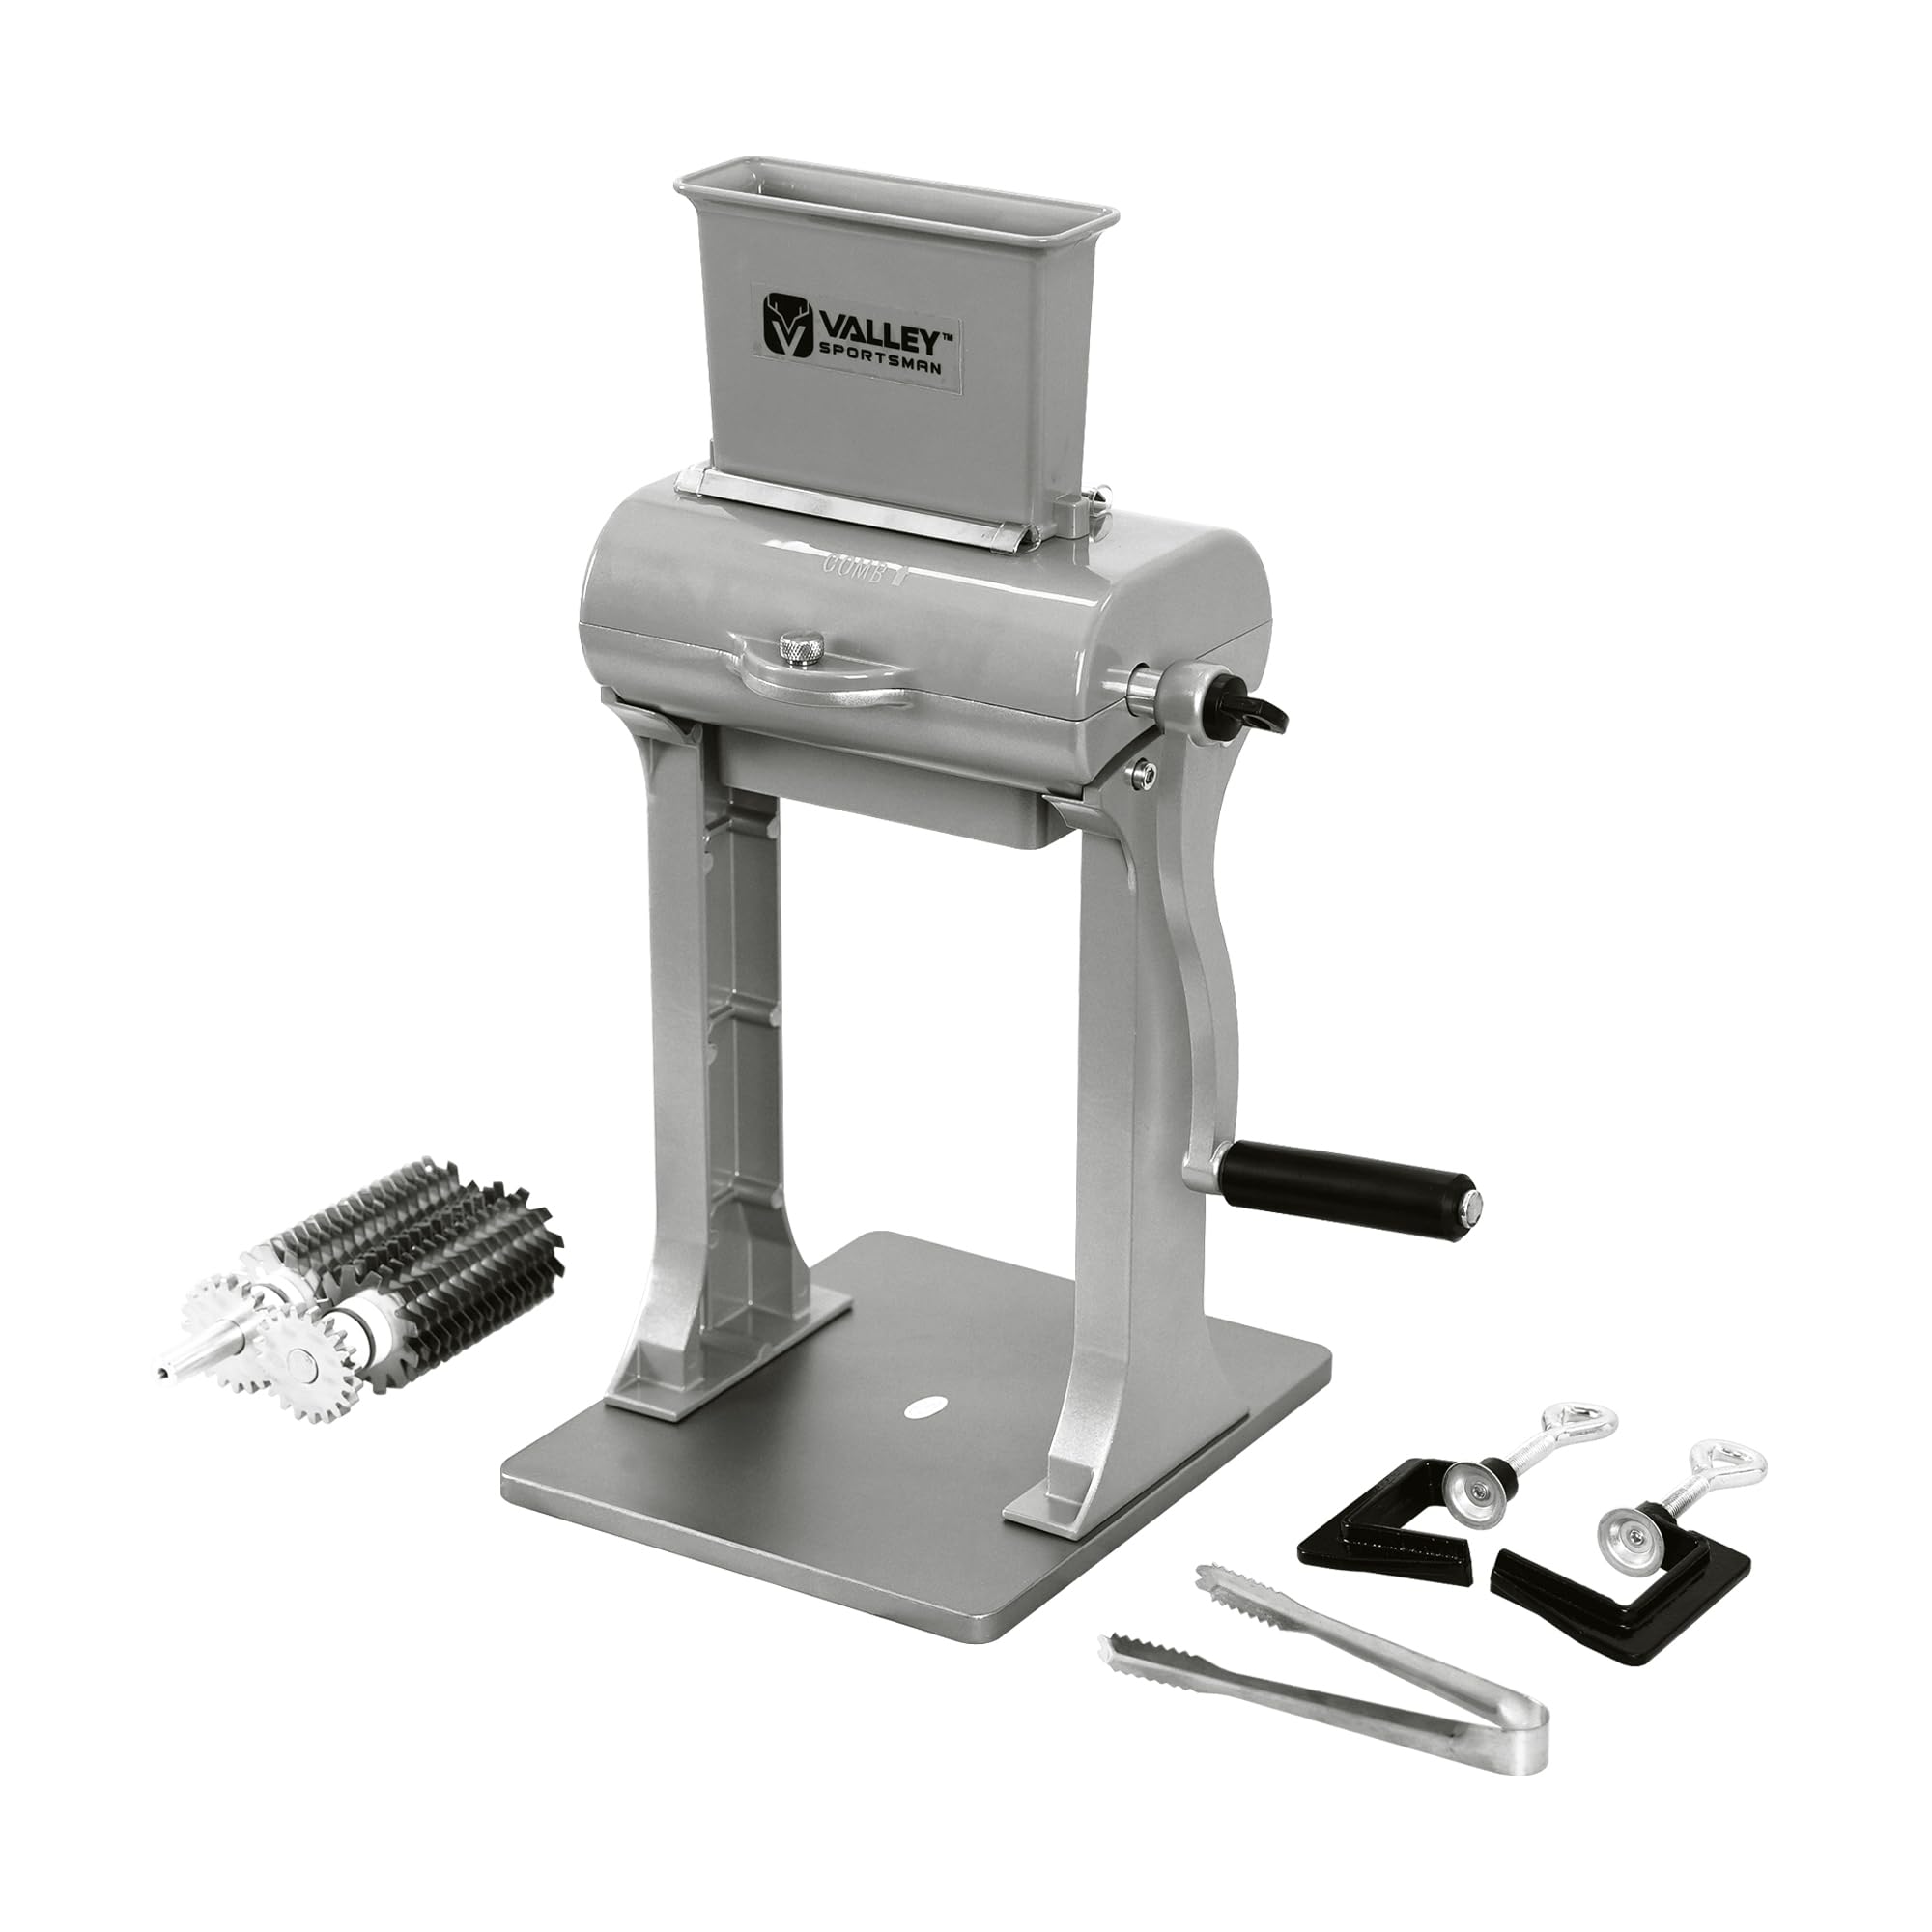
3. Valley Sportsman 2‑in‑1 Tenderizer + Jerky Slicer – One Machine, Two Real Jobs
 Check Latest Price
A lot of “2‑in‑1” kitchen tools are a compromise. This category is different—because slicing and tenderizing naturally belong together if you make jerky, cheesesteaks, fajitas, or stir-fry strips. What you’re really buying here is consistency: consistent thickness, consistent texture, and consistent cook results.
Owners who love this style tend to say the same thing: “We’ll never be without one again.” That’s not just hype—it’s what happens when a tool removes a recurring friction point. When you can crank out uniform strips quickly, jerky becomes something you do more often. When you can tenderize a pile of cutlets without pounding, weeknight chicken and pork gets easier too.
The most important “expert” detail with 2‑in‑1 machines is roller intent. Tenderizing rollers are designed to cut/pierce and open up the meat. Slicing rollers are designed to create strips. If you buy this category expecting the slicer to behave like a deli slicer (thin, paper-like sheets), you’ll be disappointed. But if your goal is practical strips that dehydrate evenly or cook evenly in a pan, it’s exactly the right behavior.
Real owners also point out a useful nuance: some tenderizing rollers cut deep. Deep cuts aren’t inherently bad—they can be amazing for thick, stubborn beef cuts and for rub penetration—but they do change how you cook. The trick is simple: after tenderizing, pat the surface dry and cook with high heat and confidence. Too much surface moisture can reduce browning and make the meat look like it “steamed” instead of seared. That’s not the tool failing—that’s just the new surface geometry holding more liquid than you’re used to.
On the cleaning side, this machine tends to earn love because it’s designed as a kitchen-friendly countertop unit rather than an industrial block. Parts separate, you wash with warm soapy water, and you move on. As with any sharp roller tool, the smartest habit is to brush the blades under running water instead of reaching into soapy water blindly. Owners who ignore that rule tend to learn it the hard way.
Why it’s a “keep forever” category
- True 2‑in‑1 usefulness – Both modes solve real problems: tenderness and uniform slicing.
- Jerky consistency – Uniform strips mean better dehydration and fewer wasted batches.
- Counter-stable setup – Clamps help you run batches without fighting sliding or wobble.
- Compact footprint – Fits a normal kitchen workflow without feeling like restaurant equipment.
Good to know
- Some users report occasional hang-ups depending on cut and fat content—trim and chill meat slightly for best feeding.
- Deep tenderizing changes searing behavior; pat dry and use high heat for best browning.
- Like any 2‑mode system, the experience depends on how easy you find swapping/cleaning the roller sets.
Ideal for: households that make jerky (or strip-based meals) often and want one unit that also improves weeknight steaks, pork, and chicken cutlets.
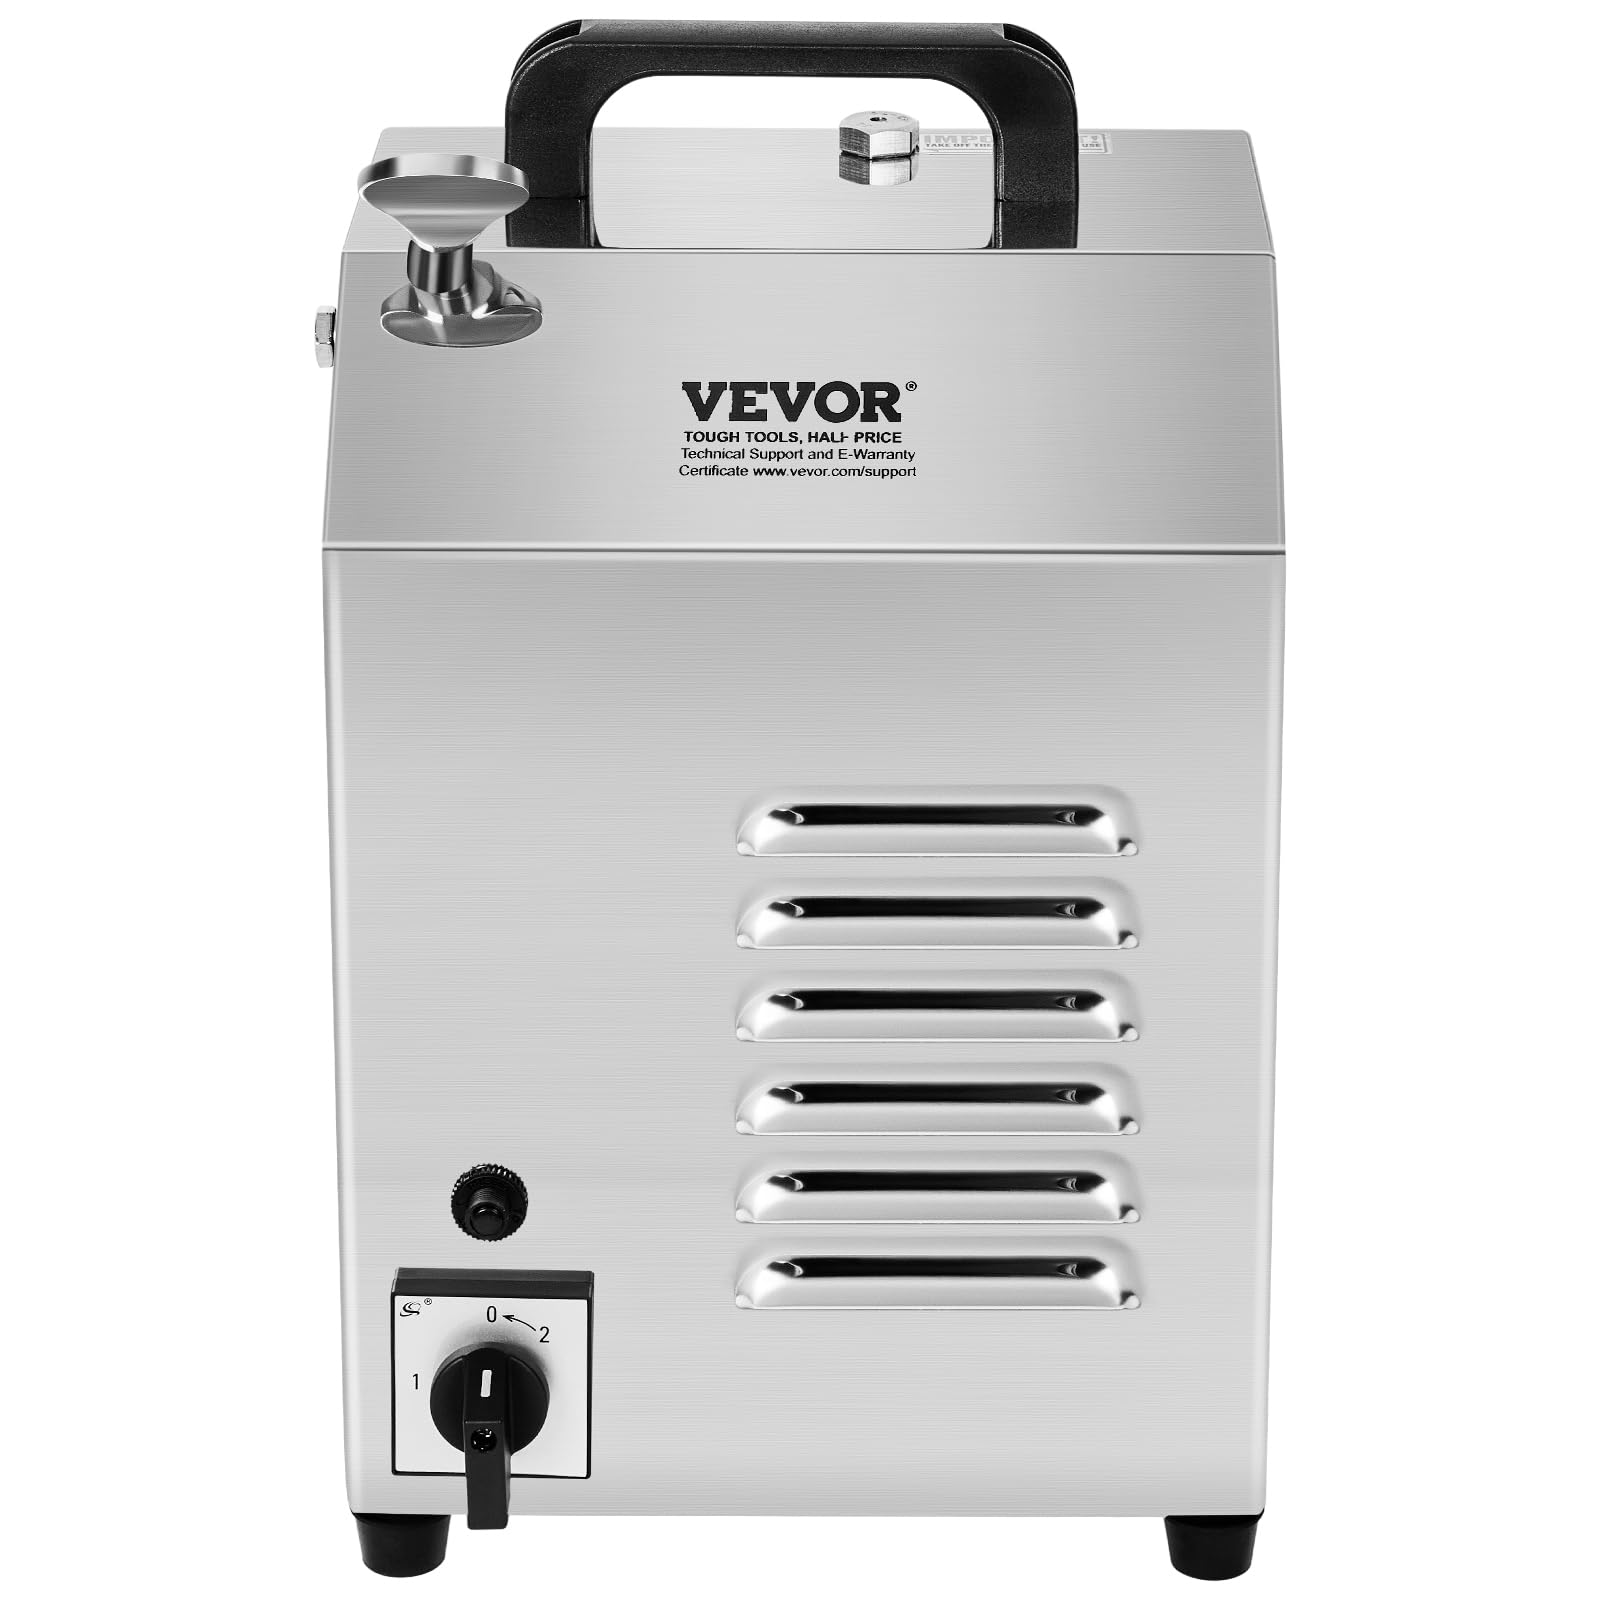
4. VEVOR Commercial Electric Tenderizer (450W) – When Speed and Throughput Matter
 Check Latest Price
Electric tenderizers are not “better” than manual ones—they’re a different promise. The promise is: you have enough meat and enough repetition that speed beats hand control. If you’re running batches for a busy household, processing a large game haul, or operating in a small commercial context, a machine like this can turn tenderizing from a task into a fast step in your production line.
Owners who love electric units tend to describe the same experience: “I place the meat in, it comes out perforated and noticeably more tender—fast.” That speed matters because tenderizing is often just one step (tenderize → season/marinate → cook/dehydrate). The faster the tenderizing step, the more realistic the whole workflow becomes.
Now the important expert detail: electric machines require a “machine owner mindset.” That means you inspect, you keep it clean, and you pay attention to how the blades and bushings behave over time. In real-world reviews across electric tenderizers, the most serious complaints are not about “it didn’t tenderize.” They’re about alignment, wear, or debris concerns if a unit arrives imperfectly assembled. That’s why the smartest approach is: (1) inspect the blade area before first use, (2) run a short test batch, and (3) clean immediately and check that everything looks right. A proper unit should feel smooth and controlled, not gritty or questionable.
This model’s “best fit” is also defined by weight. Electric tenderizers in this tier are typically heavy enough to demand a stable work surface. That’s good during operation (less movement), but it means you should pick a dedicated location and treat it like equipment, not like a drawer tool. When owners say “it’s very heavy,” that’s not just a comment—it’s a planning tip.
The payoff is obvious when you think in batches: a few minutes of work can mean a freezer full of tenderized cutlets ready for quick meals. If you’re the person in your family who does the cooking and you’re tired of “tough cut roulette,” this is one of the most direct ways to standardize outcomes.
Why volume users love it
- Speed changes your routine – Tenderizing becomes a quick step instead of a major project.
- Even results – Electric feed can produce consistent perforation when used correctly.
- Designed for multiple meat types – Useful for varied prep sessions across beef, poultry, and more.
- Commercial-style build – Built to sit on a counter like equipment, not slide like a gadget.
Good to know
- Electric machines demand inspection and disciplined cleaning—treat it like equipment.
- Heavier units are less “portable” in a kitchen; plan a stable placement.
- If you only tenderize occasionally, a manual cuber can feel simpler and more satisfying.
Ideal for: high-volume households, hunters doing big batches, and small commercial workflows where speed is the real luxury.
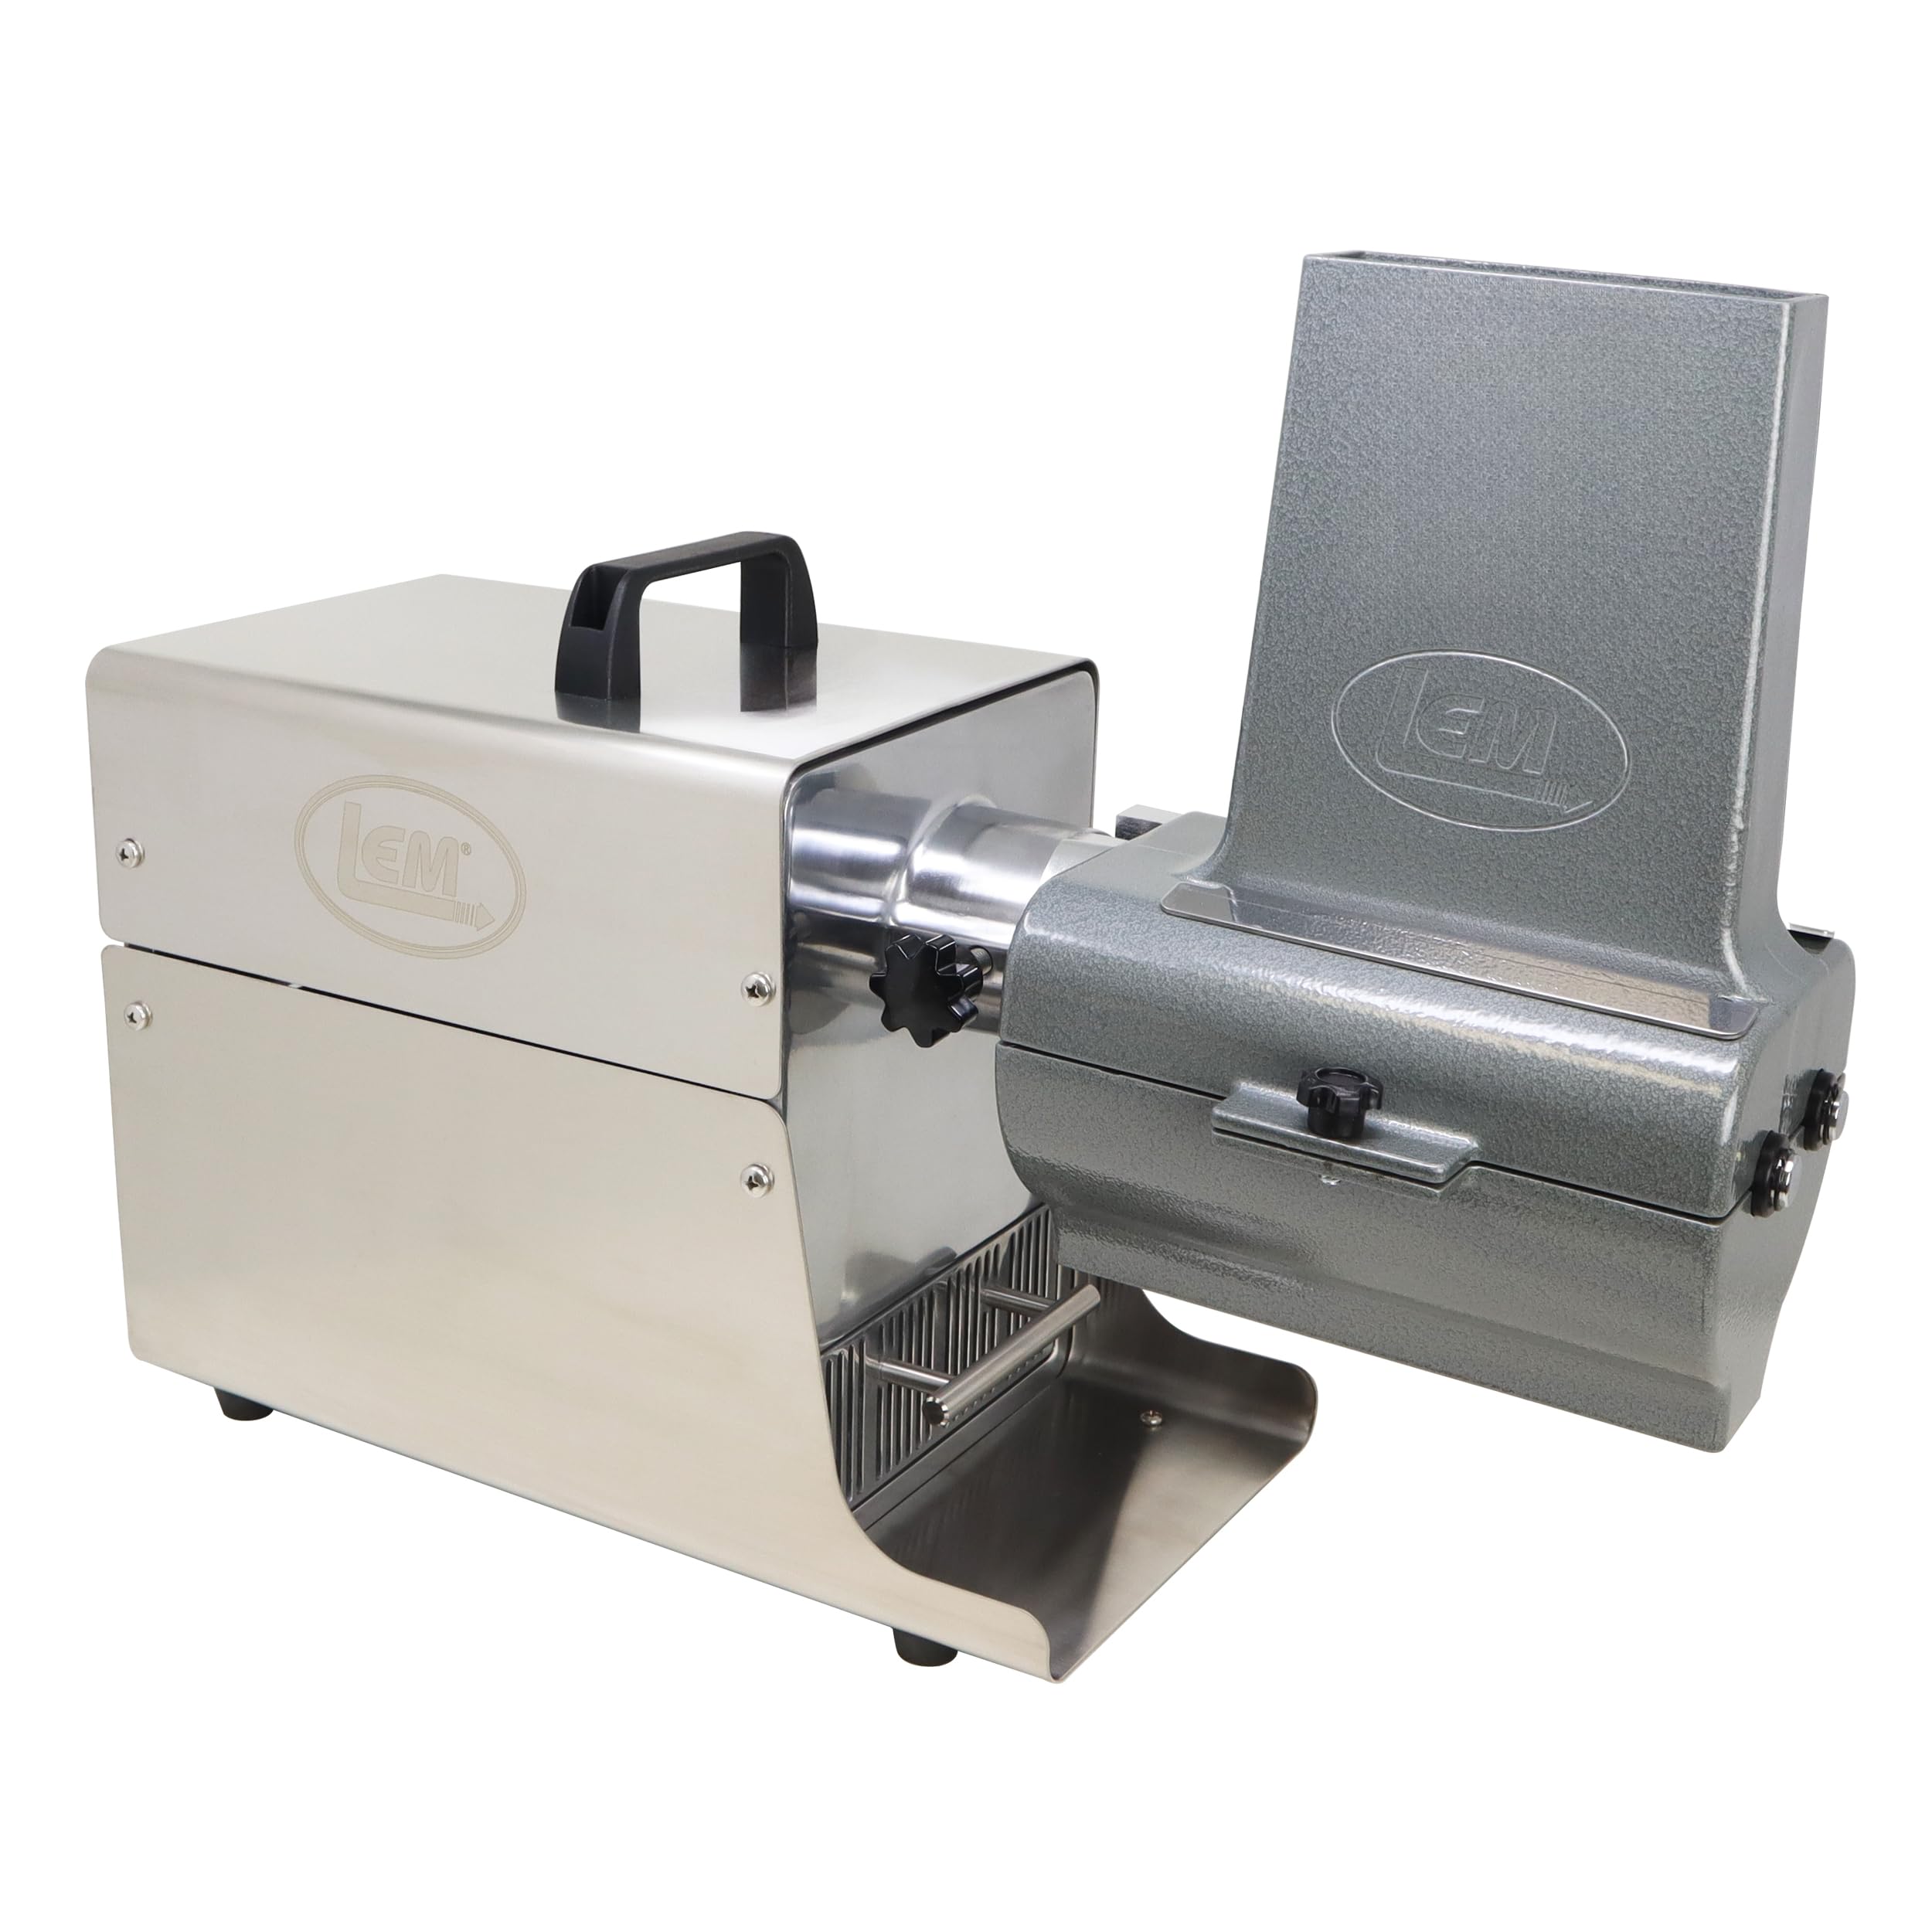
5. LEM BigBite Electric 2‑in‑1 (602TJ) – A Dedicated Jerky + Tenderizing Station
 Check Latest Price
This is the “I’m done messing around” option for people who make jerky often or who process a lot of meat with a repeatable system. The value here isn’t just that it’s motorized—it’s that it’s dedicated. No improvising with knives. No inconsistent strip thickness. No turning tenderizing into a workout.
A dedicated system changes your habits. When slicing strips becomes quick and consistent, you start buying whole cuts and processing them yourself. When tenderizing becomes a flip-a-switch step, you start using tougher cuts with confidence. That’s why the right premium tool can actually save time and reduce frustration across dozens of meals.
Now for the honest expert warning that matters: fat behavior. Across jerky slicers (even very good ones), fat can be the enemy of smooth slicing. Some owners describe any slicer in this category as less happy when the meat has “even a tiny bit of fat.” What that really means is: fat smears, and smeared fat can cause accordion-like deformation rather than clean strip separation. The fix is technique: trim hard fat, partially chill the meat to firm it, and feed with steady, even pressure rather than forcing it. If you treat it like a precision process instead of a brute-force process, you get the payoff it’s designed to deliver.
Swapping modes is also part of this ownership experience. Directions aren’t always perfect across machines in this tier, but the real win is that once you do it a couple of times, it becomes routine. You’re essentially running a small “meat prep station,” and it’s normal to have a short learning curve. After that, you’ll know exactly which roller set you want, and your batches will feel effortless.
Cleaning is the other big reality. If your jerky process involves sticky marinades, sugary sauces, or spice-heavy rubs, you’re going to be cleaning parts thoroughly. The good news: dedicated machines are usually designed to disassemble in a sensible way. The bad news: if you hate cleanup, you’ll hate owning any slicer/tenderizer system. The best approach is to build a cleanup ritual: disassemble immediately, rinse, brush, wash, dry.
Why it’s a premium favorite
- Dedicated workflow – Helps you process meat consistently without improvising.
- Uniform strips for jerky – Consistency improves dehydration and reduces “bad batch” risk.
- Motorized convenience – Great for repeat use and bigger quantities.
- Encourages better buying habits – Makes it easier to buy larger cuts and process them yourself.
Good to know
- Fat can disrupt slicing—trim and chill for best performance.
- Expect a short learning curve swapping roller sets and dialing technique.
- Cleanup is real—this category is for people who will clean thoroughly after use.
Ideal for: serious jerky makers and batch processors who want a dedicated system that makes uniform slicing and tenderizing a routine, not a project.
6. LEM BigBite 2‑in‑1 Attachment (433TJ) – Modular Power If You’re Already in the LEM Ecosystem
 Check Latest Price
This is a very specific kind of smart purchase: you already own a compatible grinder, and you want one modular station that can grind, slice jerky strips, and tenderize without buying a whole separate countertop machine. If that’s you, an attachment like this can feel like a superpower—because it turns one core appliance into a multi-tool for meat processing.
Owners who love this attachment tend to say things like “best tool I’ve purchased for processing meat.” The reasons are practical: it handles a lot quickly, the strips come out uniform, and cubed steak can be produced efficiently. When you combine it with hands-free workflow tools (some people use foot pedals with their grinders), the experience can become shockingly smooth—almost like a mini home butcher setup.
The “expert reality” is that attachments inherit the personality of the system they’re attached to. If your grinder is stable, your work surface is stable, and you feed the meat correctly, the attachment feels powerful and clean. If your setup wobbles, or you try to feed overly soft meat, or you push fatty slabs through without trimming, you can create jams or messy outputs. This isn’t a flaw—it’s just the reality of precision cutting tools.
Also: cleaning. Even glowing reviews often mention the same downside—attachments can be a pain to clean, especially if you let residue dry or if you used a sugary marinade. The best owners develop a “clean while you cook” routine: finish the batch, disassemble immediately, rinse, then do a detailed wash. If you treat it like a quick rinse-and-done accessory, you’ll eventually hate it. If you treat it like equipment, it’s fantastic.
One under-discussed advantage: the attachment encourages better sourcing and cutting discipline. People who use slicers/tenderizers regularly become very good at prepping meat correctly—cutting across grain, trimming silver skin, and choosing the right thickness for the tool. That skill transfer is a hidden benefit: you become better at cooking meat even when you’re not using the attachment.
Why it’s a smart ecosystem buy
- Modular setup – Great if you want one “meat station” built around your grinder.
- Uniform slicing – Makes consistent strips for jerky and quick-cook meals.
- Efficient tenderizing – Helps you produce cubed steak-style results quickly.
- Strong reputation – Many owners describe it as well-made and high-performing when used correctly.
Good to know
- Cleaning can be tedious—plan for immediate disassembly and brushing.
- Performance depends on meat prep (trim fat, chill slightly, feed steadily).
- Only makes sense if you have (or want) a compatible grinder setup.
Ideal for: grinder owners who want a modular jerky-and-tenderizing workflow without buying a separate dedicated machine.
7. VEVOR Multi‑functional Processing Motor (CT‑8) – The “Turn Manual Into Electric” Add‑On
 Check Latest Price
This is not a “tenderizer by itself” pick—it’s a workflow pick. If your meat prep world includes mixers, grinders, and multiple steps (seasoning, mixing, stuffing, and sometimes tenderizing in the broader process), a drive motor can change the whole vibe. It turns crank-heavy tasks into push-button tasks, which matters when you’re doing big batches and you want consistent results without fatigue.
Owners who like this type of add-on usually say the same two things: it makes mixing much easier and it’s built solid. That’s exactly the point. When you remove physical strain from batch prep, you stop rushing. And when you stop rushing, you tend to get better food: more even mixing, less “hot spots” of seasoning, and fewer “we got tired halfway through so we stopped.”
Now, let’s be very honest about the reality: compatibility and assembly matter. Add-on motors are only as good as the fit. Some buyers report that missing hardware or mismatched sizing can turn setup into a frustration story. So the “expert buy” approach here is: confirm compatibility before you commit, and treat the first assembly like a careful install (not a casual unboxing). If your workflow is built around a specific mixer/gearbox, this can be a huge upgrade. If you’re improvising compatibility, you might be happier with a dedicated tenderizer or slicer instead.
Cleaning is also part of the trade: anything that touches meat prep at scale needs cleaning discipline. People often say “annoying to clean, but it works.” That’s a fair summary of batch equipment life. The difference between loving your setup and resenting it is whether you build cleanup time into the process.
If you’re reading this and thinking, “Why is this in a tenderizing guide?”—because real households that process a lot of meat tend to evolve. They start with a tenderizer. Then they start making jerky. Then they start mixing sausage. Then suddenly their “meat prep system” is multiple tools working together. This motor is for that kind of cook: the person building a repeatable, efficient system.
Why it’s useful (for the right person)
- Reduces fatigue – Turns manual batch processing into a calmer, more consistent workflow.
- Heavy-duty feel – Designed to handle ongoing use in a prep station context.
- System builder friendly – Great if your kitchen setup includes multiple processing steps.
- Helps consistency – Steady power can improve evenness in mixing-heavy tasks.
Good to know
- This is an add-on category—compatibility and correct sizing are everything.
- Some users report hardware/assembly frustrations; treat setup carefully and verify fit early.
- It’s not a substitute for a cuber if your primary goal is cube steak texture.
Ideal for: batch-prep cooks and sausage makers building a more automated “meat processing station” at home.
8. Hakka Meat Tenderizer (5" / 27‑knife) – The Smaller Footprint “Serious Tool” Option
 Check Latest Price
Think of this as the “I want real cubing performance, but I don’t want a giant unit” pick. The 5-inch Hakka is popular with people who want the roller-and-knife style of tenderizing (the kind that actually changes tough cuts) but who don’t necessarily need the widest throat in the world. If your typical steaks are moderate width, or you don’t mind portioning large cuts into manageable pieces, this can be a sweet spot.
Owners often highlight the same big wins: it does a great job tenderizing, it comes apart for cleaning, and it feels well-made. There’s also a consistent “be careful” theme—because the rollers are very sharp. That warning isn’t a negative; it’s how you know the tool is doing real work. A dull tenderizer is safe, but it’s also pointless.
One very practical detail that shows up in user experience is countertop surface behavior. Suction or “set feet” solutions often work best on smooth surfaces. If your counter has texture, you may find that even a heavy unit can shift when you crank hard through thick cuts. The fix is simple: use a smooth cutting board, a chest freezer top, or a dedicated prep table. People who do that tend to have excellent experiences.
Another subtle point: handle and tightening behavior. Some owners mention handles loosening or needing occasional retightening. That’s not unique to this brand—any crank system can drift with vibration and repeated turning. The “expert move” is to check tightness before each batch, just like you’d check a clamp on a woodworking tool. It takes seconds and prevents mid-batch annoyance.
If you want a compact unit that still feels like a real piece of equipment, this one hits that note well. It’s especially satisfying for everyday use: pork cutlets, chicken breast for tenders, lean beef for quick stir-fry—this machine shines when it’s used often and cleaned immediately.
Why it’s a smart smaller pick
- True cubing action – Cuts and opens tough fibers instead of just flattening.
- Stainless durability feel – Owners often describe it as heavy-duty and well-built.
- Kitchen-friendly footprint – Easier to live with if you don’t want a large commercial-looking unit.
- Easy disassembly – The better the disassembly, the more likely you are to keep using it.
Good to know
- Surface matters: textured counters often reduce suction/foot stability.
- Handle tightness can require occasional attention (quick check before batch).
- Feeding very thick pieces can feel stiff—portion or thin slightly for best cranking comfort.
Ideal for: smaller kitchens that still want real roller-based tenderizing performance and don’t mind portioning wider cuts.
9. YBSVO Manual Cuber (7" feed / 40 blades) – Wide Throat, Sharp Blades, Smart Technique
 Check Latest Price
The YBSVO is a great example of why “manual” doesn’t mean “basic.” It’s designed to handle wider cuts with a big feed throat, and owners often describe it as surprisingly easy to use when the setup is stable. The general workflow is straightforward: start the steak into the chute, hold the unit steady, crank, and the meat feeds through with minimal effort.
Where this machine shines is with people who understand how to use a cuber properly: multiple passes, rotated direction, and realistic expectations. If you run flank steak through once and expect it to transform into filet texture, you’ll be disappointed. If you run it through twice, rotated 90 degrees, you get the kind of bite that makes tacos, stir fry, and quick grilling noticeably easier to chew. Owners often mention exactly that “family noticed” tenderness improvement when they do the crosshatch method.
Now, let’s talk about the most important real-life issue: stability while feeding. A few owners mention that using one hand to crank, one hand to hold the unit, and another invisible third hand to feed meat can feel awkward. That’s not a machine flaw—it’s the nature of tall, vertical feed designs. The solution is simple and powerful:
- Clamp it if you can. If your prep table allows clamps, do it.
- Work in batches with “drop-feed.” Start the piece, then crank steadily instead of constantly pushing while cranking.
- Pre-trim and flatten. The more uniform the meat, the smoother the feed.
Cleaning is another major theme with this machine. Many people love that it comes apart easily and can be washed thoroughly, but they also emphasize how sharp it is. Several owners say they cut themselves the first time they hand washed it. The “expert move” is to treat the rollers like a sharp kitchen knife: don’t reach into soapy water, and handle by safe edges. A brush and running water are your best friends.
Finally, jamming/wrapping reports usually come from the same scenario: very soft meat, lots of fat/sinew, or forcing the feed. If you want this to feel effortless, trim hard sinew, keep the cut relatively clean, and consider chilling the meat slightly so it stays firm. When the meat behaves, the machine feels great.
Why it’s a strong wide-feed value
- Wide feed throat – Handles bigger cuts without constant trimming.
- Sharp blade action – Produces real texture change when used correctly.
- Easy disassembly – Makes thorough cleaning realistic (and safer).
- Great for marinade absorption – Crosshatch passes create channels that hold seasoning and sauce.
Good to know
- Best experience comes with clamps or a stable mounting strategy.
- Some users report wrapping/jamming with certain meats—trim sinew/fat and avoid forcing the feed.
- Blades are extremely sharp; cleaning requires a brush-first approach.
Ideal for: hunters and batch cooks who want a wide-feed manual cuber and are willing to use smart technique (stable setup, crosshatch passes, and disciplined cleanup).
10. Paladin Equipment 2‑in‑1 – Heavy Feel, Clamp Stability, Jerky-Friendly Utility
 Check Latest Price
This is the kind of 2‑in‑1 machine that appeals to practical, no-nonsense users: people who want to process meat and get results, especially in hunting and bulk-cooking contexts. Owners often describe it as heavy, well-made, and stable when clamped—exactly what you want when you’re feeding meat through sharp rollers and you don’t want the unit walking across your counter.
The slicer mode is the hero feature for many households. Jerky is one of those foods that punishes inconsistency: too thick and it won’t dry evenly; too thin and it can become brittle. When people say “it’s made jerky an ease,” they’re usually talking about the stress relief of uniform strips. And because the blades are very sharp, a chilled cut of meat can run through cleanly and quickly.
The tenderizer mode is a solid companion feature. It’s great for turning cheaper cuts into something weeknight-friendly, and it’s especially useful for lean game cuts that tend to be tough. But it’s not just about tenderness—it’s also about seasoning penetration. Tenderized meat holds rubs and marinades differently. It clings to seasoning, cooks more evenly, and can taste more flavorful with less wait time.
One real-world nuance: materials mix. Some owners wish for less plastic in certain parts. That’s not automatically a dealbreaker; many modern machines use durable polymer parts where it makes sense. The question is whether the unit feels solid in the areas that matter: the rollers, the base stability, and the cranking action. Owners who keep using it tend to report that it holds up well and stays clamped reliably.
Like all slicer/tenderizer machines, it rewards good prep: trim off hard sinew, slightly chill meat for cleaner slicing, and feed in a steady motion. When people try to force soft, warm meat through quickly, that’s when outputs get messy and frustration rises. If you run it like equipment—steady, controlled, clean-you-go—it behaves like equipment.
Why it’s a favorite in processing households
- Clamps = confidence – Stable setup makes operation calmer and safer.
- Jerky slicing utility – Uniform strips reduce waste and improve results.
- Sharp rollers – Delivers real performance when used correctly.
- Batch-friendly – Great for running larger quantities in one session.
Good to know
- Some users note more plastic than expected—evaluate based on overall sturdiness and roller quality.
- Very sharp blades: take cleaning seriously and handle by safe edges.
- Best results come from chilling meat slightly before slicing for jerky.
Ideal for: jerky makers and game meat processors who want a clamp-stable 2‑in‑1 unit with a rugged, practical feel.
11. STX Chef’s Elite Vacuum Marinator – “Marinated Taste” Without Waiting Overnight
 Check Latest Price
This is the sleeper pick that can upgrade your meals even if you never buy a cuber. Why? Because a lot of “tenderness” perception is actually flavor distribution and moisture retention. When chicken is evenly coated and seasoned deeply, it often tastes “tender” even when it’s not mechanically cubed. When beef absorbs marinade properly, it tastes richer and feels more pleasant to chew.
Owners consistently describe the same experience: you stop “planning ahead.” You can marinate in minutes, cook shortly after, and still get that deep, noticeable flavor you normally associate with overnight prep. The rotating action also matters more than vacuum alone: it continually redistributes marinade, preventing the “all the flavor is on one side” problem that happens in bags.
Here’s the expert way to think about it: a vacuum marinator is not a replacement for a cuber when you need cube steak texture. It’s a different tool that pairs beautifully with tenderizing. If you tenderize first (or even just poke the meat lightly with a needle tool), you create channels. Then a vacuum tumbler helps marinade move into those channels quickly and evenly. That combo can make cheap cuts taste like you tried much harder than you did.
Real owners also talk about food safety peace of mind: faster marinating means less time with raw meat sitting around. That matters if you’re busy, you’ve got kids, or you’re cautious about fridge time and cross-contamination. When a tool reduces the “raw meat handling window,” it often makes people more willing to cook from scratch.
The biggest practical tip is cleaning discipline. Many users strongly recommend hand washing certain parts to protect sealing components. That makes sense: the entire value of a vacuum system is its seal. If the seal fails, the machine becomes a rotating bucket. So this is a “treat it with care” tool, not a toss-in-the-dishwasher tool.
If you want the biggest payoff, use it for your repeat meals: weekly meal prep chicken, beef strips for stir fry, wings, and jerky marinades. Owners often say the flavor boost is “crazy” for how little effort it takes. And that’s exactly what a great kitchen tool should do: reduce effort while increasing results.
Why it’s worth it (even if you already own a tenderizer)
- Fast flavor penetration – Great for weeknight cooking and meal prep.
- Rotating mix action – Helps coat evenly and reduces “flavor hotspots.”
- Encourages cooking at home – Makes marinating feel realistic instead of a planning burden.
- Pairs well with tenderizing – Channels + vacuum = faster, deeper seasoning.
Good to know
- Not a substitute for cube steak-style mechanical tenderizing.
- Seal care matters; many owners avoid dishwasher cleaning for key parts.
- Best payoff comes from frequent use—this is a “routine tool,” not a once-a-year gadget.
Ideal for: meal preppers and busy cooks who want big flavor fast—and who like the idea of pairing quick marinating with a tenderizing workflow.
12. Cofun Manual Tenderizer (stainless gear) – Quick Batch Results Without the Big Footprint
 Check Latest Price
If you’re new to mechanical tenderizing and you want a straightforward manual tool that can handle real batches, the Cofun is a compelling entry point. It’s the kind of unit that people buy because they’re tired of mallets—and then immediately notice the time savings when they run a pile of cutlets through quickly. One owner described tenderizing a huge batch of pork chops in a short session, which is exactly the “weekend prep” scenario where this style feels brilliant.
The biggest feature that defines the Cofun experience is the suction base. When suction bases work, they’re awesome: you get stability without clamps and you can set up on a smooth surface fast. The key is technique. Several owners mention the “press down then lock” approach—once you understand that, the suction can feel genuinely secure. If you skip that, the unit can wobble and you’ll feel annoyed.
The other real-life theme is “easy to clean” because disassembly is simple. That’s a big deal at this level. A tenderizer that’s annoying to clean becomes a rarely-used tool. A tenderizer that you can rinse and brush quickly stays in rotation. Just note that many owners recommend warm water rinse and hand washing rather than relying on a dishwasher approach.
This machine is especially attractive for people who cook a lot of lean meat: pork chops, venison steaks, and similar cuts where tenderness makes a huge difference. It’s also popular as a gift for families that process their own meat. If your household eats a lot of wild game or lean cuts, the “bite improvement” can feel dramatic.
The honest downsides are small but real: some users wish it were even more stable or prefer mounting it more permanently. That’s normal for suction-base designs—if you want absolute immovable stability, clamps or a heavier commercial base wins. But for a starter machine that gets you out of the mallet life, it’s a strong choice.
Why it’s a smart first buy
- Fast batch tenderizing – Great for prepping lots of cutlets quickly.
- Suction stability (on smooth surfaces) – Easy setup without clamps when used correctly.
- Simple cleaning workflow – Easy disassembly encourages regular use.
- Great for lean meats – A noticeable difference on pork chops, venison, and similar cuts.
Good to know
- Suction bases depend on surface and technique; textured counters reduce stickiness.
- Some users prefer permanent mounting for maximum stability during heavier cranking.
- As with all blade-style tools, clean immediately and handle sharp parts carefully.
Ideal for: first-time buyers who want a compact, practical manual tenderizer for lean meat meals and weekend batch prep.
How Tenderizing Actually Changes Meat (and How to Get the Result You Want)
If you want consistently great results, you have to know what your tool is doing. Tenderizing isn’t magic. It’s controlled structural change: you’re shortening fibers, disrupting connective tissue, and creating channels that affect how moisture and seasoning behave during cooking. Once you understand that, you stop guessing—and your results get dramatically more consistent.
The 5 “result levers” that matter more than blade count
- 1) Grain direction: Long fibers are what feel chewy. Cutting or cubing across grain shortens the “chew distance.” Rotate meat 90 degrees between passes to create a crosshatch effect.
- 2) Thickness discipline: A machine can’t fix a piece that’s too thick for its throat. Portion or butterfly thick cuts so the rollers can work evenly.
- 3) Fat and sinew management: Hard fat and silver skin can smear, wrap, or cause uneven feed. Trim strategically—especially for jerky slicing.
- 4) Moisture control before searing: Tenderized surfaces hold liquid. Pat dry before high-heat cooking so you brown instead of steam.
- 5) The “batch rhythm”: Machines feel best when you work in a rhythm: prep pieces → run batch → season → clean. If you stop mid-batch, residue dries and the tool becomes harder to enjoy.
This is why people who “hate” tenderizers often just had a poor first process: thick meat, messy feeding, and no drying before cooking. Fix those three things and the same tool suddenly feels like a pro upgrade.
How to avoid the two classic disappointments
- Disappointment #1: “It made my meat mushy.”
This usually comes from over-tenderizing a soft cut (or repeatedly running thin meat through). Use fewer passes for already-tender meats, and reserve multiple passes for tougher cuts. - Disappointment #2: “It didn’t do anything.”
This usually comes from one shallow pass on a very tough cut or from feeding in a way that bunches meat and prevents even blade contact. Use crosshatch passes, and keep meat flat and firm. - Bonus issue: “It won’t sear.”
Tenderized meat holds more liquid. Pat dry, use higher heat, and don’t overcrowd your pan. If you marinated, drain thoroughly before cooking.
Once you treat tenderizing like a technique instead of a gamble, the payoff is huge: cheaper cuts become reliable, game meat becomes enjoyable, and jerky becomes consistent.
The “chef-level” routine that makes everything easier
If you want this to feel effortless, here’s the routine that experienced users naturally adopt—because it prevents jamming and keeps cleanup manageable:
- Prep your station: stable surface, tray for “before,” tray for “after,” and a brush ready for cleaning.
- Prep your meat: trim hard sinew, portion for the throat size, and chill slightly if slicing for jerky.
- Run a test piece: this tells you if thickness is right and if the crank/feed feels smooth.
- Batch tenderize: one pass, rotate, second pass if you want the cube steak effect.
- Season intelligently: rubs cling better after tenderizing; marinades penetrate faster—especially if you pair with a tumbler.
- Clean immediately: rinse, brush, wash, dry. Done.
When you use the right technique, these tools stop being “just a kitchen gadget” and start feeling like a quiet unfair advantage.
FAQ: Tenderizing Without the Confusion
Is a blade-style tenderizer actually better than a mallet?
Why does my meat sometimes “accordion” or look uneven after slicing?
Do I tenderize before marinating or after?
How many passes should I do?
My machine slides or wobbles. What’s the best fix?
What’s the safest way to clean sharp rollers?
Final Thoughts: Pick the Tool That Makes “Tough Cuts” Feel Easy
The best tenderizing setup is the one that makes your weeknight cooking calmer. Not louder. Not messier. Calmer. When you remove the uncertainty from meat texture, you stop overbuying “safe” expensive cuts and start cooking the way you actually want.
Here’s how to translate this guide into a confident purchase—without second-guessing:
- Want the best all-around manual cuber with wide-feed practicality? Start with the Hakka 7" Commercial Meat Tenderizer. It’s the closest thing to “butcher results at home” for most people.
- Want a durability-first classic with a long reputation? Choose the Weston Manual Meat Cuber/Tenderizer. This is the “tool, not toy” option that many owners keep for years.
- Need jerky slicing and tenderizing in one machine? Look at the Valley Sportsman 2‑in‑1 or the Paladin 2‑in‑1. Pick based on which one fits your kitchen and your “how often do we make jerky?” reality.
- Doing big batches and want speed? The VEVOR 450W Electric Tenderizer is built for throughput—just treat it like equipment and keep inspection/cleaning disciplined.
- Want a premium dedicated jerky + tenderizing station? The LEM BigBite Electric 602TJ is the “serious hobby” machine for repeat batches and uniform strips (best with trimmed/chilled meat).
- Already own a compatible grinder and want a modular setup? Choose the LEM BigBite 2‑in‑1 Attachment. It’s a strong choice for people building one integrated processing ecosystem.
- Want a compact stainless cuber for everyday kitchen use? Consider the Hakka 5" (27‑knife) for real cubing performance in a smaller footprint.
- Need wide-feed manual performance with smart technique? The YBSVO 7" Feed Manual Cuber can be excellent when clamped/stabilized and used with crosshatch passes.
- Want faster flavor without waiting overnight? The STX Chef’s Elite Vacuum Marinator is a time-saving flavor tool that pairs beautifully with tenderizing.
- Want a simple starter unit with easy batch potential? The Cofun Manual Tenderizer is a practical entry option—especially if you have a smooth surface for the suction base.
- Building a batch-processing station and want to reduce hand-cranking? The VEVOR CT‑8 Processing Motor is a workflow upgrade for the right compatible setup.
The best decision is the one that fits how you actually cook: how often you process meat, how much cleanup you’ll tolerate, and whether your goal is cube steak texture, jerky consistency, or simply faster flavor. Pick the meat tenderizing machine that matches your real routine, and you’ll feel the payoff every time you turn a “tough cut” into a dinner people genuinely enjoy.
